The University uses a number of software applications, websites and technologies. This section provides documentation on a number of them.
This site is under active development and will be updated frequently.
This is the multi-page printable view of this section. Click here to print.
The University uses a number of software applications, websites and technologies. This section provides documentation on a number of them.
This site is under active development and will be updated frequently.
The University uses a number of software applications, websites and technologies. This section provides documentation on a number of them.
This site is under active development and will be updated frequently.
The following pages will help you as you get started with the University of Divinity.
There are currently two staff logins.
This document shows University members how to:
Reset your password Change your password
Each member of the University receives a University of Divinity account which allows them to access the following systems using the same username and password.
Your username is the email address that is registered in the University’s Student Management System called Paradigm. Your password is (re)set or changed in Paradigm. For convenience, the ARK homepage has links for resetting and changing your password (the first link is to this guide).

You may need to reset your University of Divinity password if:
From the ARK login page (https://ark.divinity.edu.au), click on the “Click here to RESET your password” link or head directly to here.
You will be taken to the Student Management System and prompted to enter the details for the account to be reset. Your University username is the email address that official University correspondence is sent to.

Enter your email address and date of birth then click on the Reset User Password button. You will receive a notification message indicating that your account has been found and an email has been sent. If you see a warning message that indicates an issue please check the email address and date of birth details are correct.

You should receive an email as below. Note that the email contains a long link that starts with ‘https://uod.edu.net.au’ - this is the link you need to click on. For security purposes, this link expires after 1 hour. If there is an error or warning message that appears when clicking the link, please note it down and contact your College Registrar.

Clicking on the link takes you to a form:

Enter a valid password. Please create a strong password that has not been used for any other internet website. As you enter your password the site will check for password strength - your password needs to be 8 characters or more in length, and contain 1 upper case, 1 lower case and 1 digit. Notice that the Set Password button is dimmed. You will not be able to proceed if the password entered is deemed weak or unconfirmed.

You will now need to re-enter this password in the Confirm New Password field and once they match you will be see the Set Password button is no longer dimmed.

Clicking on the Set Password button will immediately update the password. Your new password is immediately usable on the University’s systems.
From the ARK login page (https://ark.divinity.edu.au), click on the “Click here to CHANGE your password” link or head directly to here.
You will be taken to the Student Management System and prompted to enter your University username and password.

After logging in you will see a menu to the left and from this select ‘My Login’.

This presents you with a form that allows you to update your password. Enter your Current Password in the first field. As you enter your New Password you will see information about the requirements and strength of the password.

Enter a valid password - please create a strong password that has not been used for any other internet website. Notice that the Update User Password button is dimmed. You will now need to re-enter this password in the New Password Verify field and once they match you will be see the Update User Password button is no longer dimmed in the lower right of the window.

Clicking on the Update User Password button will immediately update the password. Your new password is immediately usable on the University’s systems.
There are currently two staff logins.
This document shows University members:
Single Sign-On (SSO) enables a person to sign into one service and once authenticated use the same credentials for accessing additional configured services. This provides a more seamless experience alongside better security.
Each member of the University receives a University of Divinity account which allows them to use the SSO service to access the following systems using the same username and password. Additional systems will be migrated in the future.
The email address used is the one registered in the University’s Student Management System called Paradigm. In addition, a username that consists of your student id number can be used.
For example: john.smith.as.example@gmail.com or 2023123123.
The email address is the primary email address that is recorded in the University’s StaffPlus system. In addition, a username has been generated that consists of your firstname(s) and lastname(s) joined together with a period in between. This is all in lowercase. If your name(s) has a space or apostrophe, this has been removed.
Examples are: john.smith or jaclyn.ohare or gerhard.vonrad.
You may need to reset your University of Divinity password if:
You can reset your SSO password by heading directly to https://idp.divinity.edu.au/realms/divinity/login-actions/reset-credentials.
Alternatively, when you go to sign into one of the configured sites, the form has a password reset link.

Clicking either of these links will present you with the following form that asks for your username or password. These are described above. Enter this and click Submit.

Once submitted, you will see a message indicating that the process has begun.

You will receive and email from forms@divinity.edu.au that looks like the following:

Click on the link titled ‘Link to reset credentials’ and your browser will open with a form that allows you to set your SSO password.

If more that 5 minutes has passed since you submitted the form, the link will have expired and you will see a message indicating such.

Once successfully submitted you will see the following message. You can now sign into any of the configured systems with your username and updated password.

When clicking on the Login link you will see a login form, use the Login with Single Sign-On link.

When visiting the site there is a Sign in SSO link in the top-right hand corner.

Sometimes when clicking on link to the UMS you will see a login form, use the Sign in with Keycloakopenid link.

There is no option - you will automatically be redirected to use the SSO sign in.
The University offers a number of training packages. These are typically delivered through the learning management system (ARK).
The following are offered, grouped by domain.
In your web browser head to https://outlook.office.com/owa/
Username: your email (xxxx@divinity.edu.au) PW: [use the password provided]
On first login you will be prompted to add a secondary phone or email to be used in the event that you lose access to your account. Please follow the prompts to provide a phone number.
Alice Ajax
| Honorary Research Fellow
Your College affiliation, University of Divinity
staff.divinity.edu.au/staff/firstname-lastname
ABN 95 290 912 141 | TEQSA Provider PRV12135 | CRICOS 01037A
This document introduces University staff to Divinity Portal, including how to login to Divinity Portal and accessing applications on Divinity Portal.
Divinity Portal is located at portal.divinity.edu.au. This will become the central place to visit to access and manage all of your University information. New features will become available to you as they are added.
When you visit portal.divinity.edu.au, you will be asked to login using Single Sign-On (SSO). For instructions on using your SSO login, see the SSO Migration Guide.
On the Divinity Portal home, you will see Applications that are applicable for your role and permissions. Click on an Application to access the information or actions available in that Application.
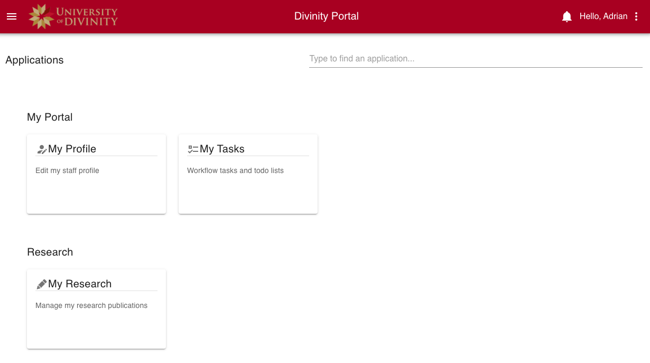
The Portal home presents Applications based on your role and permissions. You can search for applications using the ‘Search’ field on the main page. You can also view and search applications using the Left Navigation menu (see below.)
Portal Applications will remain open in a list of breadcrumbs at the top of the page, allowing you to quickly switch between applications. They can be closed by clicking the close icon " “. (Note that you cannot close the application that you are currently using.)

Switch or close applications from the breadcrumb menu.
The left navigation menu is available throughout the site and can be opened and closed from the hamburger menu icon:

All available Portal Applications can be opened from the left navigation menu throughout the site:
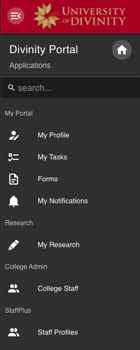
College and University academics, researchers and support staff can update their staff biography (bio) which appears on staff.divinity.edu.au.
Your staff bio appears as part of your staff profile on staff.divinity.edu.au alongside your profile picture, research output and appointments.
You can update your staff bio on Divinity Portal. Information about accessing Divinity Portal can be found on the Divinity Portal Getting Started guide.
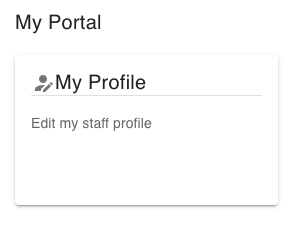
Click on the My Profile card.

Use the tool menu along the top of the text area to apply formatting.

A well-written public profile will improve the visibility of both you and the University.
As a guide, please limit your profile to around 350 words. This will ensure that your profile displays neatly and is easy to read.
Write in the third person (you are writing from the perspective of the University). Feel free to use your ‘preferred name’ within your bio. For grammar and formatting, refer to The Chicago Manual of Style Online
Structure your biography addressing six key areas (or as many as are relevant to you). Separate each area with a paragraph break.
The biography should begin with a short overview (e.g. how you would be introduced at a professional event). Following the overview, address the remaining five areas in order as is applicable to you.
| Paragraph | Content | Recommended Length |
|---|---|---|
| 1 | Overview | Two or three sentences |
| 2 | Academic/professional achievements | 100 words |
| 3 | Research Interests | 100 words |
| 4 | Teaching | 100 words |
| 5 | Media involvement as an academic | 50 words |
| 6 | Church and community engagement | 50 words |
This guide is designed to aid new teaching staff at the University on the ARK Learning Management System located at ark.divinity.edu.au.
It is written based on Moodle 4.1 functionality which the University upgraded to in December 2023.
ARK is the University of Divinity’s Learning Management System located at ark.divinity.edu.au. ARK is an online software solution “used in all courses and units of study as a means of supporting and enhancing student learning and facilitating access to learning materials.”1
ARK is located at ark.divinity.edu.au. You can also find a link to ARK at the top of the University of Divinity website.
On visiting the ARK page, you will be prompted to login.
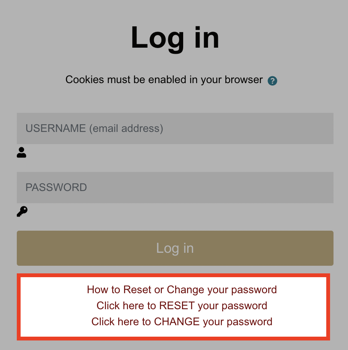
For instructions on changing or resetting your password visit the Login and Password Guide or follow the links below the login form.
This document is an introduction to the ARK user interface. It is applicable to all staff and students of the University.
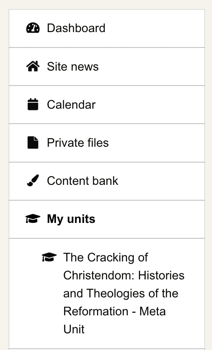
Screenshot of left navigation menu.
This document explains how to add a Profile Picture on ARK and is applicable to all students of the University and staff teaching at the University.
Adding a profile picture will help people recognise you when you participate in activities on ARK such as forums.
Step 1: Login to ARK using your login email and password.
Step 2: Click on your name in the top right corner.
Step 3: Click Profile from the drop down menu.

Step 4: Under the heading ‘User details’, click Edit profile.

Step 5: Scroll down until you see the heading User picture.
Step 6: Click the Add… button. The button is an icon of a piece of paper.

Step 7: Click the Choose file button to Upload a picture from your computer.
Step 8: When you have located the picture you wish to upload, click on it.
Step 9: Click Upload this file.
Step 10: When you are done updating your profile, be sure to press the Update profile button at the bottom of the page to save your changes.

ARK runs on Moodle software. In December 2023, the University upgraded from Moodle version 3.9 to Moodle version 4.1. Outside of this documentation, there are two authoritative sources of help for using Moodle:
Moodle is designed on a social constructionist pedagogy. In short, social constructionism holds that we learn best when we construct meaning for ourselves in dialogue with others.
Moodle aims to achieve this by providing Resources and Activities. Resources are materials that the student is presented by the instructor and Activities are materials that the students interact with in some way, either by themselves or collaboratively with other learners.
Visit MoodleDocs to learn more about the Philosophy and Pedagogy of Moodle.
A well designed ARK unit will enable great learning experiences by making it easy for students to find what they need when they need it. In this document, you will be introduced to the key concepts in the structure of ARK units and be provided guidance on best practices for enabling students to locate learning activities and resources.
An ARK unit contains a hierarchy of three levels:
stateDiagram-v2

classDef colorset1 fill:#ece5d5,stroke:#413e39,stroke-width:2px,font-size:28px,line-height:2rem
classDef colorset2 fill:#740005,stroke:#413e39,stroke-width:2px,line-height:2rem,y:-12,color:#ffffff;
classDef colorset3 fill:#ffebec,stroke:#413e39,stroke-width:2px
classDef nodeLabel padding-bottom:40px
classDef hidden display:none;
classDef edge0 display:none;
class State1 colorset1
class State2, State3, State4 colorset2
class State5, State5a, State6, State6b, State7 colorset3
class State0 hidden

        State1: Unit Format
        State2: Information sections (e.g. unit overview)
        State3: Weeks/topics sections

        State5: Content Pages
        State5a: Content Pages
        State6: Learning Activities
        State6b: Links
        State7: Links

state State1 {
        State2 --> State5
        State3 --> State6
        State3 --> State5a
        State3 --> State6b
        State2 --> State7
}
The above diagram presents one way of thinking about unit structure.
Student engagement with a unit on ARK can be thought of as having three purposes: functional, learning and assessment. These purposes peak at various stages in the delivery of the unit but are present throughout the entire delivery.
The goal of unit design is to provide a clear and consistent structure to ensure students are not frustrated in their attempts to locate and understand learning materials.
When choosing a layout, structuring your content and entering descriptions, you should consider when and why a student will be accessing the content you are entering. Cluster related content by choosing logical sections and choose layouts that reduce the number of clicks required to find discrete content. Some questions to guide your decision making:
Amrit is teaching a unit delivered face-to-face over the 12 weeks of semester. Each week of the semester will cover different topics. During each week, the students will be required to complete 2-3 pre-readings, post in a discussion forum and attend lectures. The PowerPoint files from the lecture will be posted on ARK after the lecture.
Amrit determines that the functional purposes for students visiting the meta unit are: checking the unit schedule, finding contact and attendance information, accessing resources to complete assessments, and determining priorities.
Amrit sets his meta unit to have 15 sections consisting of the following:
This is demonstrated below using the “Tile format” :
Methods and strategies for laying out the activities and resources within sections are covered in the Presenting Information document.
If you have a preferred structure that you use across multiple units, it may make sense to build a reusable template. It is often quicker to delete unneeded sections and activities than create them from scratch. Ask your ARKLO if your college has any templates that you can use.
To learn how to import from a template or other unit, see the MoodleDoc, Import course data.
This section provides a basic guide to designing and building a Meta unit on ARK. The focus is on creating learner experiences.
We recommend you are familiar with the overview of unit structure before starting this section.
When we introduced unit structure we presented the hierarchy of content in ARK as:
The smallest unit in the hierarchy is either a resource or an activity.
A resource is a piece of static, ungraded content designed to present information to the student.
An activity is an item that the student interacts with, either individually or with other students. Some activities can be graded and may contribute to the gradebook.
Teachers can add activities and resources to their units using the activity chooser. To access the activity chooser, enable editing and click Add an activity or resource at the bottom of a section.
When you first open the Activity Chooser, you will see four tabs: All, Activities, Resources and Recommended.
The Recommended tab contains a shortlist of activities and resources recommended at the University of Divinity.
You can star your favourite or frequently used activities and resources and they will show in the Starred tab.

Click the star icon to favourite an activity or resource.
The activity icons are colour-coded according to their various functions:
See the MoodleDocs page for more information: Activity Chooser (4.1)
Teachers with Editing Teacher privileges in a unit are able to make changes to settings, add content and reorder parts of the unit.
The navigation menu underneath the unit title provides access to the unit content, settings, participants list, grades and reports. The more dropdown menu provides access to the question bank, content bank and the course reuse page allowing content to be imported from one unit to another.
The left navigation menu is collapsible and enables easy access to different parts of a unit.
To add an activity or resource, rename titles or reorder content including sections/topics, you will need to enable editing. This can be done easily by clicking the Edit mode toggle next to your profile picture at the top right of the page.
To rename content, click the pencil icon and type your changes. Press enter to save or the esc key to cancel.
To reorder content, select the 3 dots to the right of an activity or resource and click the move icon. You can drag the item up or down the page, or drag it to a place in the left navigation menu. You can also reorder content using the left navigation menu.
From the 3 dots to the right of an item, you can also access the settings for that item, hide it, duplicate it or delete it.
You can also access these options for unit sections. A section can also be highlighted, which places a border around the section to mark it to learners. You might want to do this to aid students in finding the current week faster.
This page introduces teaching staff to the text editor in ARK.
When adding content to activities and resources, teachers will be able to write content directly to text areas in ARK using the text editor.
This document describes the interface for the default text editor, Atto. The new version of ARK (Moodle 4.1) introduces an alternate editor, TinyMCE which is more featured and will become the default in future versions. To change the text editor and for help on using TinyMCE, see MoodleDocs: TinyMCE editor.
This document largely provides advice on effective formatting and use of media in ARK and is applicable for both text editors.
The text editor in ARK is a powerful interface, and is similar to working with other text editors such as Microsoft Word. However, this guide contains a few key recommendations to ensure your content is accessible to all users and is consistent with how learners access content across the internet and other University of Divinity resources.
If you’re unfamiliar with the interface, jump to the text editor interface first.
Eye-tracking studies have consistently found that users scan content on the internet.1 This makes the layout and styling of your content, including on ARK, particularly important. Screen reading software uses pre-defined markers to allow vision-impaired users to more easily navigate the page but it requires those entering content to be consistent with those conventions.
The style dropdown, marked (2) on the screenshot below, presents the key styles that a screen reader will use to navigate the page. Heading levels should indicate the rank of the content, with large headings being the most important, and headings of same importance being the same size. Skipping headings can be confusing and should be avoided.2.
The top row of the editor gives easy access to bold and italics. These text effects can be difficult to read if they are used excessively and so should be reserved for emphasis.
The second row of the toolbar gives the ability to add underline, strikethrough, subscript and superscript.
To create a link, select the text and then click the chain icon, marked (9) on the screenshot below. Paste the URL into the field.
To remove a link, select the text with the link and click the break chain icon, marked (10) on the screenshot below.
You can insert or embed images, video and interactive content in text areas using the text editor.
The practice of inserting or embedding images, video and interactive content can have Copyright implications. It is advisable to seek out images and media that are released under licenses that allow for sharing such as the Creative Commons license.
For more information contact your library staff or see the Australian Copyright Council.
Most browsers will allow you to drag and drop an image from your computer to the text editor. Alternatively, you can click the image icon, marked (12) on the screenshot below. To edit the settings of an image already placed in a text area, click the image and then select the image icon.
The image properties dialogue allows you to paste a link to an image elsewhere on the internet. Always place an image description to assist students using a screen reader or to explain the image in the event the link breaks.
Where possible, resize the image before uploading it to ARK to reduce the file size and subsequent load time of your unit. As a guide, images covering the full width of a course area should be no more than 1200 pixels wide. Reduce the size accordingly for images only displaying at part width of the text area (see “Best Image Size for Websites” for more information).
You can change the size and relative position of the image using the image properties box. Select Auto size to avoid warping the image.
As with images, audio and video can be dragged and dropped into the text editor. Links to some video hosting sites such as Vimeo or YouTube will automatically be converted into embedded content (if you don’t want this behaviour, ask your ARKLO for instruction on disabling the Multimedia Filter).
Audio and video should be hosted on a hosting site such as Vimeo to avoid adding server load and slowing ARK for all users.
The insert media dialogue allows instructors to change the size of the content, adjust playback settings and add additional subtitles or captions.
H5P interactive content can be inserted with the H5P icon, marked (17) on the screenshot below. Creating H5P content is a more advanced concept and will be covered elsewhere. More information is available on MoodleDocs: H5P.
The HTML code, marked (16) on the screenshot below, allows instructors with HTML understanding to change the appearance in ways not available in the editor menus.
The text editor is used extensively throughout ARK, including posting in forums, editing section headings, activity descriptions, quiz answers and the content of blocks.
There are two rows to the editor toolbar, which can be expanded using the expand button, marked 1 below:

| (1) Expand | (2) Style | (3) Bold | (4) Italics | (5) Unordered list |
| (6) Ordered list | (7) Decrease indent | (8) Increase indent | (9) Create link | (10) Remove link |
| (11) Insert emoticon | (12) Insert picture | (13) Insert video | (14) Record audio | (15) Record video |
| (16) Manage embedded files | (17) Insert H5P |

| (1) Underline | (2) Strikethrough | (3) Subscript | (4) Superscript | (5) Left align |
| (6) Centre align | (7) Right align | (8) Equation editor | (9) Insert character | (10) Table |
| (11) Clear formatting | (12) Undo | (13) Redo | (14) Accessibility checker | (15) Screenreader helper |
| (16) Edit html code |
Nielsen, Jakob. 1997. “How Users Read on the Web.” Nielsen Norman Group. September 30, 1997. https://www.nngroup.com/articles/how-users-read-on-the-web/. ↩︎
“Headings • Page Structure • WAI Web Accessibility Tutorials.” n.d. Www.w3.org. https://www.w3.org/WAI/tutorials/page-structure/headings/. ↩︎
This document covers the methods and tools available for presenting static information to students on ARK. It will introduce the text and media, page, file and book resources and cover basic user interface and pedagogical design strategies to aid navigation for students.
There are multiple ways to present content or information to learners in ARK. The screenshot below shows the most common resources:
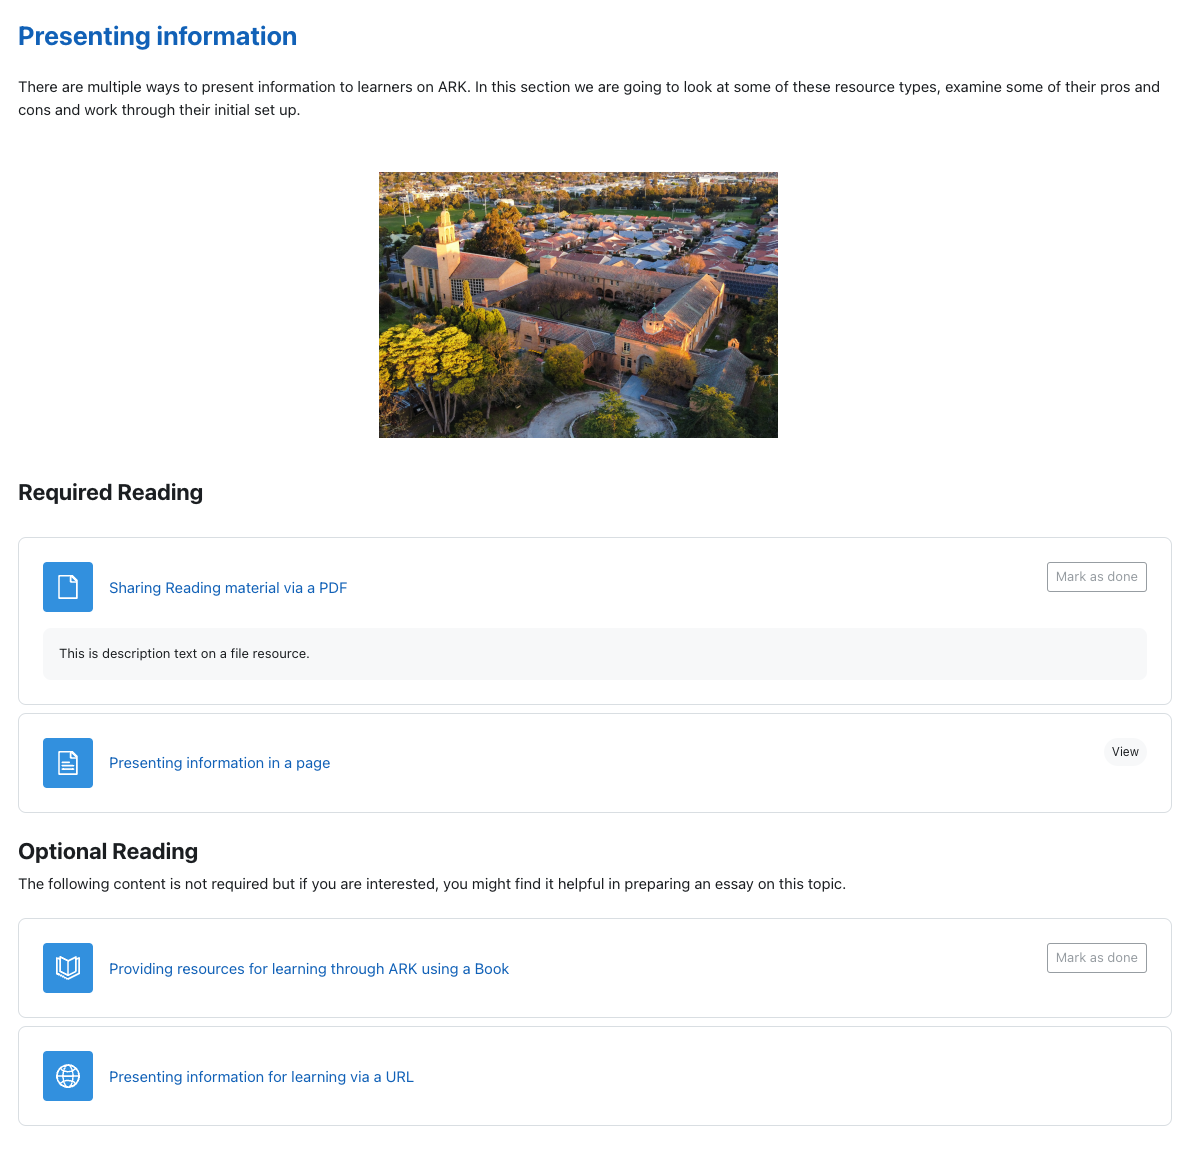
1 1 2 2 2 3 4 5 6 7 Screenshot of a sample section in Moodle. Hover over the numbers for more detail.
The above resources can be grouped into three types: presentation resources (descriptions and, text and media areas), external resources (file and URL) and internal resources (page and book) .
Text and media areas (previously called labels) and descriptions help students navigate the sections in an ARK unit. They can function as signals – to point students to where information is or how it is arranged – or as direct instruction – to explain a concept or set up an activity.
Descriptions sit below an activity or resource and are set in the settings for the activity or resource. You can use a description to provide context for a particular activity or resource, or provide a citation.
A text and media area is a way of presenting content on the section page and can be used to group or separate activities and resources, provide instruction or deliver content. In the example below, the heading is placed before the first reading to signal to students what the reading is for, a subsequent text and media area sets up an activity, and the video is placed in a text and media area for easy viewing.
In many cases, the learning resources you provide to students will be external to ARK, which you can either link to (such as an external website or Library Hub resource) or upload as a file (such as a PDF or other downloadable resource).
A URL resource allows you to provide a link to a resource external to ARK such as the Library Hub or a website. While it is possible to hyperlink from any text in a text and media area or description, a URL resource allows you to set completion requirements to track or signal progress to the student.
A file resource allows you to share files with students. This is most commonly used to upload PDFs but can also be used to provide PPTs, Word documents or audio recordings.
The practice of uploading files, images and documents can have Copyright implications.
For more information contact your library staff or see the Australian Copyright Council.
ARK offers a few resources and activities to present content. The simplest of these are page and book. Pages and books both allow you to build web content in ARK with text, images and embedded content. They are considered resources as the only behaviour available to students is to view the content. Both pages and books are easily printed to PDF by students.
Other options: other methods of presenting content include the Lesson activity and the H5P activity. These activities are more complicated to setup and will be covered elsewhere.
Page resources are best used to present content that doesn’t need extensive scaffolding for students to process or to present information that would take up too much space on the section page. For example, a page might be used to provide an extended bibliography for a topic or to collate instructions for a learning task such as an assessment.
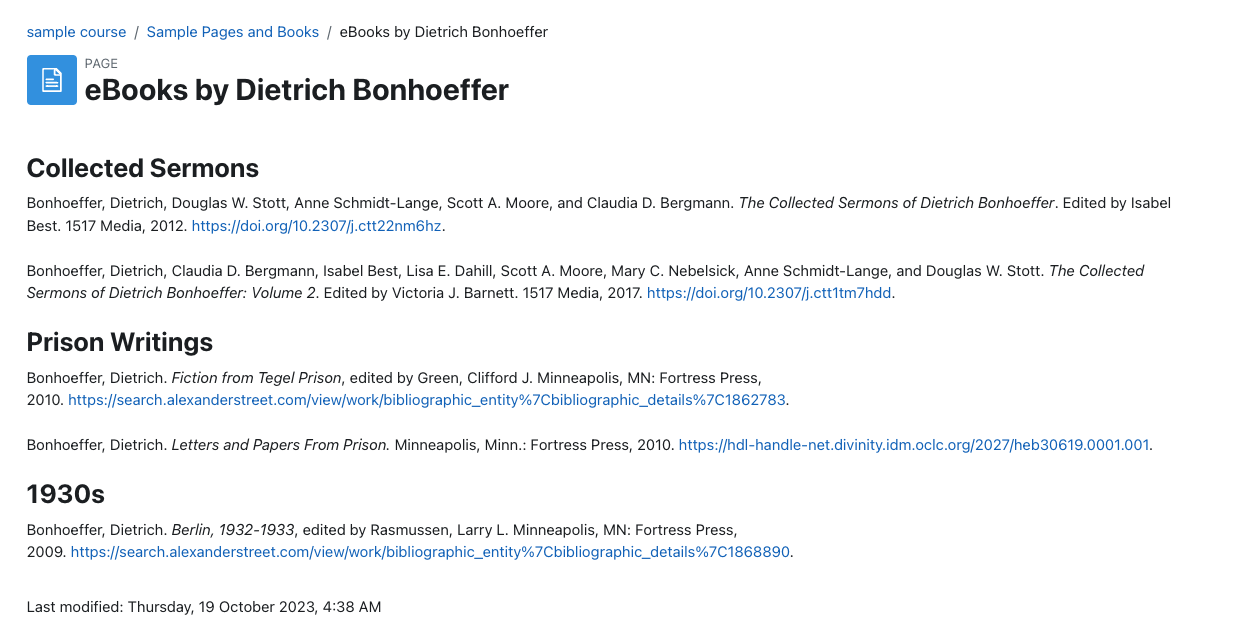
An example of a page showing a bibliography of selected Library Hub resources.
A book is a set of pages presented in a book-like format. Books are best used to present related ideas that together are too much to contain to a single page. For example, prior to a lecture on the prophets, you might wish to ensure students have a basic overview of the content and themes of each. You could create a book with a short introduction to each of them.
An introduction to the user interface of the ARK Learning Management System. The video below will introduce you to the key elements of using ARK.
The default setup of ARK is optimised for students. You may want to customise it for your own preferences.
On first login, you will be given a tour of the site. You can view this tour again by clicking ‘Reset user tour on this page’ in the bottom left corner.
The left navigation menu is collapsible. You can expand and collapse it by clicking on the three stacked horizontal lines in the top left corner.
Dashboard shows you a grid view of units you are enrolled in, quick links to site announcements, library resources and support, a timeline of tasks to complete and items you have recently accessed.
My units shows you units you are enrolled in.
A navigation menu top right when logged in has quick links other university sites. Resources links to Library Hub and the Style Guide. Support links to the Support Site and Support Forum. College Links to the College Website and College Library.
A user menu top right when logged in give you access to useful ARK pages and settings. You can edit your profile and preferences from there, enable student view and log out of the site.
You can access messages and notification from the icons at the top right.
Forms are only available to logged in users. In order for a new person to be able to log in and fill out a form, an authorised person must fill out the Add New Staff + Appointment form to have them added to the system. This ensures that relevant information is captured for reporting and college collection and systems integration processes.
Select the relevant form from the list, or by inputting a search term in the search bar. Note that your interface may differ slightly to that pictured, subject to different permissions or site developments.

Whenever you move past a field or click a button, those fields that are mandatory will be checked and a message displayed if they are empty.
At any time you may save the form for later completion with the “Save for later” button. Saving the form will preserve your content for later editing. You will be prompted to load this saved copy whenever you next open the same form.
Clicking “Close” will prompt you to save a draft (the default). Unticking the box will enable you to close the form and discard any information entered.
If you need to show the filled out form to another person, you can print the form (to paper or PDF)
The ‘My CV’ link in the menu will provide a CV-like view of your information which is available to be viewed alongside your submission and printed.

Select “Submit” to submit your form. This will save the form and automatically forward your form for review, if applicable. An email will notify the applicant that their form has been received for consideration.

Once a form has been submitted, an email notification will be issued to the person who is first in the workflow process that is associated with the form. That email will include a link to review the form (the first link highlighted in the image below). This is link is associated with the person and role of the recipient and should not be forwarded to anyone else. A read-only share link is also included in the email, and in the review process. This share link can be copied and circulated to others, where appropriate, for consideration.

After clicking on the ‘Click here to review the form’ link you will see displayed a four part form.

The last step is for you to select your decision, and provide any internal notes.

Once you have selected your decision and filled out the necessary information, use the “Confirm Approved”/“Confirm Queried”/“Confirm Denied” button to complete your review.
If approved, the review process (step 4 to 6) will repeat until the final reviewer completes their review.
The applicant will not receive an automatic notification of the result of their application and must be contacted manually.
Staff forms are submitted directly by the applicant. Authority forms are submitted on behalf of an applicant by an authorised submitter.
flowchart

    submit[Form is submitted]
    review[Reviewed by University]
    approve[Approved by DAP]
    letter[Letter of accreditation sent]
    gazette[Accreditation entered into University Gazette]

    submit --> review
    review --> approve
    approve --> letter
letter --> gazetteThis document provides support on adding entries to the University of Divinity Research Repository.
See the New Publications Field Requirements table for a summary of required and optional fields.
Research Active academics at the University can add new entries to Research Repository in the My Research Application on Divinity Portal.
For guidance on using Divinity Portal, see the Divinity Portal Getting Started Guide.
To begin adding a new publication to Research Repository on Divinity Portal, go to the My Research Application. Then select the New Publication button at the top right.

Select New Publication to begin.
The New Publication form has seven pages which are outlined below. Details about the requirements for each field are outlined in this document. To view a summary of required and optional fields for each publication type, see the New Publications Field Requirements table.
flowchart LR
    style id1 fill:#ffffff,stroke:#413e39,stroke-width:2px
    style id1b fill:#ffebec,stroke:#413e39,stroke-width:2px
    style id2 fill:#f7f3ec,stroke:#413e39,stroke-width:2px
    style id3 fill:#ece5d5,stroke:#413e39,stroke-width:2px
    style id3b fill:#b79754,stroke:#413e39,stroke-width:2px
    style id4 fill:#740005,stroke:#413e39,stroke-width:2px,color:#ffffff;
    style id5 fill:#a00021,stroke:#413e39,stroke-width:2px,color:#ffffff;

    id1>Item Details]
    id1b>Authorship]
    id2>Publication]
    id3>Classification]
    id3b>ANZSRC]
    id4>Upload]
    id5>Submit]

id1 --- id1b --- id2 --- id3 --- id3b --- id4 --- id5The Title of your published item. This is the title of your work, e.g. a book chapter, not the title of the book or journal in which it appears. Use headline-style capitalisation (CMOS 8.159).
Used for translated titles or for specific formatting of a title (e.g. ASCII-only title).
Enter an abstract of a few hundred words or less. Journal abstracts: (CMOS 1.93) and book abstracts: (CMOS 2.25).
Choose from one of the following Publication Types:
Article, Book and Book Chapter allow the following Sub-Types:
The above are important Tertiary Education Quality and Standards Agency (TEQSA) metrics and should be selected where possible. However, the following additional Publication Types are also available:
Please note: the required fields for your publication will change depending on which Publication Type you choose.
Article, Book and Book Chapter allow the following Sub-Types:
Select from one of the following Thesis Types:
The date of publication. Dates of publication in the following calendar year may be entered (e.g. if the current year is 2024 you can enter 2025).
The College or School that supported the publication, in most cases this will be the entity where you have an appointment (e.g. St Barnabas College or School of Professional Practice).
Select UD Staff or External. At least one of Authors, Editors or Contributors must be UD Staff.
UD Staff are selected from a drop down list. This list displays all staff members who are current publishers to the Repository. If your name is not on the list, or you want to select a person that is not on the list, please contact Research Strategy.
Enter the name of external authors, editors or contributors as per bibliography convention (CMOS 14.21) That is, inverted name order (last name first). Start with a capital letter unless the first word would normally be lowercased. (e.g. ‘Smith, John G.’ or ‘de Ville, Jean’)
Add any additional entries by clicking the plus icon beside Authors, Editors or Contributors.

Add an entry.
Remove entries by clicking the X icon at the right of the field.

Remove an entry.
UD Staff or External editors can be entered in the same manner as for authors. Note that some Publication Types, such as Edited Collection, do not allow an author field, but require one or more editors.
Some publications may have contributors that are neither authors nor editors. You may enter them here.
If your publication was sponsored by one or more people or organisations, you may enter the name of your sponsors here. The sponsor can be entered as free text.
Select from one of the following Publication States:
To ensure the University complies with its copyright obligations, select from one of the following:
Enter the name of the journal or publisher. The dropdown list will show all journals or publishers that contain the terms you have typed. You can search by any part of the name.
If the journal or publisher isn’t showing, try searching by parts of the name with common spelling.
Example: If you are looking for Nijmegen University Press, type ‘university press’ in the text field and scroll to ‘N’ from the dropdown list.
For Non-Traditional Research Outputs (NTRO), the publisher is free-form text.
If the journal or publisher is not listed and you have tried searching by different parts of the name, click the “My Journal/Publisher is not listed” link and enter the expected name of the publisher and the website of the publisher.
Once you have requested a new journal or publisher, you will be allowed to continue editing your item and save it to the Repository with the journal or publisher you have requested. Your request will be reviewed, and once approved, it will be available for selection for future items.
Enter the place of publication that appears on the title or copyright page. Where multiple locations are listed, enter the first location. (CMOS 14.129).
Enter the Volume or Series number in arabic numerals (e.g. 1, 2, 3,…).
Enter the Issue number in arabic numerals (e.g. 1, 2, 3,…).
Enter the page range using arabic numerals separated by an en dash (-). Abbreviate, or condense, inclusive numbers following the Chicago style (CMOS 9.61). For example, enter ‘11-22’. Do not include ‘p.’ or ‘pp.’
Indicate if the work is Peer Reviewed from the dropdown list.
Enter the citation in bibliography entry form following the University of Divinity Style Guide. Citations will appear on your University of Divinity Staff Profile.
Enter keywords separated by a comma (,). Choose keywords that represent the content of your manuscript and are specific to your discipline or sub-discipline.
For example: “Paul, New Testament, Grace”.
Do not use a space, dash, newline, or any delimiter other than a comma to separate your keywords.
Add the research/teaching disciplines relevant to the item. Assign multiple disciplines by clicking the plus icon beside Disciplines.

Add an entry.
Select from the following disciplines:
Remove an invalid entry by selecting the X icon.

Remove an entry.
Record relevant identifiers. Available identifiers are ISSN, ISBN, ISMN, URI, DOI and OTHER. Select the Identifier Type from the dropdown list and enter the value in the Identifier Value field. To record additional identifier entries, click the plus icon beside Identifiers.

Add an entry.
An International Standard Serial Number (ISSN) must be an eight-digit code, divided by a hyphen into two four digit numbers (e.g. 1234-5678).
An International Standard Book Number (ISBN) must be 10 or 13 digits.
An International Standard Music Number (ISMN) must be 13 alphanumeric characters.
Enter the full URI (such as a URL) for the publisher’s entry of this item.
Please note that items will automatically be assigned a handle, which is prefixed with ‘https://hdl.handle.net’. This is a permanent link to your item. You are not able to edit the handle once it is assigned.
Enter the DOI in prefix/suffix format, where prefix takes the form 10.NNNN (e.g. 10.1000/182). Do not append the URL (e.g. https://doi.org/10.1000/182).
Select the Type of Activity (ToA) that applies to this item. By default Pure Basic Research will be selected.
The other categories should only be used for research that specifies its application to an identified practical/applied problem.
ANZSRC definition: Pure basic research is basic research carried out for the advancement of knowledge, without seeking long-term economic or social benefits or making any effort to apply the results to practical problems or to transfer the results to sectors responsible for their application.
Pure basic research means that your publication is mainly or entirely theoretical, and engaged with existing scholarship. In advancing knowledge, it seeks to apply critical creativity, thinking and/or analysis to an existing theoretical question, problem or topic. It is not authored with the intention of informing practical discoveries or practical problems, and does not involve methodologies which include empirical evidence or data sets in support of its conclusions.
ANZSRC definition: Strategic basic research is experimental and theoretical work undertaken to acquire new knowledge directed into specified broad areas in the expectation of practical discoveries. It provides the broad base of knowledge necessary for the solution of recognised practical problems.
Strategic basic research means that your publication involves a methodology by which empirical evidence or data sets are utilised towards achieving new theoretical analyses or conclusions. It itself it does not resolve a practical problem, however it contributes to a broader established practical question or problem.
ANZSRC definition: Applied research is original investigation undertaken in order to acquire new knowledge. It is, however, directed primarily towards a specific, practical aim or objective.
ANZSRC definition: Experimental development is systematic work, drawing on knowledge gained from research and practical experience and producing additional knowledge, which is directed to producing new products or processes or to improving existing products or processes.
Experimental research means that your publication addresses a practical question or problem and offers a reproducable methodology for a solution, and which bases its conclusions on prior theoretical and practical research. This kind of publication would be most relevant for the research and design sector, and for advances which have patentable outcomes such as the development of new medications or a new process for creating a room-temperature superconductor.
Our University’s submission to TEQSA is partly assessed on how our research supports our accreditation as a Higher Education Provider. Your classification of your own research contributes to this assessment.
In describing your research, select between 1 and 3 Field of Research (FoR) codes that apply to your item. You can assign these percentages to indicate the weighting they have within your work.
As a rule of thumb, University of Divinity publications will very likely be described by the 6-digit FoR codes within 5004-Religious Studies or 5005-Theology. By default, the first item will be pre-filled with 500501 - Theology at 100%.

If you are assigning more than one FoR code, the first code will default to an 80% weighting.
Your research will likely suit a single FoR code from these categories with a weighting comprising a large majority (~80% or more). You can then select other FoR codes (as needed) to describe your research as it incorporates those other areas so that the total will come to 100%.
The allocate button below the weightings will automatically assign weightings so that the first item receives a weighting of 80% and the remaining 20% is distributed evenly between the remaining categories.

The allocated percentages must total 100% to proceed.
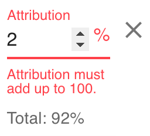
You may find that your publication is clearly described by one or more Field of Research codes. Sometimes with specialised research, the broadness of the FoRs can mean make it more difficult to discern what is most appropriate. There are no strict guides to the definitions of Field of Research codes, however - so if you can imagine your research intersecting with a particular FoR, then that is fine to assign it accordingly: it is a case of finding the best fit rather than the perfect fit.
For 5004 and 5005 codes, see below:
View the full list of FoR codes at the Australian Bureau of statistics.
Confoy, Maryanne (2015) Welcome, Inclusion, Attentive Presence: The Central Role of Pastoral Care in Catholic Health and Aged Care. Catholic Health Australia, Canberra.
Select between one and three Socio-Economic Objective (SEO) codes that apply to your item. University of Divinity research will often fall under 1305-Religion and its sub-codes, listed below:
The drop-down list on the form allows you to type keywords or codes you’ve used for similar research in the past to bring up a shortlist of options for you. You can also view the full list of SEO codes at the Australian Bureau of statistics.
When selecting one or more SEO codes, please note that some of the descriptions may seem too broad or narrow to describe your research. As with FoR codes, aim to find the best fit rather than the perfect fit. Only choose as many SEO codes as you feel are necessary for your publication.
Click the Add File button for each file you will upload, then click the paper clip icon to select the file from your computer.

Click the paper clip to select a file. Click cancel if you do not wish to upload another file.
You can set permissions for each file as follows:
If Embargoed is selected, you can set the date when the embargo will be lifted.
If you wish to remove a file, click the X icon to remove. Files marked for deletion will be removed when the form is submitted.

Click the X icon to remove a file.
You will be asked to acknowledge the following statements before submission:
Australian Bureau of Statistics. “Australian and New Zealand Standard Research Classification (ANZSRC).” ABS, 2020, https://www.abs.gov.au/statistics/classifications/australian-and-new-zealand-standard-research-classification-anzsrc/latest-release. ↩︎
This document outlines the process for uploading existing publication information to the Research Repository and is applicable to research active staff at the University.
For a comprehensive overview of adding records to the research repository, see the New Publications document. For a summary of required and optional fields, see the Field Requirements summary.
Research active academics can use the import tool to upload existing publication information from DOI or BibTex sources to the Research Repository using the My Research Application on Divinity Portal. For guidance on using Divinity Portal, see the Divinity Portal Getting Started Guide.
The Import process accepts the following sources:
There is additional information collected by the University which is not imported that you will need to complete.
Additional information you may require includes:
To begin importing from an external source, select the Import button in the My Research Application located at the top right.

Select Import to begin.
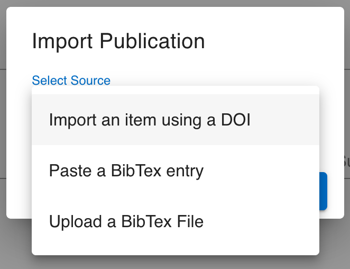
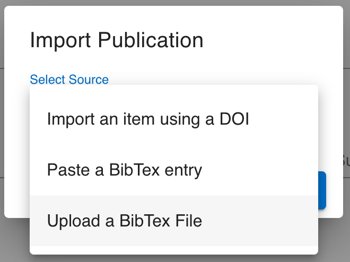
To import form a DOI, select Import an item using a DOI from the Select Source dropdown.
Paste the DOI in prefix/suffix format, where the prefix takes the form 10.NNNN (e.g. 10.1000/182).
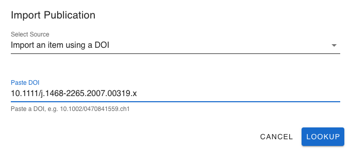
Select the Lookup button to trigger the import.
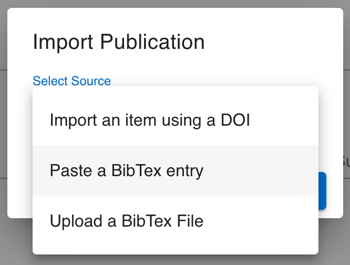
To copy and paste a BibTex entry, select Paste a BibTex entry from the Select Source dropdown.
Paste the BibTex entry into the Paste BibTex text area.
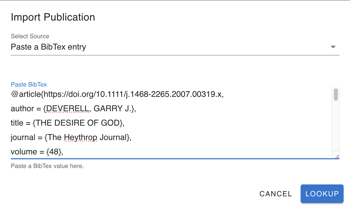
Select the Lookup button to trigger the import.
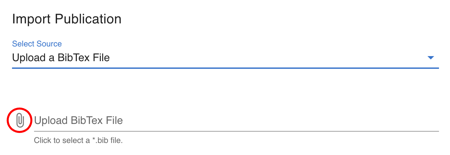
To upload a BibTex file, select Upload a BibTex file from the Select Source dropdown. To upload a BibTex file, select Upload a BibTex file from the Select Source dropdown.
Click the paper clip icon to select the file from your computer.
Select the Lookup button to trigger the import.
This document provides a list of the required fields in the New Publications form.
See the New Publications document for details on each of the fields in the form.
The new publications form will automatically update the required and optional fields based on the selected publication type. The form will guide you in that process. The table below is designed to assist you in preparing information.
| Article | Book | Edited Collection | Book Chapter | Research Report | Published Conference Paper | Thesis | |
|---|---|---|---|---|---|---|---|
| Item Details | |||||||
| Title | |||||||
| Alternative Title | |||||||
| Abstract | |||||||
| Issued Year | |||||||
| Month | |||||||
| Day | |||||||
| Authorship | |||||||
| Authors | |||||||
| Editors |
| Article | Book | Edited Collection | Book Chapter | Research Report | Published Conference Paper | Thesis | |
|---|---|---|---|---|---|---|---|
| Publication | |||||||
| Publication Status | |||||||
| Copyright Status | |||||||
| Publisher / Journal | |||||||
| Book Title | |||||||
| Series Name | |||||||
| Volume / Series # | |||||||
| Issue | |||||||
| Page Range | |||||||
| Peer Reviewed | |||||||
| Citation |
| Article | Book | Edited Collection | Book Chapter | Research Report | Published Conference Paper | Thesis | |
|---|---|---|---|---|---|---|---|
| Classification | |||||||
| Keywords | |||||||
| Disciplines | |||||||
| Identifiers | |||||||
| ANZSRC | |||||||
| ToA 2020 | |||||||
| FoR 2020 | |||||||
| SEO Objective |
The Unit Management System allows students and staff to view the diverse range of units available across the University and its Colleges. It also provides the means to develop and revise units, guiding them through the approvals process.
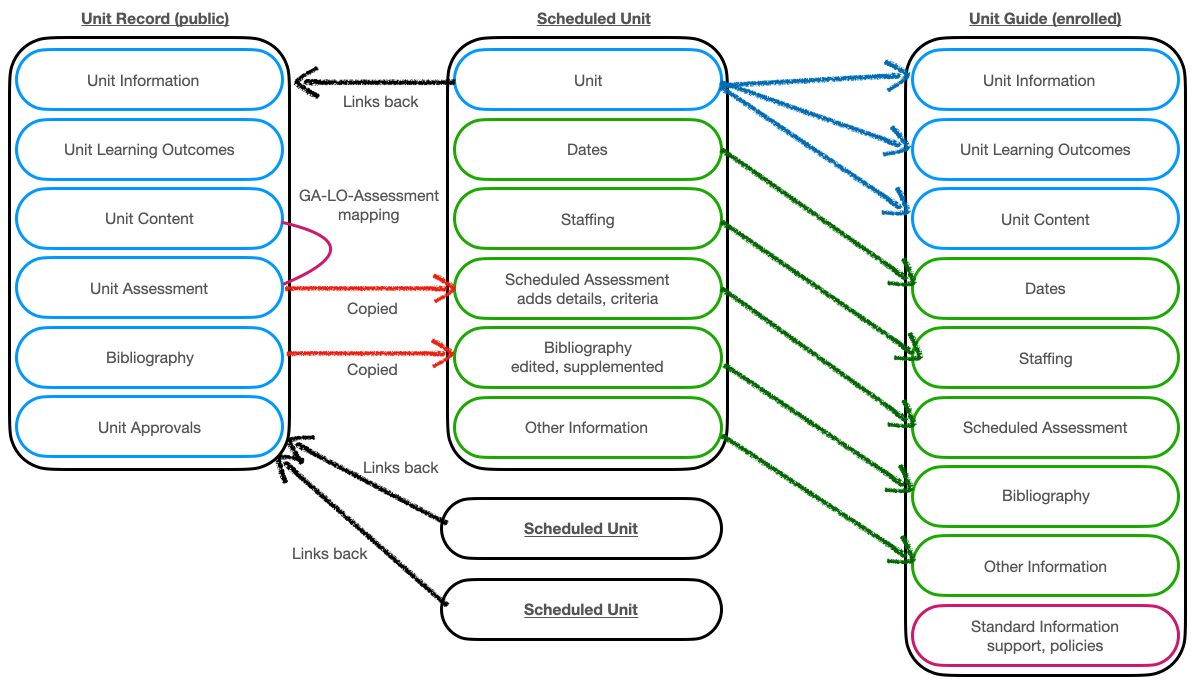
UMS Overview image
This applies to people with the capability of unit creation - Academic Dean, AD Delegate and Academic roles.
Click on Units in the menu system and select Create draft unit. You will be presented with a blank Unit Record form.
Fill out the form as needed, noting the following, and click Create unit to save it.
A title, discipline, level, college and academic are the minimum required fields.

If you do not fill out these fields you cannot proceed and you will be prompted.

You can enter up to 6 learning outcomes in this initial form (adding more or editing them later)

Most fields have an information that explains what the field is for.

A number of the fields are labelled with ‘Markdown’ which provides simple text formatting. Clicking ‘Markdown’ in the label or going Help -> Markdown will display further information.

Once the draft has been saved you can return to it as needed to continue to edit and prepare it.
Once the draft has been completed, it needs to be proposed in order for next steps in the approval process to be undertaken.

This applies to people with the capability of unit revision - Academic Dean, AD Delegate and Academic roles.
Locate the unit that you wish to be revised. Ensure that you are looking at the detailed view of the unit. If the unit is currently approved, you will be presented with three revision buttons: (1) Start major revision, (2) Start minor revision and (3) Start minor assessment revision. These correspond to sections 10.5, 10.1 and 10.2 of the Unit Policy respectively and progress along different workflow pathways.

Clicking on any of these will clone the unit, place it in a draft state (pink circle) and record the type of revision being undertaken - as noted in the unit status and button (green circles).
Please make sure that you choose the correct type of revision process as different information is copied to the draft version and cannot be changed.

You can then edit the unit by clicking on the Edit unit button, noting that the type of revision only allows certain fields of the unit record to be edited.
You can compare this new version of the unit to the previous one by clicking Compare to previous. The earlier version is on the left, the current unit is on the right.

Once any editing has been completed, click on the Propose X revisions (Propose assessment revisions in the image below) to advance the unit to the next step of the workflow process.

This applies to people with Academic Dean and AD Delegate roles.
Once a draft unit (whether new or a revision) has been edited, it is then proposed. Proposed units are considered ‘in preparation’ and require further steps by the College prior to submission for approval.
Units in this state will appear on the Units Dashboard in the Units in preparation section.

Typically the first steps in the process is an External Review. In order to send this via the UMS to the appropriate person, you need to firstly assign the external reviewer.
Locate the unit that you wish to send for review
Click the Edit unit button
Scroll down to the Approvals section and select the person from the list

Click on Update unit at the bottom of the page
You can now click on the Send to reviewer button

The unit will now appear under the Awaiting external review section

Once an external review is complete, the unit returns to ‘In preparation’ on the dashboard. Viewing the unit shows the reviewer and the review date under the Approvals section

Further, an additional button that presents the output of the external review.

There is truncated process for sending to library staff for preparation of the library impact statement.
Locate the unit that you wish to send for review
You can now click on Send to librarian

The unit will now appear under the Awaiting library review section

Once the library impact statement is complete, the unit returns to ‘In preparation’ on the dashboard. Further, viewing the unit shows the librarian and the librarian impact review date under the Approvals section.

The next step is a review by the College Academic Committee. The unit is considered prepared after having the above checks completed, and once done a new button appears - Unit prepared, for CAC.

Clicking this button progresses the unit to the next state and allows for the CAC Review.
This applies to people with the capability of unit review - Academics with Unit Reviewer status and people with Librarian role.
The College Academic Committee prepares the unit for approval. One of the key steps for new units and those undergoing a major revision is the External Review. The CAC allocates an external reviewer and sends its to them.
Units in this state will appear on the Units Dashboard in the Units in preparation section.

You are able to see a listing of all units in which you have been allocated as a reviewer by selecting My External Reviews from the menu.


Clicking on the title of the unit will show its detail along with a button that begins the external process form. From here you can also click on Compare to previous to see the differences between the two versions.

Click Do External Review of unit to display the external review form. This form aligns with the Unit Policy. Clicking on Print view will open the Unit information in a new window.

Once the review process has been done and the information entered into the form, click Save review. You are returned to the unit. You can click on Do External Review of unit to edit or add to the review.

Once a review form has been saved an additional button presented. Click on External review complete in order to finish the review step and return the unit to the College Academic Committee.
The unit will no longer appear under My External Reviews.
The unit returns to ‘In preparation’ on the dashboard.
Viewing the unit displays an additional button to Show external review.

The Approvals section of the Unit will display the reviewer and date

Another key step is the check that the library resources are sufficient. This is performed by the library staff of the unit’s college.
You are able to see a listing of all units waiting for a library impact statement by selecting Library Reviews from the menu.


Click on the title of the unit to show its detail and then click Edit unit. Scrolling down, there is Library section.

If the current library resources required to support the unit are already sufficient, the checkbox can be ticked. If additional action is to be taken, that can be noted. Otherwise, enter the details of the actions that the library intends to take. Click Update unit to save the impact statement information.

Once this information has been saved, a new button appears. Clicking Impact statement prepared indicates that the impact statement is complete and the unit is ready for the step of preparation.

The unit will no longer appear under Library Reviews.
The unit returns to ‘In preparation’ on the dashboard.
The Approvals section of the Unit will display the librarian and date

This applies to people with Academic Dean and AD Delegate roles.
Once a unit (whether new or a revision) has been prepared by having reviews done, it is then ready for review by the College Academic Committee (section 8 of the Unit Policy).
Units in this state will appear on the Units Dashboard in the Units in preparation section.

After drafting, the external review and the library impact statement are prepared the unit requires that the College Academic Committee review the unit.

Note that:
Click the Do CAC Review of unit button and the CAC Review form is presented

Click on Save review at the bottom of the page and you will return to the unit.
You now have some options as to what is next

Click on Do CAC Review of unit to continue to edit the review
Staff can view the CAC review by clicking on Show CAC review

Click on CAC endorses unit when the process is complete
The unit will now appear under the Awaiting Academic Dean’s approval section

There are a couple of steps required to link ARK to the Unit Guide for a delivery. Due to the configuration, it is the same information that is entered in each.

Markdown is “a lightweight markup language with plain-text-formatting syntax”.
This is *something with italics or emphasis* in it.

This has **something bold or strong** in it.

Paragraphs begin after a blank line.

This is a list

* Apple (you need the blank line ahead of it)
* Orange
* Pear

And another:

1. Genesis
2. Exodus
3. Leviticus
1. Numbers (note you don't need to correctly number all)
5. Deuteronomy
This is something with italics or emphasis in it.
This has something bold or strong in it.
Paragraphs begin after a blank line.
This is a list
And another:
You can display a full URL <https://www.ccel.org>

You can display [text to click](https://www.ccel.org) with a URL.
You can display a full URL https://www.ccel.org
You can display text to click with a URL.
## Section heading

### Subsection heading

#### Sub-sub section heading