This is the multi-page printable view of this section. Click here to print.
ARK Documentation
- 1: Getting Started with ARK
- 1.1: Accessing ARK
- 1.2: The User interface
- 1.3: Add profile picture
- 1.4: About ARK
- 2: Setting Up Meta Units
- 3: Meta Unit Content
- 3.1: Activity Chooser
- 3.2: Editing a Unit
- 3.3: Text Editor
- 3.4: Presenting Information
- 4: ARK navigation
1 - Getting Started with ARK
This guide is designed to aid new teaching staff at the University on the ARK Learning Management System located at ark.divinity.edu.au.
It is written based on Moodle 4.1 functionality which the University upgraded to in December 2023.
Introducing ARK
ARK is the University of Divinity’s Learning Management System located at ark.divinity.edu.au. ARK is an online software solution “used in all courses and units of study as a means of supporting and enhancing student learning and facilitating access to learning materials.”1
Footnotes
1.1 - Accessing ARK
Accessing ARK
ARK is located at ark.divinity.edu.au. You can also find a link to ARK at the top of the University of Divinity website.
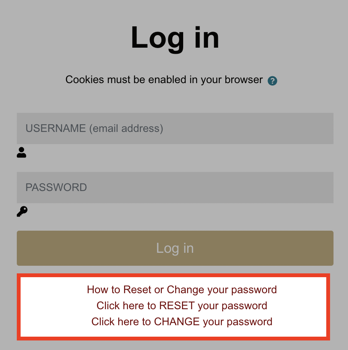
On visiting the ARK page, you will be prompted to login.
Username and Password
The login credentials for ARK are the same as your login for Paradigm and the Library Hub.For instructions on changing or resetting your password visit the Login and Password Guide or follow the links below the login form.
1.2 - The User interface
This document is an introduction to the ARK user interface. It is applicable to all staff and students of the University.
Navigating ARK
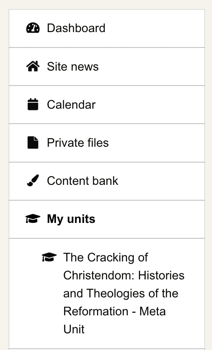
Screenshot of left navigation menu.
- On first login, users are given a guided tour of the interface. This tour can be viewed again by clicking the ‘Reset user tour on this page’ link at the bottom left of the site.
- The left navigation menu is collapsible. You can expand and collapse it by clicking on the three stacked horizontal lines in the top left corner. From the left navigation:
- Dashboard will take you to the Dashboard which shows you a grid or list of units you are enrolled in, quick links to site announcements, library resources and support, a timeline of tasks to complete and items you have recently accessed.
- Under My units are units you are enrolled in.
- A navigation menu top right when logged in has quick links to other University sites. Resources links to Library Hub and the Style Guide. Support links to the Support Site and Support Forum. College Links links to the College Website and College Library.
- A user menu top right when logged in give you access to useful ARK pages and settings. You can edit your profile and preferences from there, enable student view and log out of the site.
- You can access messages and notification from the icons at the top right.
1.3 - Add profile picture
This document explains how to add a Profile Picture on ARK and is applicable to all students of the University and staff teaching at the University.
Adding a profile picture will help people recognise you when you participate in activities on ARK such as forums.
Step 1: Login to ARK using your login email and password.
Step 2: Click on your name in the top right corner.
Step 3: Click Profile from the drop down menu.

Step 4: Under the heading ‘User details’, click Edit profile.

Step 5: Scroll down until you see the heading User picture.
Step 6: Click the Add… button. The button is an icon of a piece of paper.

Step 7: Click the Choose file button to Upload a picture from your computer.
Step 8: When you have located the picture you wish to upload, click on it.
Step 9: Click Upload this file.
Step 10: When you are done updating your profile, be sure to press the Update profile button at the bottom of the page to save your changes.

1.4 - About ARK
ARK runs on Moodle software. In December 2023, the University upgraded from Moodle version 3.9 to Moodle version 4.1. Outside of this documentation, there are two authoritative sources of help for using Moodle:
- MoodleDocs 4.1 - MoodleDocs is the extensive documentation site for Moodle with granular instructions on all functions of the software. (When using MoodleDocs, make sure that the help document matches the version of ARK. As of December 2023, ARK is using Moodle 4.1).
- Moodle Academy - Moodle Academy provides a self-paced online learning program for using Moodle including certification. Parts of this Getting Started guide are based on Moodle Academy courses.
Moodle Pedagogy
Moodle is designed on a social constructionist pedagogy. In short, social constructionism holds that we learn best when we construct meaning for ourselves in dialogue with others.
Moodle aims to achieve this by providing Resources and Activities. Resources are materials that the student is presented by the instructor and Activities are materials that the students interact with in some way, either by themselves or collaboratively with other learners.
Visit MoodleDocs to learn more about the Philosophy and Pedagogy of Moodle.
2 - Setting Up Meta Units
2.1 - Overview of Unit Structure
A well designed ARK unit will enable great learning experiences by making it easy for students to find what they need when they need it. In this document, you will be introduced to the key concepts in the structure of ARK units and be provided guidance on best practices for enabling students to locate learning activities and resources.
How are ARK units structured?
An ARK unit contains a hierarchy of three levels:
- the unit format level: This is the overarching structure of the unit where the different sections are presented on a single page. Different layouts are available and can be selected based on pedagogical design.
- the section level: Sections are a type of container for each week or topic. Learning activities are accessed from sections.
- the activity level: These are the activities and resources that present information and provide learning materials to the student. See activity chooser to learn more about this layer.
stateDiagram-v2

classDef colorset1 fill:#ece5d5,stroke:#413e39,stroke-width:2px,font-size:28px,line-height:2rem
classDef colorset2 fill:#740005,stroke:#413e39,stroke-width:2px,line-height:2rem,y:-12,color:#ffffff;
classDef colorset3 fill:#ffebec,stroke:#413e39,stroke-width:2px
classDef nodeLabel padding-bottom:40px
classDef hidden display:none;
classDef edge0 display:none;
class State1 colorset1
class State2, State3, State4 colorset2
class State5, State5a, State6, State6b, State7 colorset3
class State0 hidden

        State1: Unit Format
        State2: Information sections (e.g. unit overview)
        State3: Weeks/topics sections

        State5: Content Pages
        State5a: Content Pages
        State6: Learning Activities
        State6b: Links
        State7: Links

state State1 {
        State2 --> State5
        State3 --> State6
        State3 --> State5a
        State3 --> State6b
        State2 --> State7
}
The above diagram presents one way of thinking about unit structure.
Thinking about structure from student experience
Student engagement with a unit on ARK can be thought of as having three purposes: functional, learning and assessment. These purposes peak at various stages in the delivery of the unit but are present throughout the entire delivery.
- the functional purpose of visiting an ARK unit is to ascertain information about the delivery of the unit: resources required (e.g. textbooks), find zoom links, location of classes, key dates and learning processes
- the learning purpose is to access resources and participate in activities intrinsic to learning
- a student will visit ARK for information about assessments, ensuring they are completing the task correctly and seeking resources to aid in the completion of the assessment
The goal of unit design is to provide a clear and consistent structure to ensure students are not frustrated in their attempts to locate and understand learning materials.
How to use structure effectively
When choosing a layout, structuring your content and entering descriptions, you should consider when and why a student will be accessing the content you are entering. Cluster related content by choosing logical sections and choose layouts that reduce the number of clicks required to find discrete content. Some questions to guide your decision making:
- What do students want to see in the week before the start of the unit? Is it easy to locate? Does it enable students to organise a study plan?
- Note: units become visible to students a week before the scheduled start date of the delivery. This allows students time to design a study plan and locate any required resources or sort out any technical issues.
- What do students need to access in each week or module of study? Can they easily find the information? Is it clear what is required and what is optional or supplementary?
- Is it clear when content will be released if it is not currently available?
- How will students use the meta unit in preparation for an assessment? If information presented in teaching weeks will aid in assessment preparation, is it easy to locate a few weeks later?
Worked example
Scenario
Amrit is teaching a unit delivered face-to-face over the 12 weeks of semester. Each week of the semester will cover different topics. During each week, the students will be required to complete 2-3 pre-readings, post in a discussion forum and attend lectures. The PowerPoint files from the lecture will be posted on ARK after the lecture.
Amrit determines that the functional purposes for students visiting the meta unit are: checking the unit schedule, finding contact and attendance information, accessing resources to complete assessments, and determining priorities.
Solution
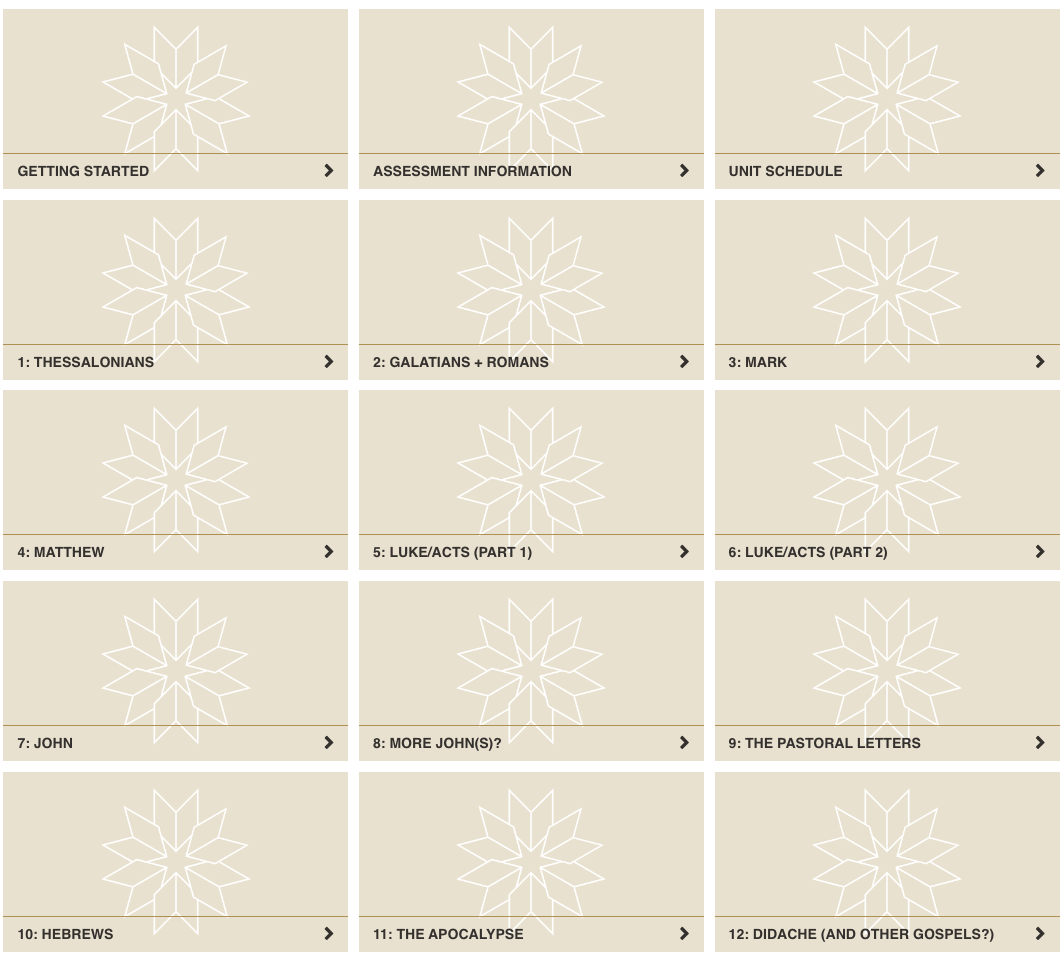
Amrit sets his meta unit to have 15 sections consisting of the following:
- Section 1: Getting Started: this section provides an orientation to the meta unit itself, contact and attendance information, and an overview of how the unit will be delivered.
- Section 2: Assessment Information: this section provides links to the associated child units, additional information or resources for the assessments not placed in the child unit, directions and links to academic skills supports and assessment information such as the Grading and Assessment information page on the University website.
- Section 3: Unit Schedule: a calendar of weekly requirements for the semester including readings and assessment dates. (Note: if you choose to do this, remember to update any dates before each delivery.)
- Sections 4-15: Weekly topics: each week contains links or PDFs of required readings, and a summary of the lecture after the class. A pattern is repeated throughout the semester for ease of use.
This is demonstrated below using the “Tile format” :
Methods and strategies for laying out the activities and resources within sections are covered in the Presenting Information document.
Making it easier
If you have a preferred structure that you use across multiple units, it may make sense to build a reusable template. It is often quicker to delete unneeded sections and activities than create them from scratch. Ask your ARKLO if your college has any templates that you can use.
To learn how to import from a template or other unit, see the MoodleDoc, Import course data.
3 - Meta Unit Content
This section provides a basic guide to designing and building a Meta unit on ARK. The focus is on creating learner experiences.
We recommend you are familiar with the overview of unit structure before starting this section.
3.1 - Activity Chooser
When we introduced unit structure we presented the hierarchy of content in ARK as:
- unit
- section
- resource or activity
The smallest unit in the hierarchy is either a resource or an activity.
A resource is a piece of static, ungraded content designed to present information to the student.
An activity is an item that the student interacts with, either individually or with other students. Some activities can be graded and may contribute to the gradebook.
Using the Activity Chooser
Teachers can add activities and resources to their units using the activity chooser. To access the activity chooser, enable editing and click Add an activity or resource at the bottom of a section.
When you first open the Activity Chooser, you will see four tabs: All, Activities, Resources and Recommended.
The Recommended tab contains a shortlist of activities and resources recommended at the University of Divinity.
You can star your favourite or frequently used activities and resources and they will show in the Starred tab.

Click the star icon to favourite an activity or resource.
The activity icons are colour-coded according to their various functions:
- Green = communication
- Pink = assessment
- Blue = content
- Red(orange) = collaboration.
Further Resources
See the MoodleDocs page for more information: Activity Chooser (4.1)
3.2 - Editing a Unit
Teachers with Editing Teacher privileges in a unit are able to make changes to settings, add content and reorder parts of the unit.
Unit Navigation
The navigation menu underneath the unit title provides access to the unit content, settings, participants list, grades and reports. The more dropdown menu provides access to the question bank, content bank and the course reuse page allowing content to be imported from one unit to another.
Unit index
The left navigation menu is collapsible and enables easy access to different parts of a unit.
Editing Mode
To add an activity or resource, rename titles or reorder content including sections/topics, you will need to enable editing. This can be done easily by clicking the Edit mode toggle next to your profile picture at the top right of the page.
To rename content, click the pencil icon and type your changes. Press enter to save or the esc key to cancel.
To reorder content, select the 3 dots to the right of an activity or resource and click the move icon. You can drag the item up or down the page, or drag it to a place in the left navigation menu. You can also reorder content using the left navigation menu.
From the 3 dots to the right of an item, you can also access the settings for that item, hide it, duplicate it or delete it.
You can also access these options for unit sections. A section can also be highlighted, which places a border around the section to mark it to learners. You might want to do this to aid students in finding the current week faster.
Note
Depending on unit layout settings, you will not be able to add a topic directly on the unit page but will need to go to unit settings, Edit Format and set the “Number of sections”.3.3 - Text Editor
This page introduces teaching staff to the text editor in ARK.
When adding content to activities and resources, teachers will be able to write content directly to text areas in ARK using the text editor.
Default text editor
This document describes the interface for the default text editor, Atto. The new version of ARK (Moodle 4.1) introduces an alternate editor, TinyMCE which is more featured and will become the default in future versions. To change the text editor and for help on using TinyMCE, see MoodleDocs: TinyMCE editor.
This document largely provides advice on effective formatting and use of media in ARK and is applicable for both text editors.
The text editor in ARK is a powerful interface, and is similar to working with other text editors such as Microsoft Word. However, this guide contains a few key recommendations to ensure your content is accessible to all users and is consistent with how learners access content across the internet and other University of Divinity resources.
If you’re unfamiliar with the interface, jump to the text editor interface first.
Styling content
Eye-tracking studies have consistently found that users scan content on the internet.1 This makes the layout and styling of your content, including on ARK, particularly important. Screen reading software uses pre-defined markers to allow vision-impaired users to more easily navigate the page but it requires those entering content to be consistent with those conventions.
Headings and paragraphs
The style dropdown, marked (2) on the screenshot below, presents the key styles that a screen reader will use to navigate the page. Heading levels should indicate the rank of the content, with large headings being the most important, and headings of same importance being the same size. Skipping headings can be confusing and should be avoided.2.
Applying styles
The style dropdown will apply the style to an entire paragraph of text so it easiest to insert paragraph breaks between content before selecting the style.Emphasis
The top row of the editor gives easy access to bold and italics. These text effects can be difficult to read if they are used excessively and so should be reserved for emphasis.
- Bold text is useful for increasing the scannability of text and should be used to draw attention to key pieces of information. Avoid emboldening full sentences or paragraphs.
- Italics can help denote special terms. As with bold, avoid applying to full sentences or paragraphs.
The second row of the toolbar gives the ability to add underline, strikethrough, subscript and superscript.
- Underline (for example) is generally reserved on the web for marking hyperlinks. Using underline elsewhere can confuse readers who may expect it to be a link (if a student uses different colour/contrast settings for vision access, all underlined text may appear the same).
- Strikethrough (for
example) can illustrate changes or corrections but can be difficult to read. Always provide an alternate representation of the text that is struck out if it needs to be read. - Subscript (for example) is most commonly used in science and mathematics.
- Superscripts (for example) are more commonly used for functions such as ordinals and footnotes. They may also be used for trademark (TM).
Using colour for emphasis
The default editor provides no option for changing text colour. Colour in text can have unwanted effects and be distracting so should be avoided.Using links
To create a link, select the text and then click the chain icon, marked (9) on the screenshot below. Paste the URL into the field.
- The tick box “Open in a new window” will launch the page in a separate tab or window based on a users browser settings. A rule of thumb is to always load external links (that is, to sites other than ARK) so the student can access the resource and easily return to the content in the unit.
- For accessibility reasons, use descriptive links. For example:
- The Web Content Accessibility Guidelines (WCAG) explain how to make web content more accessible.
- Using click here doesn’t tell a user where the link is going
- A raw URL is unhelpful for a screen reader. Such as:
To remove a link, select the text with the link and click the break chain icon, marked (10) on the screenshot below.
Working with media
You can insert or embed images, video and interactive content in text areas using the text editor.
Caution
The practice of inserting or embedding images, video and interactive content can have Copyright implications. It is advisable to seek out images and media that are released under licenses that allow for sharing such as the Creative Commons license.
For more information contact your library staff or see the Australian Copyright Council.
Inserting images
Most browsers will allow you to drag and drop an image from your computer to the text editor. Alternatively, you can click the image icon, marked (12) on the screenshot below. To edit the settings of an image already placed in a text area, click the image and then select the image icon.
The image properties dialogue allows you to paste a link to an image elsewhere on the internet. Always place an image description to assist students using a screen reader or to explain the image in the event the link breaks.
Where possible, resize the image before uploading it to ARK to reduce the file size and subsequent load time of your unit. As a guide, images covering the full width of a course area should be no more than 1200 pixels wide. Reduce the size accordingly for images only displaying at part width of the text area (see “Best Image Size for Websites” for more information).
You can change the size and relative position of the image using the image properties box. Select Auto size to avoid warping the image.
Inserting video and sound files
As with images, audio and video can be dragged and dropped into the text editor. Links to some video hosting sites such as Vimeo or YouTube will automatically be converted into embedded content (if you don’t want this behaviour, ask your ARKLO for instruction on disabling the Multimedia Filter).
Audio and video should be hosted on a hosting site such as Vimeo to avoid adding server load and slowing ARK for all users.
The insert media dialogue allows instructors to change the size of the content, adjust playback settings and add additional subtitles or captions.
Interactive content
H5P interactive content can be inserted with the H5P icon, marked (17) on the screenshot below. Creating H5P content is a more advanced concept and will be covered elsewhere. More information is available on MoodleDocs: H5P.
Working with the code
The HTML code, marked (16) on the screenshot below, allows instructors with HTML understanding to change the appearance in ways not available in the editor menus.
Caution
Be extremely careful using code you have found on other websites. Only use it if you can understand all parts of the code. Code found elsewhere may break your ARK page or allow malicious actors access to student information. Always use the editor tools where possible and only use code if you are sure it can be trusted.Note
If you introduce custom style parameters or particularly css classes, your content may render poorly after an ARK upgrade or on mobile devices. It is best to use the provided styles to avoid against future breaking changes.The text editor interface
The text editor is used extensively throughout ARK, including posting in forums, editing section headings, activity descriptions, quiz answers and the content of blocks.
There are two rows to the editor toolbar, which can be expanded using the expand button, marked 1 below:
Toolbar Row 1

| (1) Expand | (2) Style | (3) Bold | (4) Italics | (5) Unordered list |
| (6) Ordered list | (7) Decrease indent | (8) Increase indent | (9) Create link | (10) Remove link |
| (11) Insert emoticon | (12) Insert picture | (13) Insert video | (14) Record audio | (15) Record video |
| (16) Manage embedded files | (17) Insert H5P |
Toolbar Row 2

| (1) Underline | (2) Strikethrough | (3) Subscript | (4) Superscript | (5) Left align |
| (6) Centre align | (7) Right align | (8) Equation editor | (9) Insert character | (10) Table |
| (11) Clear formatting | (12) Undo | (13) Redo | (14) Accessibility checker | (15) Screenreader helper |
| (16) Edit html code |
Footnotes
Nielsen, Jakob. 1997. “How Users Read on the Web.” Nielsen Norman Group. September 30, 1997. https://www.nngroup.com/articles/how-users-read-on-the-web/. ↩︎
“Headings • Page Structure • WAI Web Accessibility Tutorials.” n.d. Www.w3.org. https://www.w3.org/WAI/tutorials/page-structure/headings/. ↩︎
3.4 - Presenting Information
This document covers the methods and tools available for presenting static information to students on ARK. It will introduce the text and media, page, file and book resources and cover basic user interface and pedagogical design strategies to aid navigation for students.
Common Resources
There are multiple ways to present content or information to learners in ARK. The screenshot below shows the most common resources:
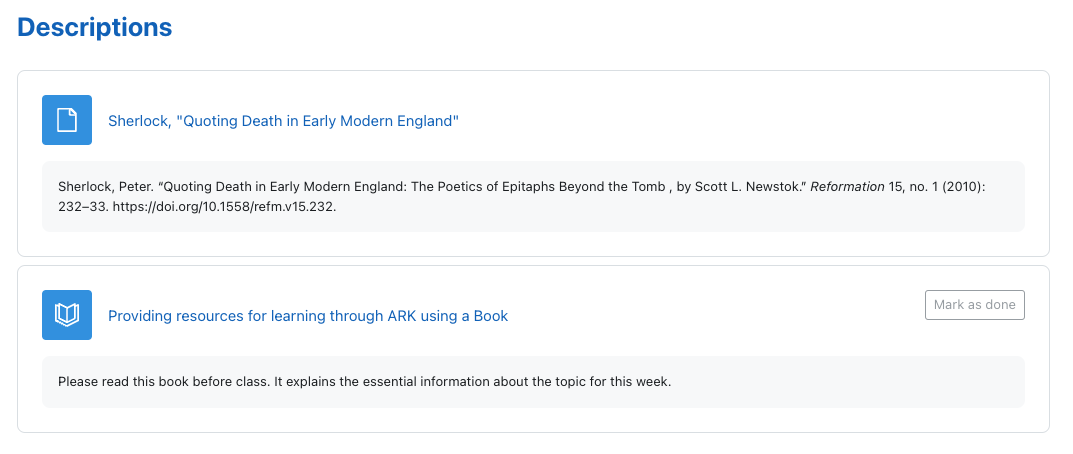
- (1) Description - the section title is followed by a description. Descriptions can be added to any activity or resource – there is also a description on the file resource.
- (2) Text and media area (previously called labels). There are three separate text and media area resources shown. The first is displaying a picture of the St Paschal’s campus, the second and third contain headings to break up the content. The first two could be combined with the description but leaving them separate makes it easier to move or duplicate parts of the content.
- (3) File resource, in this case it is a PDF. You can also add images and office documents as files.
- (4) Page resource. This shows content in a single page with all the functionality of the text editor.
- (5) Book resource. A book is a set of pages presented in a book-like format, allowing a table of contents and forward and back navigation.
- (6) URL resource. This allows you to provide links to resources elsewhere on the internet.
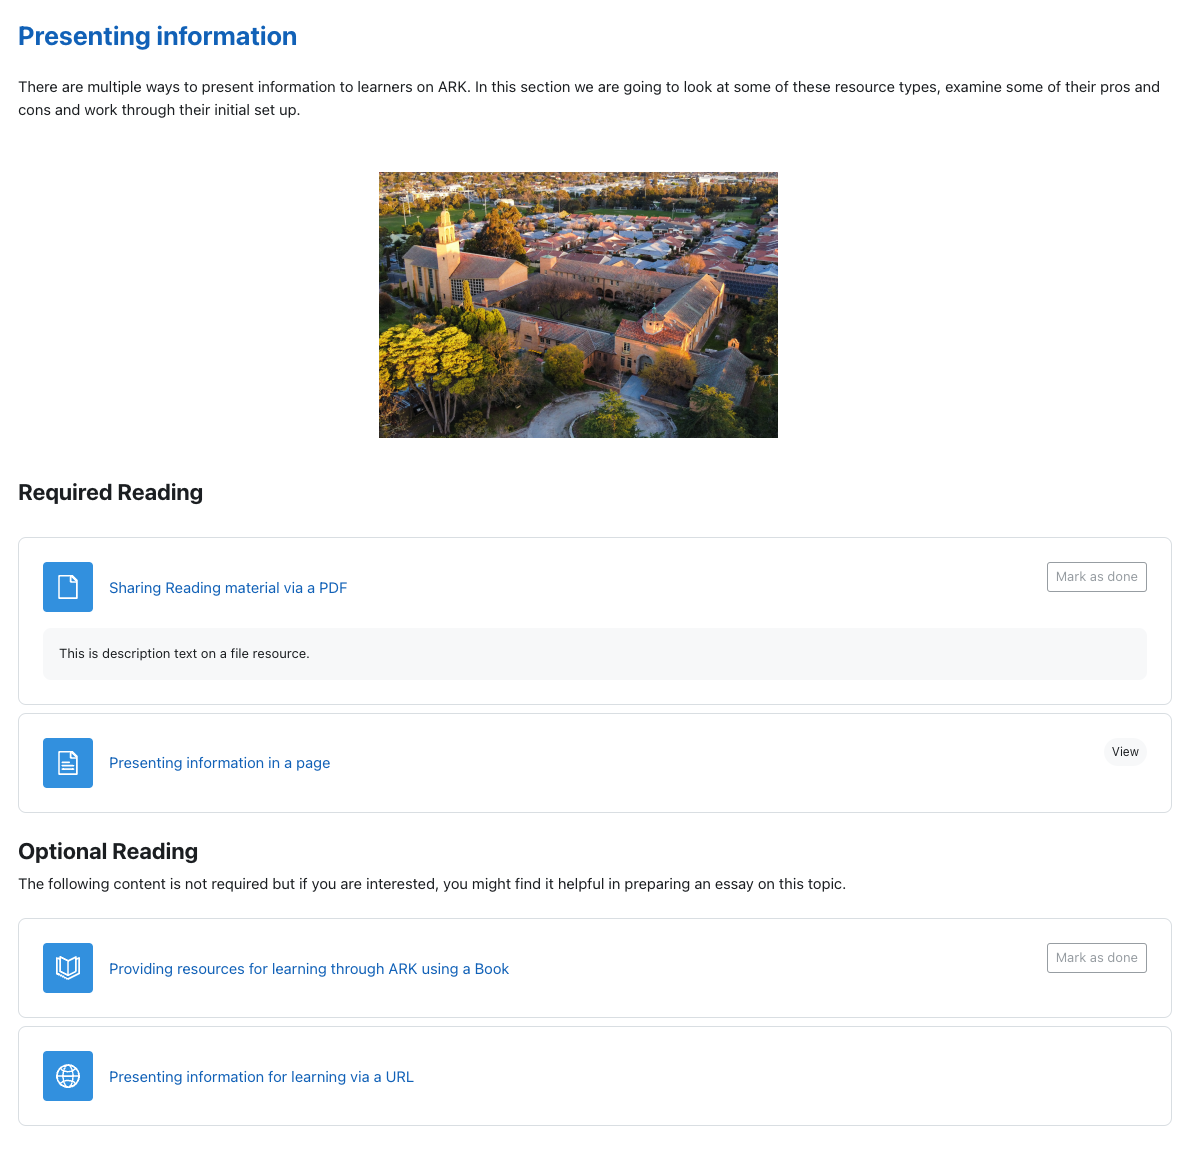
1 1 2 2 2 3 4 5 6 7 Screenshot of a sample section in Moodle. Hover over the numbers for more detail.
Selecting Resources
The above resources can be grouped into three types: presentation resources (descriptions and, text and media areas), external resources (file and URL) and internal resources (page and book) .
Presentation resources
Text and media areas (previously called labels) and descriptions help students navigate the sections in an ARK unit. They can function as signals – to point students to where information is or how it is arranged – or as direct instruction – to explain a concept or set up an activity.
Descriptions
Descriptions sit below an activity or resource and are set in the settings for the activity or resource. You can use a description to provide context for a particular activity or resource, or provide a citation.
Text and media areas
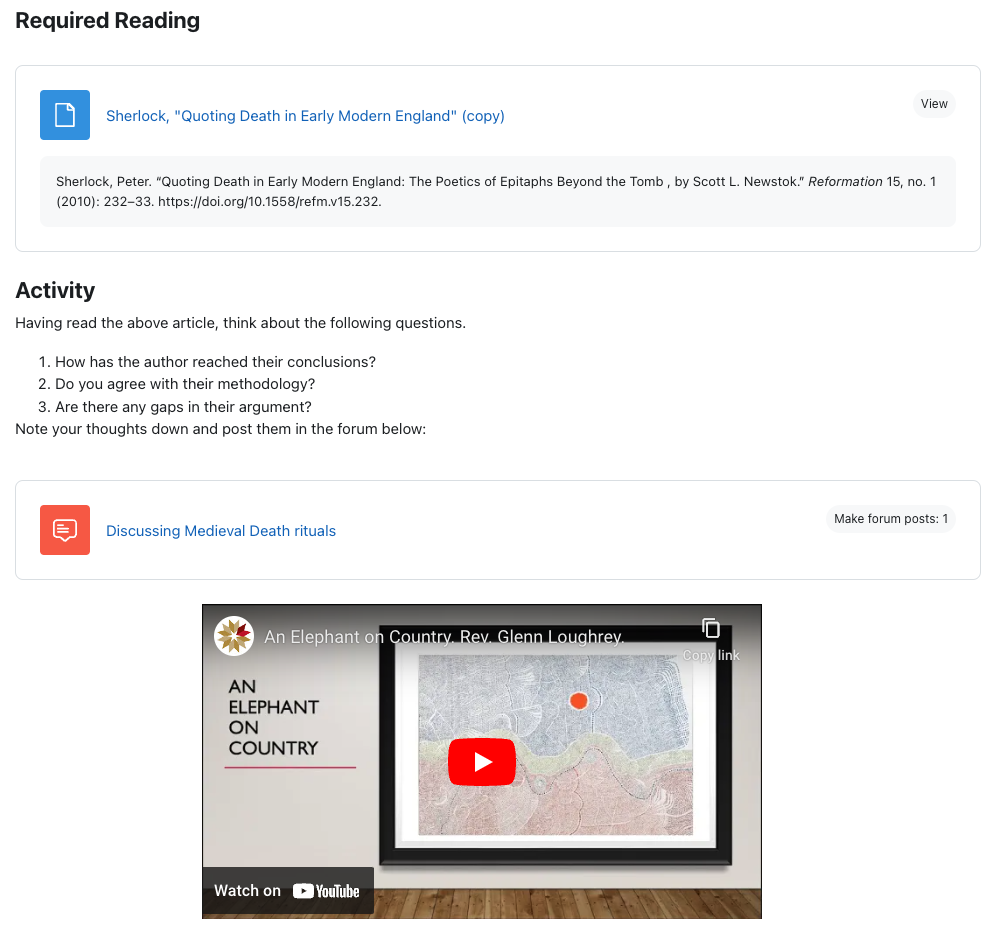
A text and media area is a way of presenting content on the section page and can be used to group or separate activities and resources, provide instruction or deliver content. In the example below, the heading is placed before the first reading to signal to students what the reading is for, a subsequent text and media area sets up an activity, and the video is placed in a text and media area for easy viewing.
External resources
In many cases, the learning resources you provide to students will be external to ARK, which you can either link to (such as an external website or Library Hub resource) or upload as a file (such as a PDF or other downloadable resource).
URL resource
A URL resource allows you to provide a link to a resource external to ARK such as the Library Hub or a website. While it is possible to hyperlink from any text in a text and media area or description, a URL resource allows you to set completion requirements to track or signal progress to the student.
File resource
A file resource allows you to share files with students. This is most commonly used to upload PDFs but can also be used to provide PPTs, Word documents or audio recordings.
Caution
The practice of uploading files, images and documents can have Copyright implications.
For more information contact your library staff or see the Australian Copyright Council.
Internal resources
ARK offers a few resources and activities to present content. The simplest of these are page and book. Pages and books both allow you to build web content in ARK with text, images and embedded content. They are considered resources as the only behaviour available to students is to view the content. Both pages and books are easily printed to PDF by students.
Other options: other methods of presenting content include the Lesson activity and the H5P activity. These activities are more complicated to setup and will be covered elsewhere.
Page resource
Page resources are best used to present content that doesn’t need extensive scaffolding for students to process or to present information that would take up too much space on the section page. For example, a page might be used to provide an extended bibliography for a topic or to collate instructions for a learning task such as an assessment.
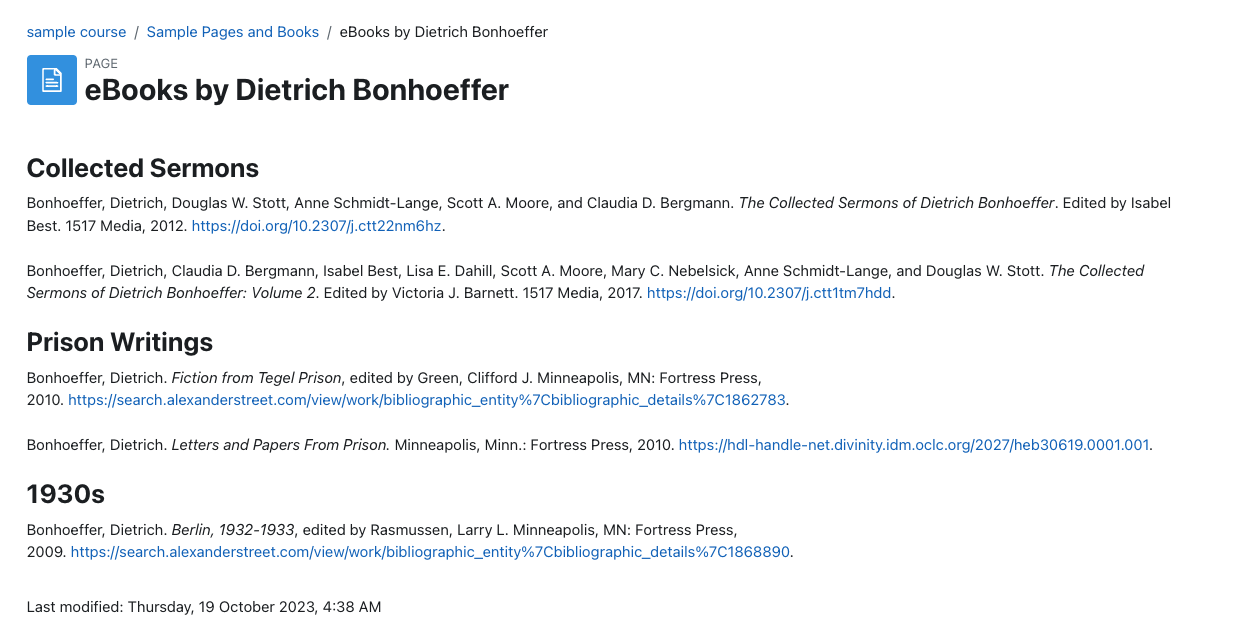
An example of a page showing a bibliography of selected Library Hub resources.
Book resource
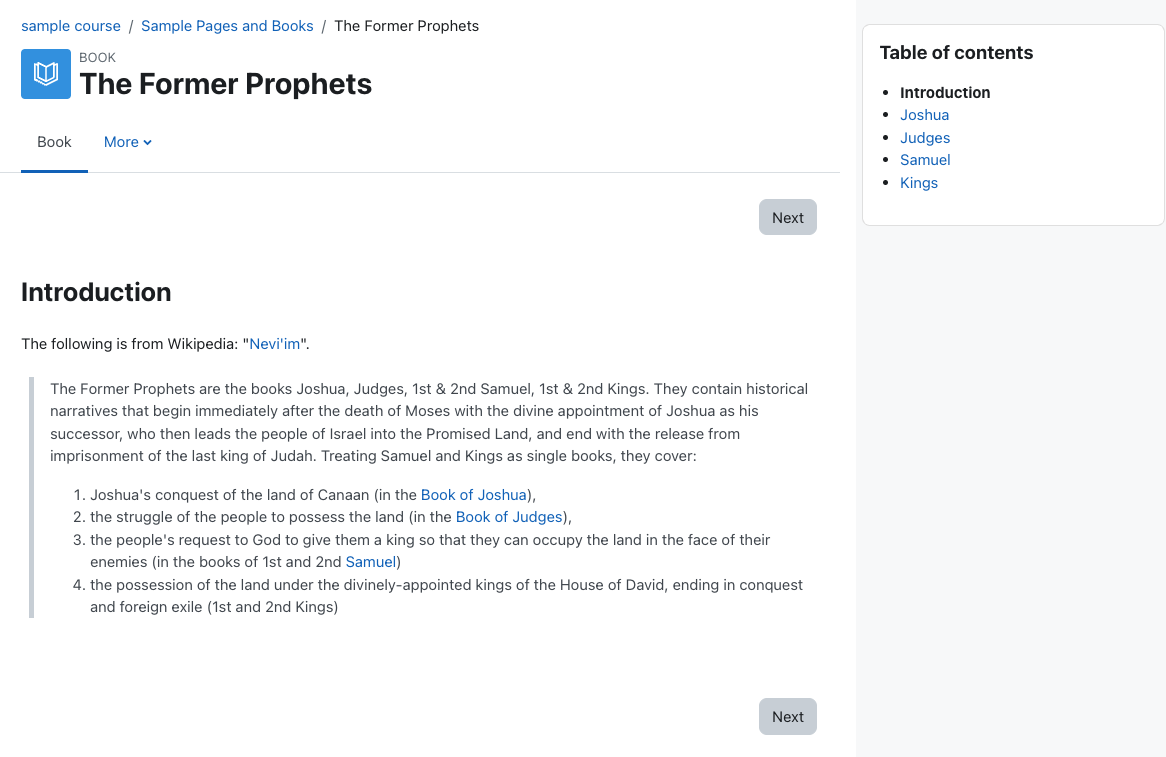
A book is a set of pages presented in a book-like format. Books are best used to present related ideas that together are too much to contain to a single page. For example, prior to a lecture on the prophets, you might wish to ensure students have a basic overview of the content and themes of each. You could create a book with a short introduction to each of them.
4 - ARK navigation
An introduction to the user interface of the ARK Learning Management System. The video below will introduce you to the key elements of using ARK.
The default setup of ARK is optimised for students. You may want to customise it for your own preferences.
On first login, you will be given a tour of the site. You can view this tour again by clicking ‘Reset user tour on this page’ in the bottom left corner.
The left navigation menu is collapsible. You can expand and collapse it by clicking on the three stacked horizontal lines in the top left corner.
Dashboard shows you a grid view of units you are enrolled in, quick links to site announcements, library resources and support, a timeline of tasks to complete and items you have recently accessed.
My units shows you units you are enrolled in.
A navigation menu top right when logged in has quick links other university sites. Resources links to Library Hub and the Style Guide. Support links to the Support Site and Support Forum. College Links to the College Website and College Library.
A user menu top right when logged in give you access to useful ARK pages and settings. You can edit your profile and preferences from there, enable student view and log out of the site.
You can access messages and notification from the icons at the top right.
