The University uses a number of software applications, websites and technologies. This section provides documentation on a number of them.
This is the multi-page printable view of this section. Click here to print.
Staff Documentation
- 1: Getting Started
- 1.1: Training
- 2: Guides
- 3: Portal
- 4: ARK
- 4.1: Getting Started with ARK
- 4.1.1: What's New in 2023 Update
- 4.1.2: Accessing ARK
- 4.1.3: The User interface
- 4.1.4: Editing a Unit
- 4.1.5: Add profile picture
- 4.1.6: About ARK
- 4.2: Setting Up Meta Units
- 4.2.1: Overview of Unit Structure
- 4.2.2: Changing Unit Settings
- 4.3: Meta Unit Content
- 4.3.1: Activity Chooser
- 4.3.2: Text Editor
- 4.3.3: Presenting Information
- 4.3.4: Adding Zoom Resources
- 4.4: Setting Up Child Units
- 4.4.1: Setting Up the Gradebook
- 4.5: Reporting and Analytics
- 4.5.1: Students At Risk (Analytics)
- 5: Forms
- 6: UMS
- 6.1: The UMS - an overview
- 6.2: Help Videos
- 6.3: Creating a Unit
- 6.4: Revising a Unit
- 6.5: College preparation of a Unit
- 6.6: External Review of a Unit
- 6.7: College endorsement of a Unit
- 6.8: Linking to the Unit Guide from ARK
- 6.9: College auditing of scheduled units
- 6.10: Markdown
- 7: Repository
- 7.1: New Publications
- 7.2: Import From Source
- 7.3: Field Requirements
- 8: Vox
- 8.1: How to Submit
- 9: Websites
- 9.1: Introduction
- 9.2: Link: Connecting Content
- 9.3: Images and Media Items: Meta-data and SEO Settings
- 9.4: Pages: Meta-data and SEO Settings
- 9.5: Documentation site
- 9.5.1: Documentation Style Guide
- 9.5.2: Code Cheat Sheet
- 10: Office365
- 10.1: UD webmail
1 - Getting Started
These pages will help you as you get started with the University of Divinity.
Login Guide
Start here to see the login guide.
ARK
ARK is the University's online Learning Environment.
Staff Documentation
Documentation on University IT systems and Applications
Staff Training
Training by the University
1.1 - Training
The University offers a number of training packages.
The University offers a number of training packages. These are typically delivered through the learning management system (ARK).
The following are offered, grouped by domain.
University
How to use ARK
- Start Teaching with ARK - This course addresses some basics on teaching with ARK. It specifically covers how to navigate in ARK and set up your teaching space.
- Course Content - This course addresses the best ways to display teaching materials and track learner progress.
- Course Activities - This course addresses ways to encourage discussion, collaboration and other interactivity in your Moodle course. You will also explore automatic and manual grading in Moodle, including quizzes and assignments.
Professional Development for Academic Staff
2 - Guides
Here you will find sequenced documentation and how to guides for University platforms.
2.1 - ARK: Signalling With Text and Media Areas
This guide introduces the design principle of Signalling and its application in Text and Media Areas on ARK.
The challenge when developing documentation and training on educational technology is that technology and pedagogy have to engage in a symbiotic relationship. Placed in binary, if you only have the pedagogy but not the skills to use the technology – you have a resourcing gap and both teaching staff and students alike will be frustrated. On the other hand, if you have the technical skills but not the design or pedagogical understanding to use the technology appropriately, bad design can also get in the way of students learning effectively.
With that tension in mind, this guide will aim to teach how a basic multimedia learning principle can be applied using a very simple technique on ARK. On the pedagogy side we’re going to be looking at the design principle of Signalling and on the technology side, we’re going to be using Text and Media Areas to achieve that on ARK.
A recording of the live presentation at Teaching Conference 2023 can be viewed or click through to each of the 4 parts to the guide for a written walkthrough.
2.1.1 - Part 1: Signalling Principle
An introduction to Signalling Principle
This document is the first part of a guide to Signalling with Text and Media Areas.
Related documentation is available for:
What will the student do now?
Whenever students access ARK, they are doing so with the intent to advance their learning. Our job as educators is to ensure that students can find the learning resources and information they need as they progress in their learning.
That’s why asking what the student is going to do on each visit is so important.
What students need to find when they access the ARK unit is based on context:
- Students get access to units a week before the start of the semester. When a student logs in on Monday, 19 February – what are they looking for?
- Students use ARK to access resources and activities during the teaching period. In a face-to-face weekly delivery, what are they looking for before or after a class? In an asynchronous delivery, is it clear what a student should be reading or participating in at the time they login?
- Finally, students use ARK to prepare for, and submit assessments. Can they find the information they need to understand the task requirements, meet those requirements, and submit the task?
Signalling Principle
One of the methods of reducing cognitive load identified by educational psychologist, Richard Mayer and colleagues is the Signalling principle. A basic implementation of this principle is to mark on a or highlight in text the information a learner needs to take note of.
Signalling (or cueing)
“multimedia learning materials become more effective when cues are added that guide learners’ attention to the relevant elements of the material or highlight the organisation of the material” 1
Applying Signalling in ARK Design
In setting up ARK units, we want to think about how we use signalling to help students:
- Locate relevant information and resources, and
- Choose which information or activity to access.
Locate relevant information
If our answer to “what will the student do now?” is “ensure they are ready to join a Zoom class”, then, is it easy to locate the Zoom links?
Effective use of ARK layout can make this easier.
Zoom Links Tip
Please create your zoom links and place them on ARK well before class. Try to have them up when students gain access to the unit, which is a week before the scheduled start date. This will make life so much easier for both the students and the various support teams.Choose which information to access
We also want to help students choose which information to access.
Very few, if any, students have the luxury of taking a unit of study with no competing interests on their time. We can’t assume a utopia where students have the time and motivation to read 300 pages every week. Further, if we want to ensure as many students as possible attain the learning outcomes, we need to help students who make time poor decisions to prioritise the time they do put towards learning.
Even the best students have crises that affect their ability to prioritise study.
Takeaway recommendations
Help students make good choices by signalling:
- The order in which tasks should be completed,
- The difference between required tasks and optional tasks, and
- An indicative time allocation for completing each task.
To test whether you have done this effectively, imagine a student who knows they have a set amount of time until they need to pick up the kids from school. If they were to open ARK and say, “I have 90 minutes to study”, would they be able to easily identify what the best use of their 90 minutes could be?
In Part 2: Building an ARK Section or Topic, we will begin applying Signalling Principle to building a section or topic in an ARK unit.
Van Gog, T. (2014). The Signaling (or Cueing) Principle in Multimedia Learning. In R. Mayer (Ed.), The Cambridge Handbook of Multimedia Learning (Cambridge Handbooks in Psychology, pp. 263-278). Cambridge: Cambridge University Press. doi:10.1017/CBO9781139547369.014 ↩︎
2.1.2 - Part 2: Adding Content to an ARK Section or Topic
Adding content to an ARK section
This document is the second part of a guide to Signalling with Text and Media Areas. Part 1 introduced Signalling Principle.
Related documentation is available for:
In this part of our series on applying Signalling Principle in ARK, we’re going to use Text and Media Areas and Activity Descriptions to Signal to students how to engage with learning materials.
ARK skills you will learn in this section include:
- working in editing mode in ARK,
- rearranging activities,
- adding activities and resources,
- using Text and Media Areas,
- using Descriptions
Introduction to the material being used
In late 2022, the IT Team began a process of reviewing and refreshing training and documentation on the platforms used by academics new to the University. In 2023, Uniting College for Leadership and Theology offered to allocate some staff time to assist us with bringing an academic’s perspective to this work, so Dr Toar Hutagalung has been assisting us in this project.

In this article, we’re going to use a week from one of Toar’s units. Toar describes the unit as follows:
This class is designed for a blended format, which means not only I am anticipating students to come in person, but students can also join online synchronously, like through zoom, and asynchronously, according to their own pace for that week, and the asynchronous students can see the recordings of the lecture. There are both level 2 and level 9 students looking at Christian histories, starting around the year of 1500 to now.
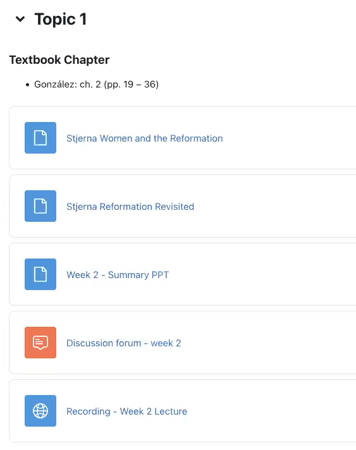
For this demonstration, Toar has given us the following:
- a description and learning objectives for the week,
- some readings and resources,
- a PowerPoint from the lecture and recording of the lecture,
- discussion questions, and
- a textbook chapter the students need to read.
Step One: Uploading Files and Adding Resources
- We’ll begin by enabling editing mode. We can do this by using the toggle in the top right corner:

- With edit mode on, drag and drop the files from our computer into the section.
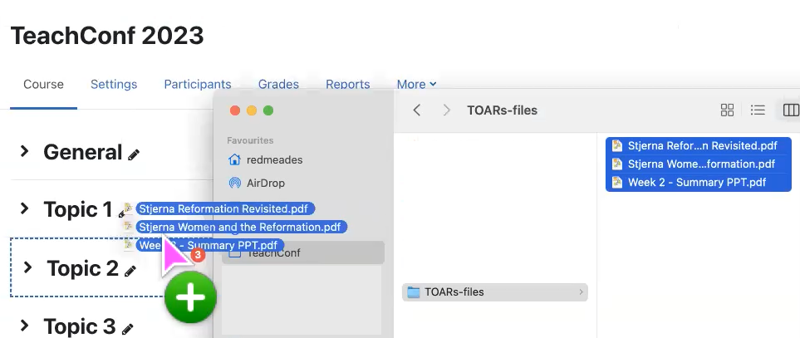
You could also click to Add an activity or resource, and select a File Resource to do this one by one. However, drag and drop is a bit quicker.
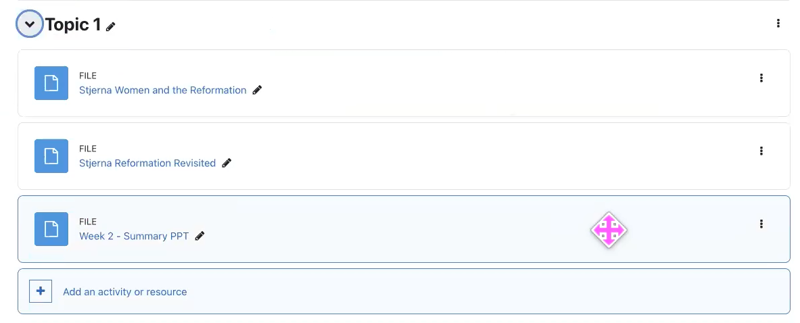
- In edit mode, we can easily reorder the content, so lets place them in the order we need them. You can do this by clicking and dragging an activity or resource to the place you need it.
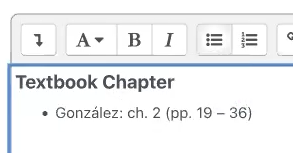
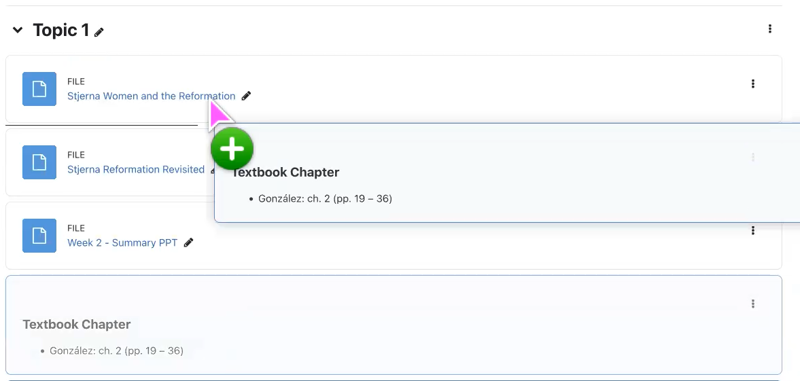
- In our example, the students read multiple chapters from the textbook so they have purchased a copy. Since we’re not uploading or linking to that reading, we want to tell the students what to read somehow. To do this, we’re going to click Add an activity or resource and click Text and Media Area. (See Activity Chooser to learn more about adding Activities or Resources.)

Note
Text and Media Area was called Label on older versions of ARK but the name has been changed. However, the functionality has not changed at all.- In the Text Editor, we’re going to paste the chapter.
We’ll make this easier to read by making the top line a small heading and adding a bulleted list to visually signal this is an action item.
See also
See the Text Editor documentation for more guidance about formatting text on ARK.- Click Save. And place it in the right spot by dragging it to the location.
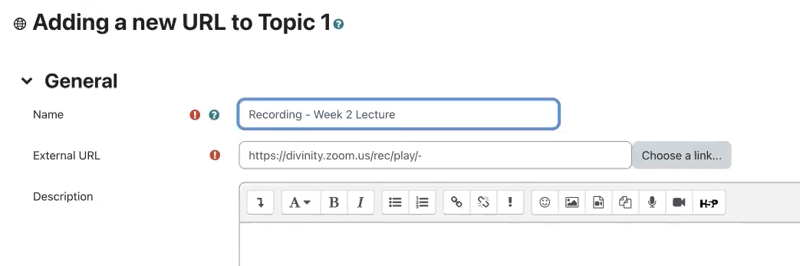
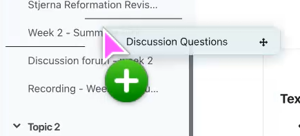
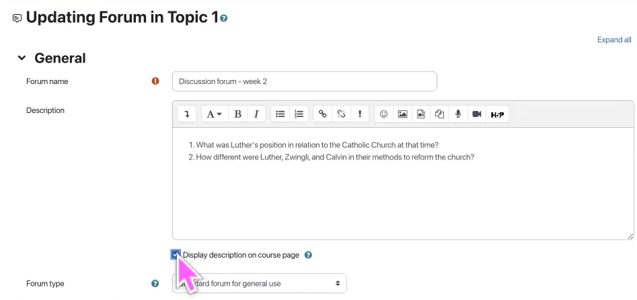
- Now, we’ll add a Forum to allow the students to answer the discussion questions. We’ll leave the forum settings as they are but add the questions to the description. We’ll present these questions as an ordered list.

- And we’ll add a URL Resource and link to the recording.
- Exit editing mode by clicking the toggle in the top right corner.
Evaluating the resulting ARK section
At this point we’ve given the students everything they need for this week. However, when a student sees a page like this, they are forced to make a few decisions they are not given information to answer:
- Do I need to read all of this?
- Do I read it in this order?
- How long will it take?
- What if I don’t have time?
It can be helpful to think of digital experiences in terms of physical analogues. Adding readings to ARK without clear directions and signalling, is like walking in to class and leaving a pile of handouts underneath your laptop, never referring to it in class and then asking the students the following week if they completed the reading.
If we revisit Signalling Principle, we recall:
“learning materials become more effective when cues are added that guide learners’ attention” 1
Step Two: Applying Signalling Principle
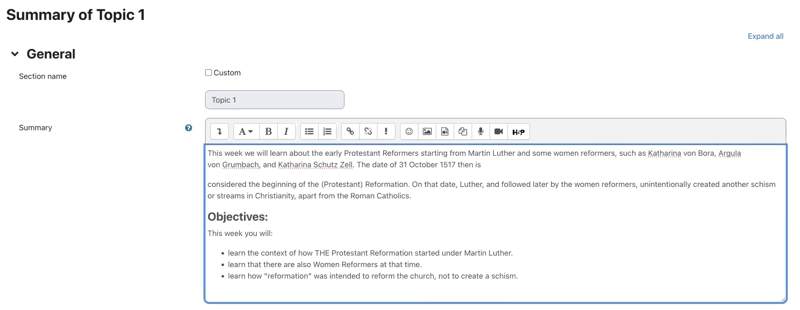
- We’ll begin by adding an introduction to the week. We’re going to enter Editing mode and click the three dots to the right of the section name to edit the section description.
- We’ll paste a description of what we’re doing this week and the learning objectives.
- And apply some formatting to make this neater. We’ll make Objectives a medium sized heading and turn the objectives into an unordered list.
- Click Save changes.
Step Three: Organising the Content
This is where Text and Media Areas really shine. A Text and Media Area is exactly what it sounds like, an area on a section page that can be used to display Text and Media. You can use them to:
- provide directions,
- add illustrations,
- instructional content,
- or other text and media material
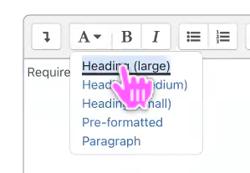
- Click Add an activity or resource and select Text and Media Area.
- Add our text and make it a large heading.
- Click Save and return to course.
- We need a few of these so we’ll speed up the process by clicking on the 3 dots to the right of the resource, and select Duplicate.
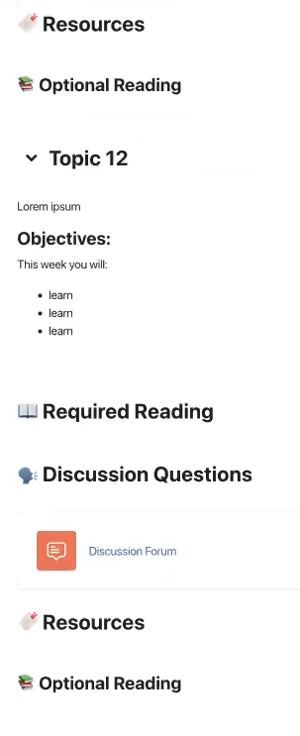
- Edit that Text to say Optional Reading and we will make this a medium sized heading.
(I’ve also added a Resources text area and a Discussion Questions text area).
Step Four: Sequencing the Content
Web usability studies have long pointed to the problem of getting users to move deeper into the page, either by clicking onwards or scrolling down (see Amy Schade, “The Fold Manifesto: Why the Page Fold Still Matters” (Nielsen Norman Group)). We don’t want to bury the actions we want the students to do, so if you have optional material, apply the inverse pyramid principle to your section pages by placing important and required material at the top and optional material towards the bottom.
With that in mind, we’ll move the Optional Reading down below the Resources.
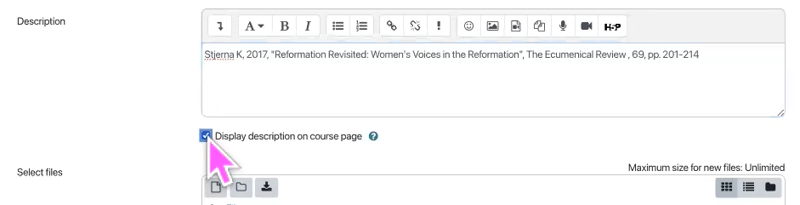
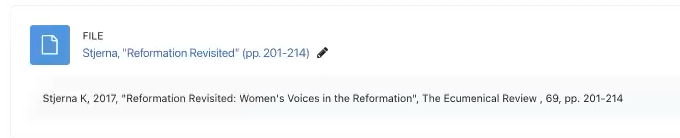
We will tidy up some of the Drag and Drop files by renaming the readings and providing a citation. We’ll open the settings and change the name to include a short citation.
We’ll include the page numbers in the title because it helps students gauge how much time they will need to complete the task.
We’ll add a citation. To show the citation, we will click Display description on unit page. Save changes and return to unit.
Repeat for the other reading. Updating the title and description. Clicking to display description on unit page.
We’ll make it easier for students to prepare for the forum by showing the description for that on the unit page.
Disable edit mode.
Step Five: Remove any Guesswork
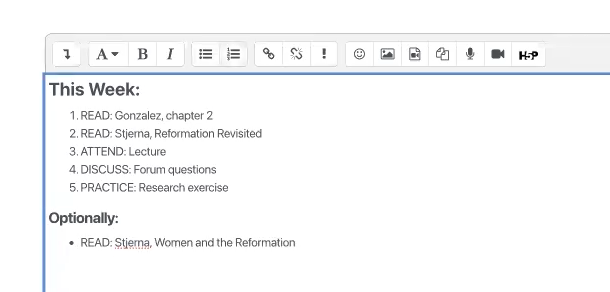
We can improve our signalling further by providing clear instructions for the students as to what they will be doing this week. To do that we’re going to add a task list to the top of the section.
- Add another Text and Media area. We’ll make the first line a medium heading and create an ordered list for the required reading and activities. We’ll let the students know there are additional resources at the bottom of the section, making that a medium heading an unordered list – they can do it in whatever sequence they like.
- Now we’re going to reorder this. In the new version of ARK, we can do this by using the sidebar. When editing mode is enabled, you can reorder items in the sidebar, including dragging content from the main section to somewhere in the sidebar.
- Turn off editing mode.
Tip
Now you might be wondering why that last Text and Media Area isn’t just part of the description. This is just a trick to make editing easier later. Text and Media Areas are easier to duplicate and re-sequence than descriptions.
The only catch is you need to be mindful of trailing paragraph breaks at the bottom of your text editor to avoid massive gaps between text areas.
Van Gog, T. (2014). The Signaling (or Cueing) Principle in Multimedia Learning. In R. Mayer (Ed.), The Cambridge Handbook of Multimedia Learning (Cambridge Handbooks in Psychology, pp. 263-278). Cambridge: Cambridge University Press. doi:10.1017/CBO9781139547369.014 ↩︎
2.1.3 - Part 3: Applying Signalling Principle to an ARK section
Applying Signalling Principle to building a section or topic in an ARK unit.
This document is the third part of a guide to Signalling with Text and Media Areas. Part 1 introduced Signalling Principle and Part 2 demonstrated Adding Content to an ARK Section.
Related documentation is available for:
In this part of our series on applying Signalling Principle in ARK, we’re going to use Text and Media Areas and Activity Descriptions to Signal to students how to engage with learning materials.
In this section you will learn:
- effective use of section descriptions
- using the inverse pyramid principle to order content
- a simple way to signal a week’s structure to students
Step Two: Applying Signalling Principle
- We’ll begin by adding an introduction to the week. We’re going to enter Editing mode and click the three dots to the right of the section name to edit the section description.
- We’ll paste a description of what we’re doing this week and the learning objectives.
- And apply some formatting to make this neater. We’ll make Objectives a medium sized heading and turn the objectives into an unordered list.
- Click Save changes.
Step Three: Organising the Content
This is where Text and Media Areas really shine. A Text and Media Area is exactly what it sounds like, an area on a section page that can be used to display Text and Media. You can use them to:
- provide directions,
- add illustrations,
- instructional content,
- or other text and media material
- Click Add an activity or resource and select Text and Media Area.
- Add our text and make it a large heading.
- Click Save and return to course.
- We need a few of these so we’ll speed up the process by clicking on the 3 dots to the right of the resource, and select Duplicate.

- Edit that Text to say Optional Reading and we will make this a medium sized heading.
- Repeat steps 4 and 5 for a Resources heading and a Discussion Questions heading.
Step Four: Sequencing the Content
Web usability studies have long pointed to the problem of getting users to move deeper into the page, either by clicking onwards or scrolling down (see Amy Schade, “The Fold Manifesto: Why the Page Fold Still Matters” (Nielsen Norman Group)). We don’t want to bury the actions we want the students to do, so if you have optional material, apply the inverse pyramid principle to your section pages by placing important and required material at the top and optional material towards the bottom.
- With that in mind, we’ll move the Optional Reading down below the Resources. You can reorder content by dragging and dropping items in the course index which is in the left sidebar menu.
- We will tidy up the naming of some of the Drag and Drop files by renaming the readings and providing a citation. We’ll open the settings and change the name to include a short citation.

We’ll include the page numbers in the title because it helps students gauge how much time they will need to complete the task.
- We’ll add a citation. To show the citation, we will click Display description on unit page. Save changes and return to unit.
- Repeat for the other reading. Updating the title and description. Clicking to display description on unit page.
- We’ll make it easier for students to prepare for the forum by showing the description for that on the unit page.
- Disable edit mode.

Step Five: Remove some Guesswork
We can improve our signalling further by providing clear instructions for the students as to what they will be doing this week. To do that we’re going to add a task list to the top of the section.
- Add another Text and Media area. In this Text and Media Area, we’re going to give a list of what the student will be doing this week.
We’ll make the first line a medium heading and create an ordered list for the required reading and activities. We’ll let the students know there are additional resources at the bottom of the section, making that a medium heading an unordered list – they can do it in whatever sequence they like.
Place this text at the top below the description.
Turn off editing mode.
Tip
Now you might be wondering why that last Text and Media Area isn’t just part of the description. This is just a trick to make editing easier later. Text and Media Areas are easier to duplicate and re-sequence than descriptions.
The only catch is you need to be mindful of trailing paragraph breaks at the bottom of your text editor to avoid massive gaps between text areas.
We now have a section that looks something like this:
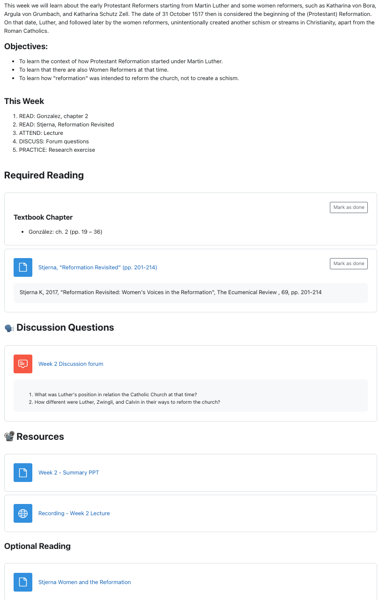
This gives us a section in ARK that:
- Clearly indicates to students what they will be learning,
- What they need to do this week, and
- The order in which they should complete the material.
2.1.4 - Part 4: Using Templates to Build Units
Using templates to speed up the process of building well designed units
This document is the fourth part of a guide to Signalling with Text and Media Areas. Part 1 introduced Signalling Principle, Part 2 demonstrated Adding Content to an ARK Section and Part 3 demonstrated Applying Signalling Principle with Text and Media Areas
Related documentation is available for:
In this final part of our series on applying Signalling Principle in ARK, we’re going to use Course Reuse to speed up the process of building a unit.
ARK skills you will learn in this section include:
- working with templates
- course reuse
We can make this even easier by using a template. Templates are a way of avoiding unnecessary repetitive work. Its easier to delete content then it is to add it – so if you don’t use the forum in a given week, you can just hide it or delete it.
Lets show you what I mean.
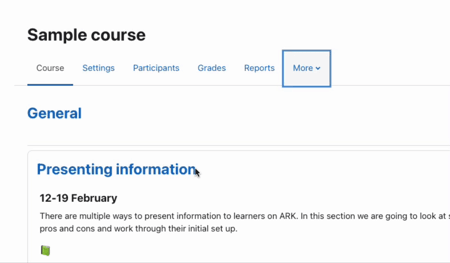
- Scroll to the top of the unit and from the unit navigation, click More. At the bottom click Course Reuse.
- We’ll stick with Import and search for Template. Select the Template we’re going to use. Click Continue.
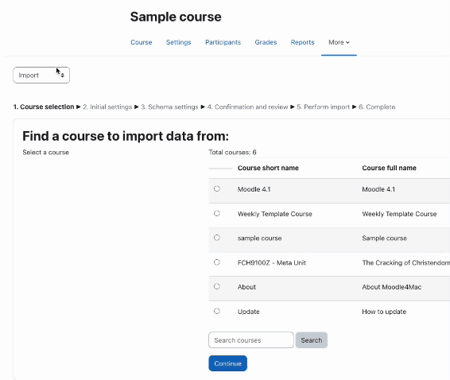
- In this case we will Jump to the Final Step but if you want, you can pick and choose what you want to import from the template.
Now all we need to do is upload the readings and add the relevant text. You can use the templated design and focus on teaching content.
For more information on importing from a template or other unit, see the MoodleDoc, Import course data.
3 - Portal
Portal will become the central place to visit to access and manage all of your University information.
3.1 - Getting Started with Portal
This document introduces University staff to Divinity Portal, including how to login to Divinity Portal and accessing applications on Divinity Portal.
Divinity Portal is located at portal.divinity.edu.au. This will become the central place to visit to access and manage all of your University information. New features will become available to you as they are added.
Logging in to Portal
When you visit portal.divinity.edu.au, you will be asked to login using Single Sign-On (SSO). For instructions on using your SSO login, see the SSO Migration Guide.
Portal Home
On the Divinity Portal home, you will see Applications that are applicable for your role and permissions. Click on an Application to access the information or actions available in that Application.
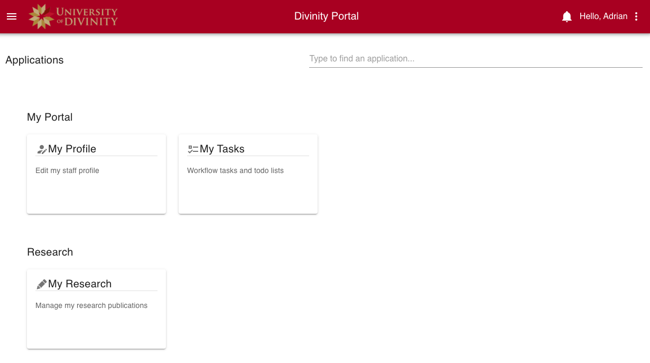
The Portal home presents Applications based on your role and permissions. You can search for applications using the ‘Search’ field on the main page. You can also view and search applications using the Left Navigation menu (see below.)
Navigating Portal
Breadcrumbs
Portal Applications will remain open in a list of breadcrumbs at the top of the page, allowing you to quickly switch between applications. They can be closed by clicking the close icon " “. (Note that you cannot close the application that you are currently using.)

Switch or close applications from the breadcrumb menu.
Left Navigation
The left navigation menu is available throughout the site and can be opened and closed from the hamburger menu icon:
All available Portal Applications can be opened from the left navigation menu throughout the site:

Right Navigation
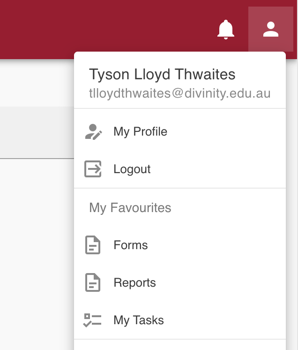
On the right-hand side of the header, you can find your personal navigation icons.
- the bell icon will show your notifications, such as new tasks
- the user icon will open your user menu, with links to your favourite applications, display preferences, and account actions
3.2 - Updating Your Staff Bio
College and University academics, researchers and support staff can update their staff biography (bio) which appears on staff.divinity.edu.au.
Your staff bio appears as part of your staff profile on staff.divinity.edu.au alongside your profile picture, research output and appointments.
You can update your staff bio on Divinity Portal. Information about accessing Divinity Portal can be found on the Divinity Portal Getting Started guide.
Update Process
Navigation update
Note that the navigation to the bio editor has changed.1. From Divinity Portal home, open the ‘My Profile’ application:
Option 1: Use the home page search bar
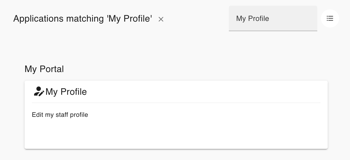
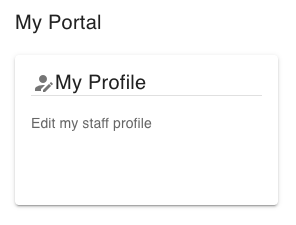
- Click on the My Profile card.
Option 2: Shortcut in your user menu
Open the user menu and choose ‘My Profile’
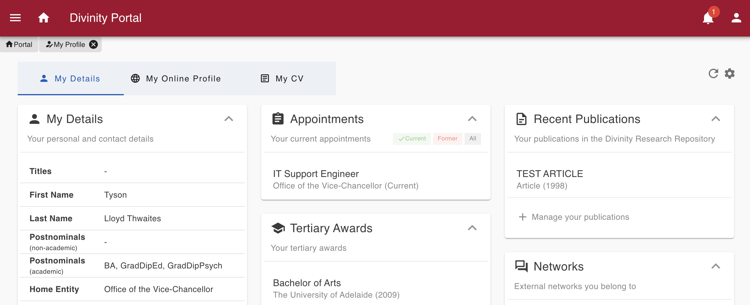
2. Your ‘My Profile’ page shows an overview of your profile information.
- My Details: this tab shows all of your current records and research output
- My Online Profile: this tab allows you to preview and edit your Online Profile
- My CV: this tab shows a full summary of your CV in printable format
Click on the My Online Profile tab.
3. Your current bio text and profile image will be displayed for review.
- Click your bio text to begin making changes
- Click your profile image to upload a new profile image
- You can also remove your profile image altogether
- Click your bio text to open the text editor
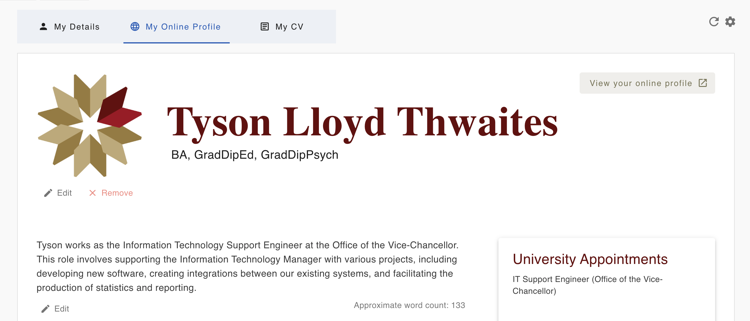
You can click on the pencil (edit) icon, or click the text itself to being editing
- Update your profile by entering text in the text area.
- You can use the tool menu to add links and basic formatting.
- Limit styling to links and italics, and avoid changing colours or text sizing.
- See the Profile Guidance notes for recommendations on style, content, and structure.
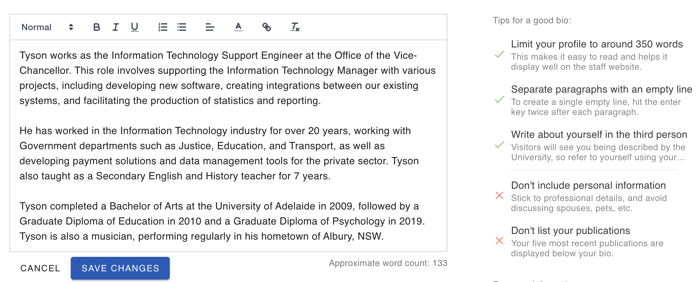
- Save your edits by clicking the blue Save Changes button in the lower left of the page.

4. Your changes will be queued for upload to the staff site.
- Changes are usually applied within 5 minutes, but it may take up to an hour.
- You can click the View your online profile button on the top-left of the page to see your live profile.
- If your changes have not been applied after 24 hours, or are not displaying correctly, please email support@divinity.edu.au for help.
Profile Guidance Notes
A well-written public profile will improve the visibility of both you and the University.
Note
This is a formal University profile. Please do not include personal information such as spouses, children, pets etc. If you feel this information is particularly relevant to your bio please contact the Office of the Vice-Chancellor first to discuss relevance.Length
As a guide, please limit your profile to around 350 words. This will ensure that your profile displays neatly and is easy to read.
Style
Write in the third person (you are writing from the perspective of the University). Feel free to use your ‘preferred name’ within your bio. For grammar and formatting, refer to The Chicago Manual of Style Online
Structure
Structure your biography addressing six key areas (or as many as are relevant to you). Separate each area with a paragraph break.
The biography should begin with a short overview (e.g. how you would be introduced at a professional event). Following the overview, address the remaining five areas in order as is applicable to you.
| Paragraph | Content | Recommended Length |
|---|---|---|
| 1 | Overview | Two or three sentences |
| 2 | Academic/professional achievements | 100 words |
| 3 | Research Interests | 100 words |
| 4 | Teaching | 100 words |
| 5 | Media involvement as an academic | 50 words |
| 6 | Church and community engagement | 50 words |
Note
Your 5 most recent publications will automatically be displayed on your Profile, along with a link to all of your publications in the Research Repository. You do not need to list your publications in your bio.4 - ARK
Learn how to use the University’s Learning Management System, ARK.
4.1 - Getting Started with ARK
This section assists all staff at the University in accessing units on the Learning Management System, ARK.
This guide is designed to aid new teaching staff at the University on the ARK Learning Management System located at ark.divinity.edu.au.
It is written based on Moodle 4.1 functionality which the University upgraded to in December 2023.
Introducing ARK
ARK is the University of Divinity’s Learning Management System located at ark.divinity.edu.au. ARK is an online software solution “used in all courses and units of study as a means of supporting and enhancing student learning and facilitating access to learning materials.”1
Footnotes
4.1.1 - What's New in 2023 Update
This document will assist staff with understanding what new features are available in ARK from December 2023.
In December 2023, the University upgraded ARK to Moodle 4.1. This document will assist staff with understanding what new features are made available and the different methods of using ARK in the new version.
Logging In
All users will now login to ARK with Single Sign On (SSO).
If you have used Forms, Portal or UMS, you are already set up with SSO and can use your existing username and password to login. If you are already logged in to Forms, Portal or UMS when accessing ARK, you will be automatically logged in to ARK without needing to re-enter your credentials.
If you haven’t logged into SSO previously, your username will be the email address registered on StaffPlus - the University’s personnel management platform (this will be the email you have been using to log in to the old ARK site) and you can set a password by using the Forgot Password link. You will receive an email with a link to reset your password. For further assistance, see the Login Guide.
New Navigation
Dashboard and My Units
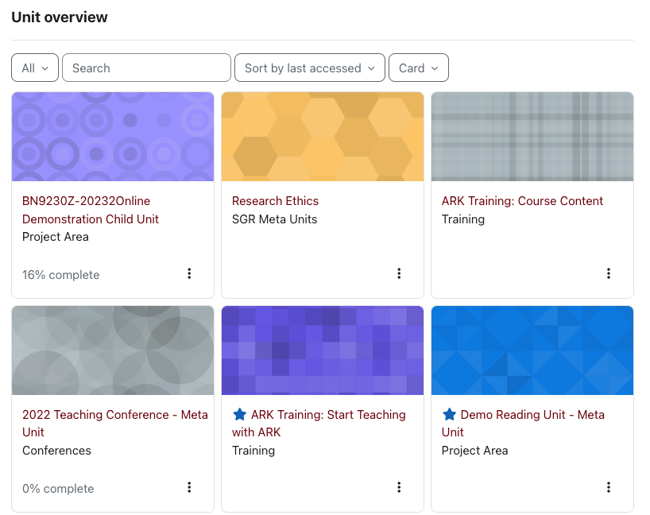
A new My Units page in the top navigation menu makes it easy to locate your units.

On this page you will find an updated Unit Overview block with the ability to filter by a search term.
Tip
Using this search filter will make it easy to find meta or child units. For example:
- Search “meta” to only show meta units
- Search the current year (e.g. “2024”) to find only child units
- Add the numerical start month of the unit after the year to narrow to current child units (e.g. “20242” will filter to units starting in February 2024) - n.b. the month is single digit unless November or December
- Add the discipline code and a space before the year to find just units in a particular discipline (e.g. “BN 2024” will find units in New Testament in 2024)
Unit Navigation
The screenshot below highlights enhancements to unit navigation and presentation. Hover over the numbers on the screenshot below for more on each interface element:
- (1) Unit Index - a new collapsible Unit Index navigation menu makes navigating through courses easier.
- (2) Contextual navigation - find your way around units and activities with the contextual tab menu.
- (3) Block drawer - collapse or expand the block drawer
- (4) Edit mode toggle - the toggle in the top right of the interface makes it easy to enter and exit edit mode
- (5) New activity icons - modern icons enhance unit presentation
- (6) New activity completion badges - improved presentation of completion status and requirements
Edit Mode
Interface
The screenshot and animations below highlight enhancements to the Edit mode interface. Hover over the numbers on the screenshots for more on each interface element:
- (1) Edit mode toggle - the toggle in the top right of the interface makes it easy to enter and exit edit mode
- (2) Add blocks buttons - an easy to find button to add blocks.
- (3) Add activities and resources button - a simple click button to add activities and resources

Reorder content
It is now easier to reorder content with a simple drag and drop.

You can also reorder content from the Unit Index.

4.1.2 - Accessing ARK
Learn how to access the ARK Learning Management System.
Accessing ARK
ARK is located at ark.divinity.edu.au. You can also find a link to ARK at the top of the University of Divinity website.
On visiting the ARK page, click Student or Staff Login to sign in to the site:

Username and Password
The login credentials for ARK use Single Sign On (SSO Account). For instructions on changing or resetting your Single Sign On account, visit the Login and Password Guide.4.1.3 - The User interface
Learn how to navigate the ARK user interface and access user settings.
This document is an introduction to the ARK user interface. It is applicable to all staff and students of the University.
Navigating ARK
On first login, users are given a guided tour of the interface. This tour can be viewed again by clicking the ‘Reset user tour on this page’ link at the bottom of the site.
Dashboard and My Units
The My Units page in the top navigation menu makes it easy to locate your units.
Choosing visible units
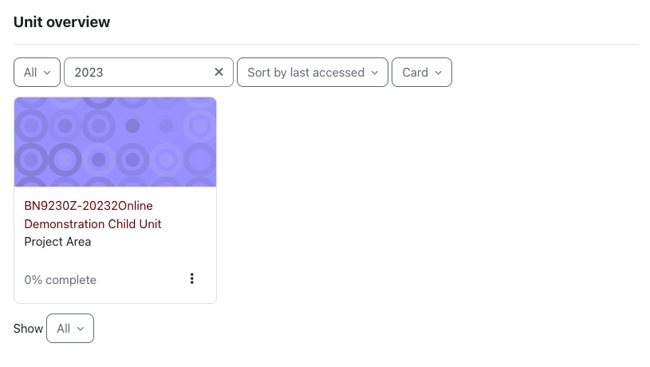
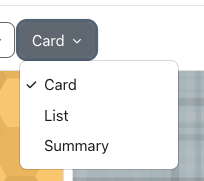
The unit overview block shows units in which the user is enrolled as an Editing Teacher, Teacher, or Student. Users can customise the view of units and filter units to easily locate what they need. The screenshot below highlights the following elements:
- (1) Filter by status - filter by All, In progress, Future, Past, Starred and Removed from view
- (2) Search filter - filter units by name
- (3) Sort - sort units by Last Accessed or Unit Name
- (4) View mode - view listed units in Card, List or Summary view
Filter by status
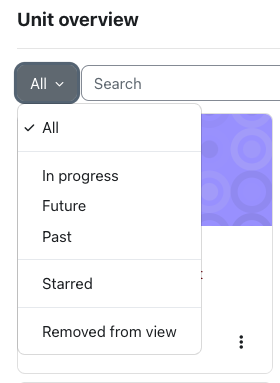
The left-most drop down menu in the Unit Overview block allows you to select from the following view options:
- All - All units you are enrolled in are displayed, unless you hidden some units.
- In Progress - Units for which the current date is after the unit start date, and where no end date is set or the end date is in the future. Teaching staff can set the Start Date and End Dates of Meta Units from the unit settings page.
- Past - Units for which the End Date is in the past unless Course Completion settings have been set and the course completion criteria have not been met.
- Future - Units for which the Start Date is in the future.
- Starred - Only units you have Starred will show.
- Removed from view - If you have hidden units, you can find those units from this view.
Starred and hidden units
Starred units allow you to bookmark or favourite a set of units and only show those units. You can also choose to hide units.
- To ‘star’ (bookmark) a unit, click the three dots by its name and click “Star this course”.
- To hide a unit, click the three dots by its name and click “Remove from view”.
Tip
If you choose to filter by starred, or hide units, you may wish to make a note that you have done this in your calendar so that you remember in the lead up to the next semester.Search filter
The search field in the Unit Overview block allows you to filter by a search term.

Tip
Using this search makes it possible to filter by meta or child units. For example:
- Search “meta” to only show meta units
- Search the current year (e.g. “2024”) to find only child units
- Add the numeric start month of the unit to the end of the year to narrow to current child units (e.g. “20242” will filter to units starting in February 2024)
- Add the discipline code and a space before the year to find just units in a particular discipline (e.g. “BN 2024” will find units in New Testament in 2024)
Sort
Sort the view of units by unit name or last accessed.
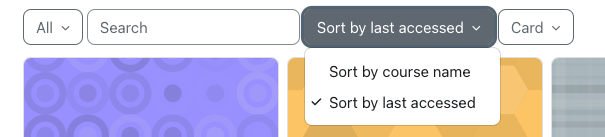
View mode
Change the way units are displayed in the Unit Overview block to Card, List or Summary.
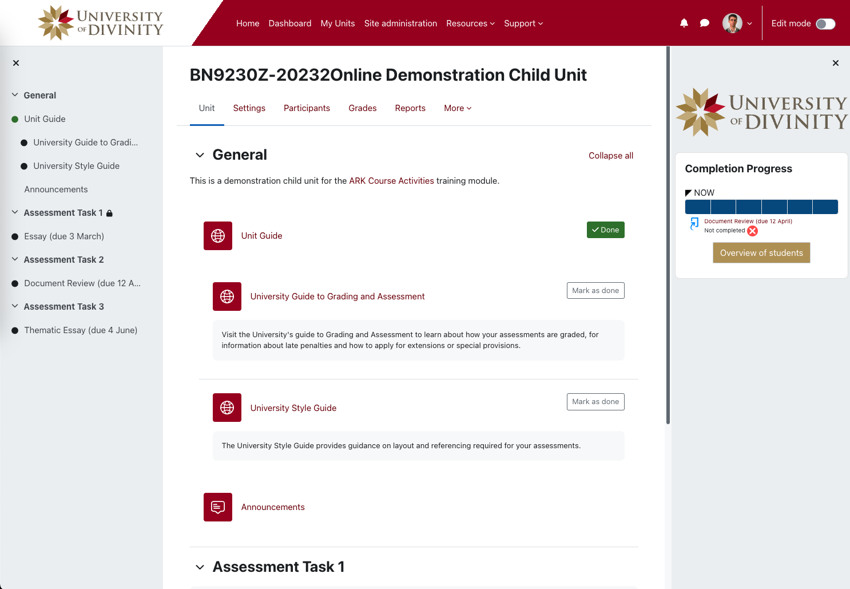
Unit Navigation
The screenshot below highlights key components of unit navigation and presentation. Hover over the numbers on the screenshot for more on each interface element:
- (1) Unit Index - a collapsible Unit Index makes navigating through courses easier.
- (2) Contextual navigation - find your way around units and activities with clear tab menus.
- (3) Block drawer - collapse or expand the block drawer
- (4) Edit mode toggle - easy edit mode toggle makes entering and exiting edit mode simple
- (5) Activity icons - modern icons enhance unit presentation
- (6) Activity completion badges - activity completion badges signal to learners completion status and requirements

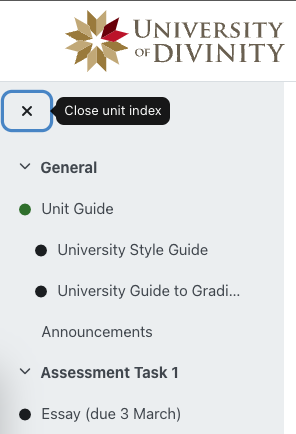
Unit Index
The left navigation menu is collapsible and enables easy access to different parts of a unit. Click the menu icon to open and X to close.
Contextual Navigation Menu
The contextual navigation menu underneath the unit title will present options for configuring or reports on the unit, activity or resource you are viewing. On the unit page, it provides access to the unit content, settings, participants list, grades and reports. The more dropdown menu provides access to the question bank, content bank and the course reuse page allowing content to be imported from one unit to another.

4.1.4 - Editing a Unit
How to enable editing on ARK.
Teachers with Editing Teacher privileges in a unit are able to make changes to settings, add content and reorder parts of the unit.
Edit Mode
Interface
The screenshot and animations below highlights enhancements to the Edit mode interface. Hover over the numbers for more on each interface element:
- (1) Edit mode toggle - toggle the switch in the top right of the window to enter or exit edit mode
- (2) Add blocks button - use this button to add blocks to the block drawer
- (3) Edit item names - click the pencil icon to rename items
- (4) Edit menu - click the ellipsis icon to access the edit menu for sections, activities or resources
- (5) Add activities and resources button - a simple click button to add activities and resources

Edit Mode Toggle

The edit mode toggle in the top right of the ARK window allows you to enter editing mode. Toggle it again to exit editing mode.
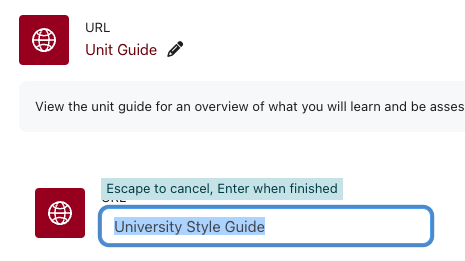
Rename content
To rename content, click the pencil icon and type your changes. Press enter to save or the escape key to cancel.
Reorder content
To reorder content, select the 3 dots to the right of an activity or resource and click the move icon (or just click the item and drag). You can drag the item up or down the page, or drag it to a place in the unit index.

You can also reorder content using the unit index.

Item edit menu
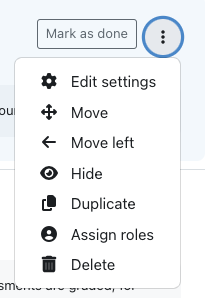
From the 3 dots to the right of an item, you can access the settings for that item, hide it, duplicate it or delete it.
The edit menu next to a section allows a section to be highlighted, which places a border around the section to mark it to learners. You might want to do this to aid students in finding the current week faster.
Note
Depending on unit layout settings, you will not be able to add a topic directly on the unit page but will need to go to unit settings, Edit Format and set the “Number of sections”.Adding content
When in edit mode, you can drag and drop files from your computer to add them to the unit.
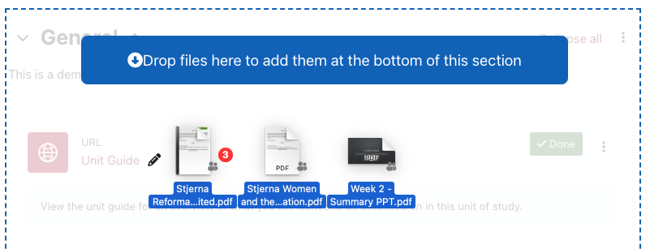
You can also add activities or resources by clicking the Add an activity or resource button.

Moodle Course Editing Overview video
4.1.5 - Add profile picture
How to add a Profile Picture on ARK
Adding a profile picture will help people recognise you when you participate in activities on ARK such as forums.
Step 1: Login to ARK using your login email and password.
Step 2: Click on your name in the top right corner.
Step 3: Click Profile from the drop down menu.
Step 4: Under the heading ‘User details’, click Edit profile.

Step 5: Scroll down until you see the heading User picture.
Step 6: Click the Add… button. The button is an icon of a piece of paper.
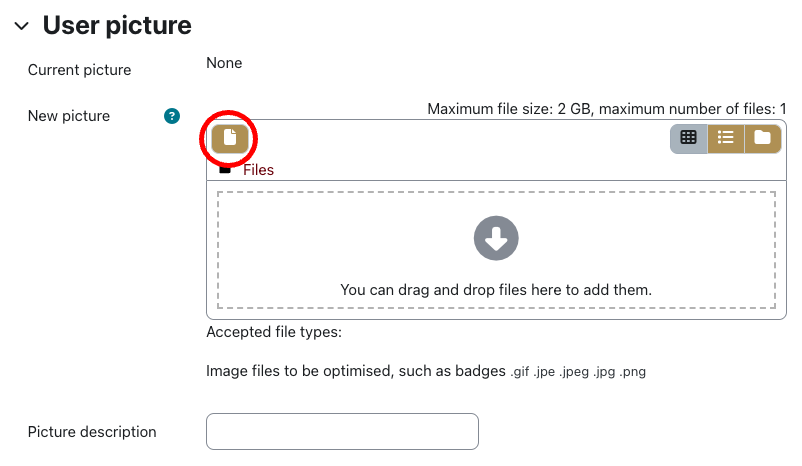
Step 7: Click the Choose file button to Upload a picture from your computer.
Step 8: When you have located the picture you wish to upload, click on it.
Step 9: Click Upload this file.
Step 10: When you are done updating your profile, be sure to press the Update profile button at the bottom of the page to save your changes.
4.1.6 - About ARK
Key information about ARK software and further help resources.
ARK runs on Moodle software. In December 2023, the University upgraded from Moodle version 3.9 to Moodle version 4.1. Outside of this documentation, there are two authoritative sources of help for using Moodle:
- MoodleDocs 4.1 - MoodleDocs is the extensive documentation site for Moodle with granular instructions on all functions of the software. (When using MoodleDocs, make sure that the help document matches the version of ARK. As of December 2023, ARK is using Moodle 4.1).
- Moodle Academy - Moodle Academy provides a self-paced online learning program for using Moodle including certification. Parts of this Getting Started guide are based on Moodle Academy courses.
Moodle Pedagogy
Moodle is designed on a social constructionist pedagogy. In short, social constructionism holds that we learn best when we construct meaning for ourselves in dialogue with others.
Moodle aims to achieve this by providing Resources and Activities. Resources are materials that the student is presented by the instructor and Activities are materials that the students interact with in some way, either by themselves or collaboratively with other learners.
Visit MoodleDocs to learn more about the Philosophy and Pedagogy of Moodle.
4.2 - Setting Up Meta Units
Discover how to design and configure a meta unit for effective delivery.
4.2.1 - Overview of Unit Structure
This document assists instructors in understanding the structure of units and how to use that structure to guide learners.
A well designed ARK unit will enable great learning experiences by making it easy for students to find what they need when they need it. In this document, you will be introduced to the key concepts in the structure of ARK units and be provided guidance on best practices for enabling students to locate learning activities and resources.
How are ARK units structured?
An ARK unit contains a hierarchy of three levels:
- the unit format level: This is the overarching structure of the unit where the different sections are presented on a single page. Different layouts are available and can be selected based on pedagogical design.
- the section level: Sections are a type of container for each week or topic. Learning activities are accessed from sections.
- the activity level: These are the activities and resources that present information and provide learning materials to the student. See activity chooser to learn more about this layer.
stateDiagram-v2

classDef colorset1 fill:#ece5d5,stroke:#413e39,stroke-width:2px,font-size:28px,line-height:2rem
classDef colorset2 fill:#740005,stroke:#413e39,stroke-width:2px,line-height:2rem,y:-12,color:#ffffff;
classDef colorset3 fill:#ffebec,stroke:#413e39,stroke-width:2px
classDef nodeLabel padding-bottom:40px
classDef hidden display:none;
classDef edge0 display:none;
class State1 colorset1
class State2, State3, State4 colorset2
class State5, State5a, State6, State6b, State7 colorset3
class State0 hidden

        State1: Unit Format
        State2: Information sections (e.g. unit overview)
        State3: Weeks/topics sections

        State5: Content Pages
        State5a: Content Pages
        State6: Learning Activities
        State6b: Links
        State7: Links

state State1 {
        State2 --> State5
        State3 --> State6
        State3 --> State5a
        State3 --> State6b
        State2 --> State7
}
The above diagram presents one way of thinking about unit structure.
Thinking about structure from student experience
Student engagement with a unit on ARK can be thought of as having three purposes: functional, learning and assessment. These purposes peak at various stages in the delivery of the unit but are present throughout the entire delivery.
- the functional purpose of visiting an ARK unit is to ascertain information about the delivery of the unit: resources required (e.g. textbooks), find zoom links, location of classes, key dates and learning processes
- the learning purpose is to access resources and participate in activities intrinsic to learning
- a student will visit ARK for information about assessments, ensuring they are completing the task correctly and seeking resources to aid in the completion of the assessment
The goal of unit design is to provide a clear and consistent structure to ensure students are not frustrated in their attempts to locate and understand learning materials.
How to use structure effectively
When choosing a layout, structuring your content and entering descriptions, you should consider when and why a student will be accessing the content you are entering. Cluster related content by choosing logical sections and choose layouts that reduce the number of clicks required to find discrete content. Some questions to guide your decision making:
- What do students want to see in the week before the start of the unit? Is it easy to locate? Does it enable students to organise a study plan?
- Note: units become visible to students a week before the scheduled start date of the delivery. This allows students time to design a study plan and locate any required resources or sort out any technical issues.
- What do students need to access in each week or module of study? Can they easily find the information? Is it clear what is required and what is optional or supplementary?
- Is it clear when content will be released if it is not currently available?
- How will students use the meta unit in preparation for an assessment? If information presented in teaching weeks will aid in assessment preparation, is it easy to locate a few weeks later?
Worked example
Scenario
Amrit is teaching a unit delivered face-to-face over the 12 weeks of semester. Each week of the semester will cover different topics. During each week, the students will be required to complete 2-3 pre-readings, post in a discussion forum and attend lectures. The PowerPoint files from the lecture will be posted on ARK after the lecture.
Amrit determines that the functional purposes for students visiting the meta unit are: checking the unit schedule, finding contact and attendance information, accessing resources to complete assessments, and determining priorities.
Solution
Amrit sets his meta unit to have 15 sections consisting of the following:
- Section 1: Getting Started: this section provides an orientation to the meta unit itself, contact and attendance information, and an overview of how the unit will be delivered.
- Section 2: Assessment Information: this section provides links to the associated child units, additional information or resources for the assessments not placed in the child unit, directions and links to academic skills supports and assessment information such as the Grading and Assessment information page on the University website.
- Section 3: Unit Schedule: a calendar of weekly requirements for the semester including readings and assessment dates. (Note: if you choose to do this, remember to update any dates before each delivery.)
- Sections 4-15: Weekly topics: each week contains links or PDFs of required readings, and a summary of the lecture after the class. A pattern is repeated throughout the semester for ease of use.
This is demonstrated below using the “Tile format” :

Methods and strategies for laying out the activities and resources within sections are covered in the Presenting Information document.
Making it easier
If you have a preferred structure that you use across multiple units, it may make sense to build a reusable template. It is often quicker to delete unneeded sections and activities than create them from scratch. Ask your ARKLO if your college has any templates that you can use.
To learn how to import from a template or other unit, see the MoodleDoc, Import course data.
4.2.2 - Changing Unit Settings
This document assists teaching staff in configuring whole of unit settings such as unit visibility, start dates, layouts, number of sections and completion tracking.
Teachers with Editing Teacher privileges in a unit are able to make changes to settings such as unit visibility, indicative start and end dates, unit format and appearance.
Finding unit settings
Click ‘Settings’ from the unit navigation menu at the top of the unit:
General Settings
The General settings allow you to change the name of the unit, show or hide its visibility to students and set the start and end dates for the unit.
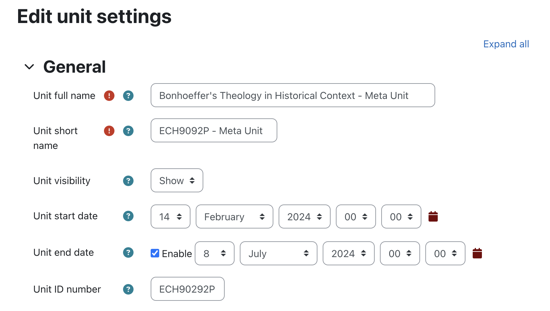
Unit full name, Unit short name and Unit ID number
Caution
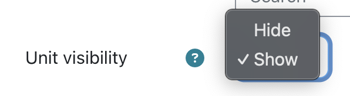
Do not change the Unit full name, unit short name or Unit ID number. If there is an issue, let your college ARKLO know.Unit visibility
The unit visibility setting determines if a unit will display in the list of units available to a student. It does not affect users with Teacher, Editing Teacher or admin privileges such as ARKLOs, Registrars or Academic Deans. If a meta unit visibility is set to Show, the unit will be visible to students from when the student’s enrolment is processed by the Registrar. To prevent students from viewing content in the meta unit while you are preparing for the semester, set the visibility to Hide but don’t forget to toggle it back 7 days before the scheduled commencement date for the unit.
Unit start date and end date
The Start date and End date for a unit do not change whether a student can access a unit. However, the view settings in the Unit Overview block can be set to filter units based on these dates.
- Set the Start date to at least 7 days prior to the scheduled start date of the unit. (For example, if the unit starts on 26 February, set the start date to 19 February or before).
- Set the End date to 6 weeks after the end of the teaching period to allow for any possible extensions and for students to review content.

4.3 - Meta Unit Content
In this section, users are introduced to the choices and methods of presenting information to learners on ARK.
This section provides a basic guide to designing and building a Meta unit on ARK. The focus is on creating learner experiences.
We recommend you are familiar with the overview of unit structure before starting this section.
4.3.1 - Activity Chooser
Learn how to use the activity chooser and the difference between resources and activities.
When we introduced unit structure we presented the hierarchy of content in ARK as:
- unit
- section
- resource or activity
The smallest unit in the hierarchy is either a resource or an activity.
A resource is a piece of static, ungraded content designed to present information to the student.
An activity is an item that the student interacts with, either individually or with other students. Some activities can be graded and may contribute to the gradebook.
Using the Activity Chooser
Teachers can add activities and resources to their units using the activity chooser. To access the activity chooser, enable editing and click Add an activity or resource at the bottom of a section.
When you first open the Activity Chooser, you will see four tabs: All, Activities, Resources and Recommended.
The Recommended tab contains a shortlist of activities and resources recommended at the University of Divinity.
You can star your favourite or frequently used activities and resources and they will show in the Starred tab.
Click the star icon to favourite an activity or resource.
The activity icons are colour-coded according to their various functions:
- Green = communication
- Pink = assessment
- Blue = content
- Red(orange) = collaboration.
Further Resources
See the MoodleDocs page for more information: Activity Chooser (4.1)
Moodle Academy video: The Activity Chooser
4.3.2 - Text Editor
How to use the Text Editor in ARK to add and format text and images.
This page introduces teaching staff to the text editor in ARK.
When adding content to activities and resources, teachers will be able to write content directly to text areas in ARK using the text editor.
Default text editor
This document describes the interface for the default text editor, Atto. The new version of ARK (Moodle 4.1) introduces an alternate editor, TinyMCE which is more featured and will become the default in future versions. To change the text editor and for help on using TinyMCE, see MoodleDocs: TinyMCE editor.
This document largely provides advice on effective formatting and use of media in ARK and is applicable for both text editors.
The text editor in ARK is a powerful interface, and is similar to working with other text editors such as Microsoft Word. However, this guide contains a few key recommendations to ensure your content is accessible to all users and is consistent with how learners access content across the internet and other University of Divinity resources.
If you’re unfamiliar with the interface, jump to the text editor interface first.
Styling content
Eye-tracking studies have consistently found that users scan content on the internet.1 This makes the layout and styling of your content, including on ARK, particularly important. Screen reading software uses pre-defined markers to allow vision-impaired users to more easily navigate the page but it requires those entering content to be consistent with those conventions.
Headings and paragraphs
The style dropdown, marked (2) on the screenshot below, presents the key styles that a screen reader will use to navigate the page. Heading levels should indicate the rank of the content, with large headings being the most important, and headings of same importance being the same size. Skipping headings can be confusing and should be avoided.2.
Applying styles
The style dropdown will apply the style to an entire paragraph of text so it easiest to insert paragraph breaks between content before selecting the style.Emphasis
The top row of the editor gives easy access to bold and italics. These text effects can be difficult to read if they are used excessively and so should be reserved for emphasis.
- Bold text is useful for increasing the scannability of text and should be used to draw attention to key pieces of information. Avoid emboldening full sentences or paragraphs.
- Italics can help denote special terms. As with bold, avoid applying to full sentences or paragraphs.
The second row of the toolbar gives the ability to add underline, strikethrough, subscript and superscript.
- Underline (for example) is generally reserved on the web for marking hyperlinks. Using underline elsewhere can confuse readers who may expect it to be a link (if a student uses different colour/contrast settings for vision access, all underlined text may appear the same).
- Strikethrough (for
example) can illustrate changes or corrections but can be difficult to read. Always provide an alternate representation of the text that is struck out if it needs to be read. - Subscript (for example) is most commonly used in science and mathematics.
- Superscripts (for example) are more commonly used for functions such as ordinals and footnotes. They may also be used for trademark (TM).
Using colour for emphasis
The default editor provides no option for changing text colour. Colour in text can have unwanted effects and be distracting so should be avoided.Using links
To create a link, select the text and then click the chain icon, marked (9) on the screenshot below. Paste the URL into the field.
- The tick box “Open in a new window” will launch the page in a separate tab or window based on a users browser settings. A rule of thumb is to always load external links (that is, to sites other than ARK) so the student can access the resource and easily return to the content in the unit.
- For accessibility reasons, use descriptive links. For example:
- The Web Content Accessibility Guidelines (WCAG) explain how to make web content more accessible.
- Using click here doesn’t tell a user where the link is going
- A raw URL is unhelpful for a screen reader. Such as:
To remove a link, select the text with the link and click the break chain icon, marked (10) on the screenshot below.
Working with media
You can insert or embed images, video and interactive content in text areas using the text editor.
Caution
The practice of inserting or embedding images, video and interactive content can have Copyright implications. It is advisable to seek out images and media that are released under licenses that allow for sharing such as the Creative Commons license.
For more information contact your library staff or see the Australian Copyright Council.
Inserting images
Most browsers will allow you to drag and drop an image from your computer to the text editor. Alternatively, you can click the image icon, marked (12) on the screenshot below. To edit the settings of an image already placed in a text area, click the image and then select the image icon.
The image properties dialogue allows you to paste a link to an image elsewhere on the internet. Always place an image description to assist students using a screen reader or to explain the image in the event the link breaks.
Where possible, resize the image before uploading it to ARK to reduce the file size and subsequent load time of your unit. As a guide, images covering the full width of a course area should be no more than 1200 pixels wide. Reduce the size accordingly for images only displaying at part width of the text area (see “Best Image Size for Websites” for more information).
You can change the size and relative position of the image using the image properties box. Select Auto size to avoid warping the image.
Moodle Academy video: Add images in Moodle
Inserting video and sound files
As with images, audio and video can be dragged and dropped into the text editor. Links to some video hosting sites such as Vimeo or YouTube will automatically be converted into embedded content (if you don’t want this behaviour, ask your ARKLO for instruction on disabling the Multimedia Filter).
Audio and video should be hosted on a hosting site such as Vimeo to avoid adding server load and slowing ARK for all users.
The insert media dialogue allows instructors to change the size of the content, adjust playback settings and add additional subtitles or captions.
Moodle Academy video: Sound and video in Moodle
Interactive content
H5P interactive content can be inserted with the H5P icon, marked (17) on the screenshot below. Creating H5P content is a more advanced concept and will be covered elsewhere. More information is available on MoodleDocs: H5P.
Working with the code
The HTML code, marked (16) on the screenshot below, allows instructors with HTML understanding to change the appearance in ways not available in the editor menus.
Caution
Be extremely careful using code you have found on other websites. Only use it if you can understand all parts of the code. Code found elsewhere may break your ARK page or allow malicious actors access to student information. Always use the editor tools where possible and only use code if you are sure it can be trusted.Note
If you introduce custom style parameters or particularly css classes, your content may render poorly after an ARK upgrade or on mobile devices. It is best to use the provided styles to avoid against future breaking changes.The text editor interface
The text editor is used extensively throughout ARK, including posting in forums, editing section headings, activity descriptions, quiz answers and the content of blocks.
There are two rows to the editor toolbar, which can be expanded using the expand button, marked 1 below:
Toolbar Row 1

| (1) Expand | (2) Style | (3) Bold | (4) Italics | (5) Unordered list |
| (6) Ordered list | (7) Decrease indent | (8) Increase indent | (9) Create link | (10) Remove link |
| (11) Insert emoticon | (12) Insert picture | (13) Insert video | (14) Record audio | (15) Record video |
| (16) Manage embedded files | (17) Insert H5P |
Toolbar Row 2

| (1) Underline | (2) Strikethrough | (3) Subscript | (4) Superscript | (5) Left align |
| (6) Centre align | (7) Right align | (8) Equation editor | (9) Insert character | (10) Table |
| (11) Clear formatting | (12) Undo | (13) Redo | (14) Accessibility checker | (15) Screenreader helper |
| (16) Edit html code |
Footnotes
Nielsen, Jakob. 1997. “How Users Read on the Web.” Nielsen Norman Group. September 30, 1997. https://www.nngroup.com/articles/how-users-read-on-the-web/. ↩︎
“Headings • Page Structure • WAI Web Accessibility Tutorials.” n.d. Www.w3.org. https://www.w3.org/WAI/tutorials/page-structure/headings/. ↩︎
4.3.3 - Presenting Information
Learn strategies for effectively presenting content to learners and the primary Resources for presenting content - Text and Media area, Page and Book.
This document covers the methods and tools available for presenting static information to students on ARK. It will introduce the Text and Media, Page, File and Book Resources and cover basic user interface and pedagogical design strategies to aid navigation for students.
Common Resources
There are multiple ways to present content or information to learners in ARK. The screenshot below shows the most common Resources:
- (1) Description - the section title is followed by a Description. Descriptions can be added to any activity or Resource – there is also a Description on the File Resource.
- (2) Text and media area (previously called labels). There are three separate Text and Media Area Resources shown. The first is displaying a picture of the University’s St Paschal’s campus, the second and third contain headings to break up the content. The first two could be combined with the description but leaving them separate makes it easier to move or duplicate parts of the content.
- (3) File resource, in this case it is a PDF. You can also add images and office documents as Files.
- (4) Page Resource. This shows content in a single page with all the functionality of the text editor.
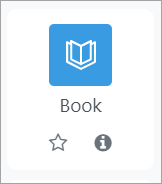
- (5) Book Resource. A Book is a set of Pages presented in a book-like format, allowing a table of contents and forward and back navigation.
- (6) URL Resource. This allows you to provide links to resources elsewhere on the internet.
1 1 2 2 2 3 4 5 6 7 Screenshot of a sample section in Moodle. Hover over the numbers for more detail.
Selecting Resources
The above Resources can be grouped into three types: presentation resources (descriptions and, Text and Media Areas), external resources (URL) and internal resources (Page, Book and File) .
Presentation Resources
Text and Media Areas (previously called Labels) and Descriptions help students navigate the sections in an ARK unit. They can function as signals – to point students to where information is or how it is arranged – or as direct instruction – to explain a concept or set up an activity.
Descriptions
Descriptions sit below an Activity or Resource and are set in the settings for the Activity or Resource. You can use a Description to provide context for a particular Activity or Resource, or provide a citation.

Text and media areas
A Text and Media Area is a way of presenting content on the section page and can be used to group or separate Activities and Resources, provide instruction or deliver content. In the example below, the heading is placed before the first reading to signal to students what the reading is for, a subsequent Text and Media Area sets up an activity, and the video is placed in a Text and Media Area for easy viewing.
External Resources
In many cases, the learning resources you provide to students will be outside of ARK, which you can link to (such as an external website or Library Hub resource).
URL Resource
A URL Resource allows you to provide a link to a resource external to ARK such as the Library Hub or a website. While it is possible to hyperlink from any text in a Text and Media Area or description, a URL resource is preferred as it allows you you to set completion requirements to track or signal progress to the student.
Internal Resources
ARK offers a few Resources and Activities to present content. The simplest of these are Page and Book. Pages and Books both allow you to build web content in ARK with text, images and embedded content. They are considered Resources as the only behaviour available to students is to view the content. Both Pages and Books are easily printed to PDF by students. You can also upload a File (such as a PDF or other downloadable resource)
Other options: other methods of presenting content include the Lesson activity and the H5P activity. These activities are more complicated to setup and will be covered elsewhere.
Page Resource
Page Resources are best used to present content that doesn’t need extensive scaffolding for students to process or to present information that would take up too much space on the section page. For example, a Page might be used to provide an extended bibliography for a topic or to collate instructions for a learning task such as an assessment.
An example of a Page showing a bibliography of selected Library Hub resources.
Book Resource
A Book is a set of pages presented in a book-like format. Books are best used to present related ideas that together are too much to contain to a single Page. For example, prior to a lecture on the prophets, you might wish to ensure students have a basic overview of the content and themes of each. You could create a Book with a short introduction to each of them.
File Resource
A File Resource allows you to share files with students. This is most commonly used to upload PDFs but can also be used to provide PPTs, Word documents or audio recordings.
Caution
The practice of uploading files, images and documents can have Copyright implications.
For more information contact your library staff or see the Australian Copyright Council.
4.3.4 - Adding Zoom Resources
This page shows the process for displaying Zoom information in a meta unit on ARK. It requires Editing Teacher permissions and a Zoom account issued by either the University of Divinity or Yarra Theological Union.
Note
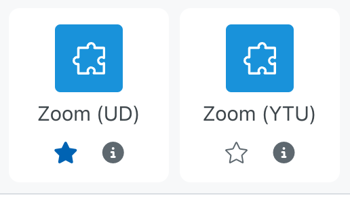
Before adding a Zoom resource to your meta unit, ensure that you are logged in to Zoom with your University of Divinity or Yarra Theological Union issued Zoom account on the computer you are using.- Turn editing on in the meta unit on ARK, click on Add an activity or resource.

- From the Activities tab select the Zoom (UD) button (or Zoom (YTU) as applicable).
- Name the activity (e.g. Weekly session).
The rest of the settings can be left as they are, scroll to the bottom and click ‘Save and return to unit’ - Open the activity and click Schedule a New Meeting.

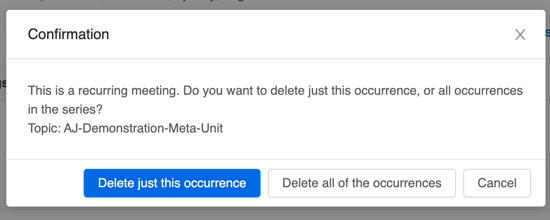
- Schedule the Meeting with a time, duration and start date. You can set up one meeting for the entire semester by selecting Recurring meeting.
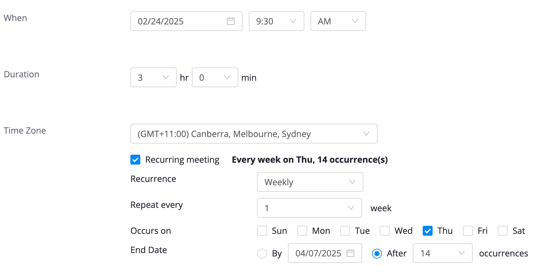
Note: the start date is displaying in MM/DD/YYYY format
Tip
There is no need to create multiple meetings if your class meets on different times or skips some weeks. Once you have scheduled the recurrence, you can delete the instances that you don’t need.
In the screenshot above, the class is scheduled for 14 recurrences. That way, once we’ve Saved our new meeting we can delete the two mid-semester break weeks:

- If you’re co-teaching or someone else may need to step in for you, add them as an alternative host. (Alternative hosts must be on the same Zoom account as you - either UD or YTU).

- Save to apply your settings.
- You can return to your unit by clicking on the unit name in the ‘breadcrumbs’ that appear at the top of the page.
Permissions error
If a user is accessing the meta unit with a privileged role in the unit (e.g. Teacher or Editing teacher), they must be logged into their UD Zoom account on their computer to be able to access the meeting from the External Tool resource on ARK.4.4 - Setting Up Child Units
This section will guide instructors in setting up child units for the effective communication and grading of assessment at the University.
4.4.1 - Setting Up the Gradebook
How to setup and use the Gradebook.
The Gradebook in ARK provides a clear summary of student progress through a unit. The Gradebook can include both activities graded on ARK (such as Turnitin submissions or quizzes) and tasks graded offline (such as exams or oral presentations). Once set up, the Gradebook will show students a summary of their grades for each task and the weighted total contribution to their overall mark for the unit (pre-moderation). For teaching staff, the Gradebook provides a convenient way to track student progress across tasks and a simple way to provide student results to the Academic Dean and Registrar for moderation and finalisation in Paradigm.
The Gradebook is incredibly powerful and can get very complicated. To simplify things, this document will step through setting up the Gradebook in increasing complexity:
- Setting Gradebook visibility and Accessing the Gradebook
- Navigating the Gradebook interface
- Assigning weights to tasks graded on ARK
- Configuring Grade settings in ARK activities
- Adding grade items for tasks graded offline
- Using Gradebook categories for tasks with multiple graded components
Setting Gradebook visibility and Accessing the Gradebook
A lecturer can choose to show or hide the Gradebook from students in the Appearance section of Unit Settings (see Changing Unit Settings):
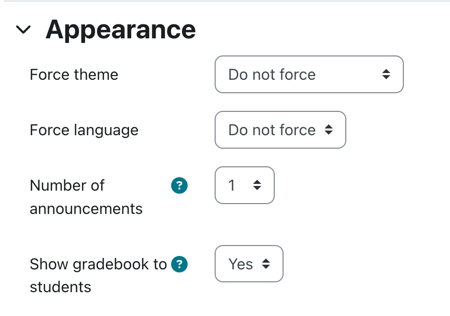
Set Show gradebook to students to No if you don’t want students to be able to access the gradebook.
The Gradebook will still show and function as usual for the Editing Teacher and Teacher even if students cannot see it.
The Gradebook is accessed via Grades in the Unit Navigation menu:

Navigating the Gradebook interface
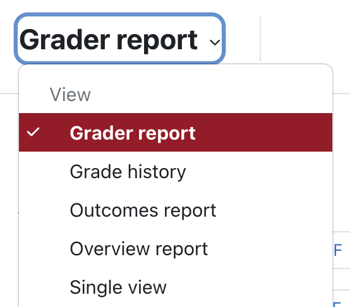
The Grader report
The default view in the Gradebook is the Grader report:

1. Navigation dropdown menu
The Gradebook provides a number of views and settings. To access different pages, use the navigation dropdown menu in the top left (marked (1) on the screenshot above).
Navigation dropdown menu. This screenshot is cropped, more items display in the menu on ARK.
2. Grader report table
The Grader report table displays a row for each student in the unit and by default a column for each grade item along with any grade categories and totals.
The table is wider than the window. To view all items, you will need to scroll right.
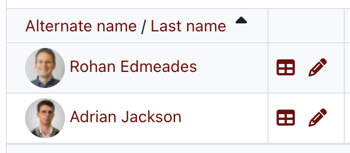
Icons to the right of the student names provide shortcuts to view a user report ( table icon) or grade items for the student ( pencil icon).
3. Expand and collapse categories
The table can be displayed in three views:
- full view
- aggregates only (shows only the weighted totals for each student)
- grades only (shows only the totals for each grade item)
Select the icon to the right of the unit or category name (here the dark red minus icon; marked (3) on the screenshot above) to change views:
Assigning weights to tasks graded on ARK
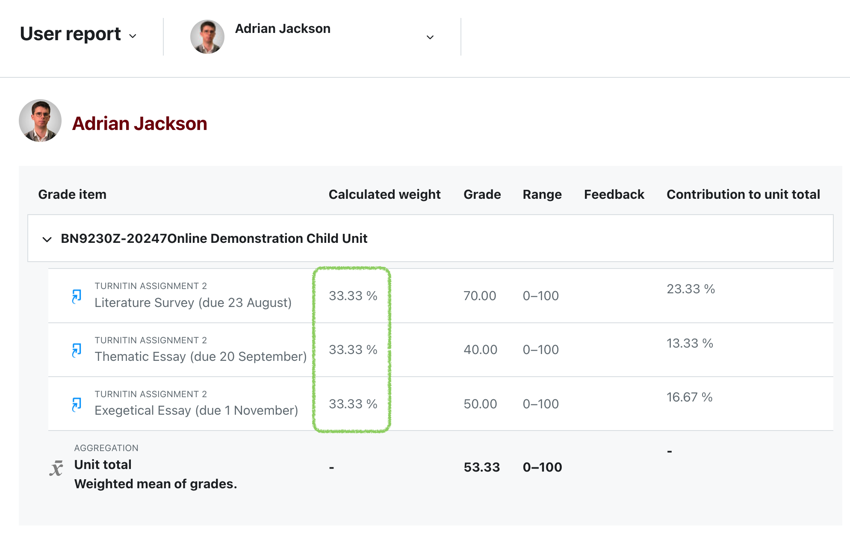
If all of the assessment tasks for a unit are ARK activities that receive grades in the child unit, the Gradebook is already partially set up. Activities such as Turnitin or Quiz will report the grade to the Gradebook. However, you will need to weight those grades appropriately to align with the Unit Record.
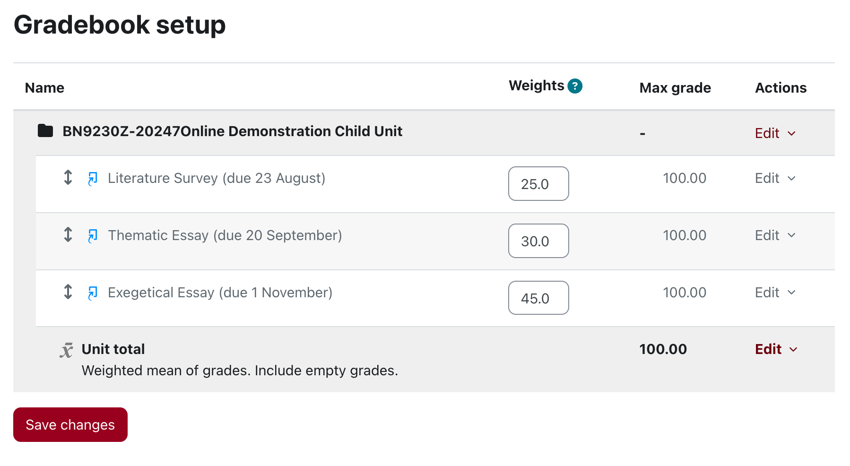
To demonstrate, we will assume the unit in Sample 3 from the Unit Policy §Schedule F . There are three tasks, to be submitted via Turnitin, summarised in the table:
| Assessment Type | Weight | Due |
|---|---|---|
| Literature Survey | 25% | Week 4 |
| Thematic Essay | 30% | Week 8 |
| Exegetical Essay | 45% | Week 12 |
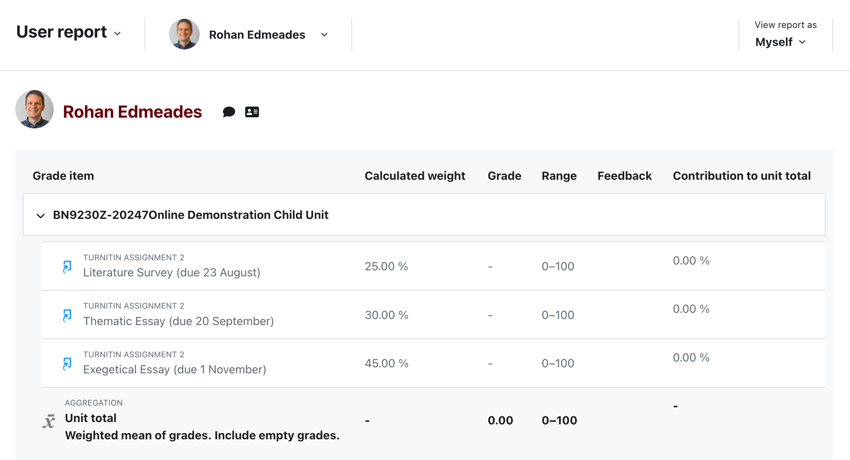
By default, each item in the Gradebook is weighted equally with each grade item contributing an equal amount to the final grade. See the example User Report below:
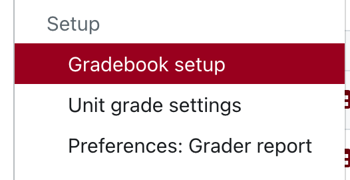
To reflect our unit’s assessment configuration, we need the calculated weights to match the weights in the Unit Record. We can set this up by going to Gradebook Setup.
Setting weights in Gradebook Setup
Click the navigation dropdown menu in the top left corner of the Gradebook and select Gradebook Setup:
When we open Gradebook Setup, all tasks have a default weight of 1.0:
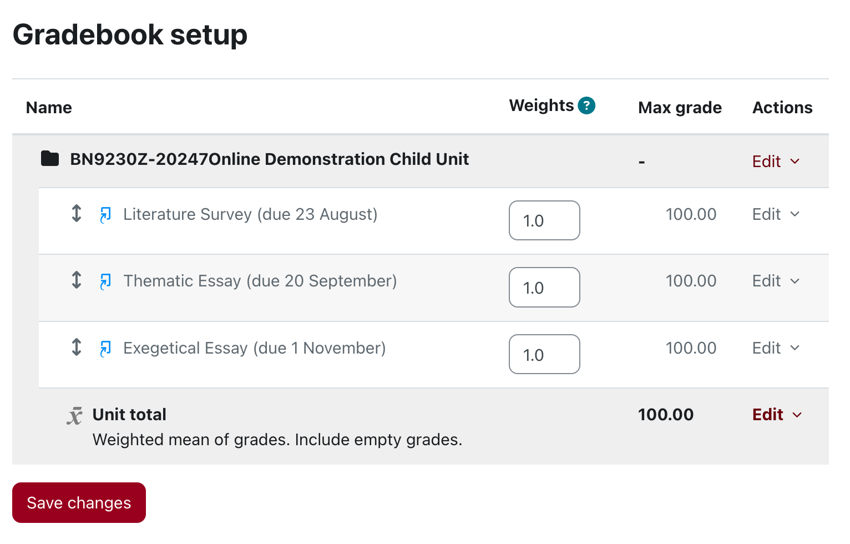
We can set the Gradebook to our desired outcome by changing the weights to match the values in our Unit Record.
Note: Weight ≠ Percentage
Please note that Weight does not equal Percentage. ARK will not tell you if the weights do not add up to 100.
The calculated weight is relative to the other weightings in the category. The default value of 1.0 for each means that each item contributes an equal amount (1/3) to the total. In the above example, setting the weights to 50, 60 and 90 or 2.5, 3 and 4.5 would give the same result.
Always confirm your desired outcome by following the step below.
Confirming configuration in the User Report
Confirm the weight is set correctly by viewing the User Report from the navigation dropdown menu. If the calculated weights equal your Unit Record, then you have set the weights correctly:
If the calculated weights aren’t what you expect or the totals aren’t as expected, confirm the following:
- Check the weights have been entered correctly in Gradebook Setup
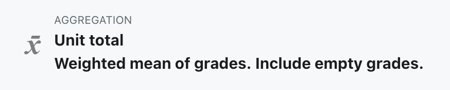
- Check that the aggregation is showing as Weighted mean of grades. Include empty grades. As per the image below. If they aren’t, see Using Gradebook categories:
Configuring Grade settings in ARK activities
Most activities in ARK will contribute to the Gradebook. Depending on your needs, you can change how the grade works. On the settings page for the activity (such as Turnitin or Quiz), you will find a section labelled Grade:
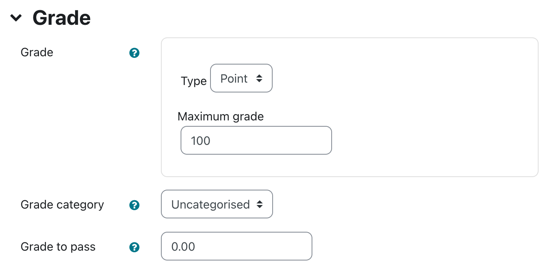
From here, you can change the Grade, Grade Category and Grade to pass.
To set an item to not send a grade to the Gradebook, set the Grade Type to None.
Grade
The Grade Type can be:
- None. The activity is not graded and any completion or points will not be sent to the Gradebook for the unit.
- Point. The activity is given a point based result. If this is chosen, you can set a Maximum grade:
- Maximum grade. By default the maximum grade is 100. In most cases, you will leave this as 100 and use the weights in the Gradebook to adjust relative contributions to the unit grade total. This is usually easier than trying to assign marks on a scale such as 0-35.
- Scale. The item is graded by selecting from a scale such as Fail, Pass, Non-Graded Pass or Not yet competent, Competent. Additional scales can be created in the Gradebook settings.
Grade category
You can group grades using categories. You can assign a grade to a category using this setting if the category is set up in the Gradebook. This will be covered in Using Gradebook categories for tasks with multiple graded components.
Grade to pass
This setting determines the minimum grade required to pass. The value is used in activity and unit completion, and in the gradebook, where pass grades are highlighted in green and fail grades in red.
Adding grade items for tasks graded offline
The ARK Gradebook allows you to record grades for tasks that are graded away from ARK such as an exam, practical assessment or in-class quiz. This can also be used to add grade items for activities completed in the meta unit, such as forums.
To add a grade item, go to Gradebook Setup and select Add Grade Item:

You will be asked to enter a name for the item and settings similar to the activity grade settings above:
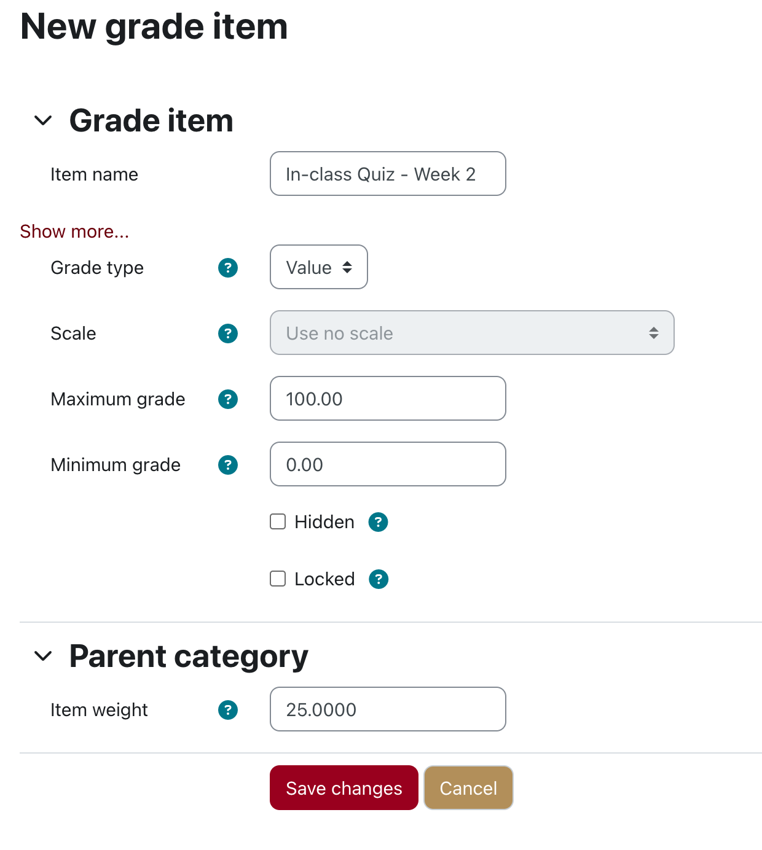
To add a Grade to Pass or a date the grade is Hidden until, click the Show more… link.
You can set the weight at this point or when you return to the Gradebook Setup. Your additional grade item will show like below. To change settings, click the edit dropdown to the right of the item.

Entering grades for offline grade items
To enter grades for offline grade items, select Single View from the navigation dropdown menu and select View By Grade Items:

Select the grade item you wish to enter from the Select a grade item dropdown:
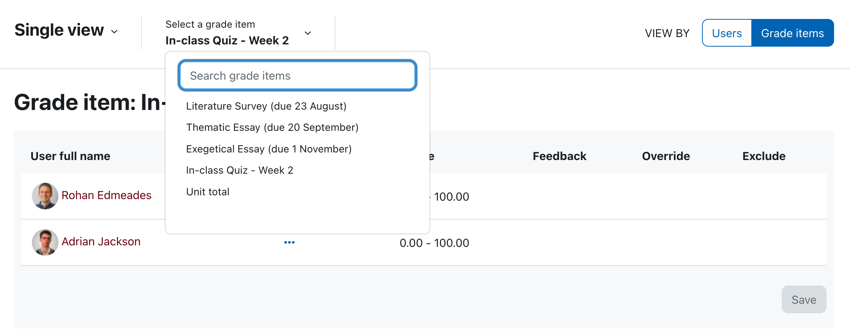
Toggle the edit mode icon in the top right to enter editing mode. You will now be able to enter grades for each student. Be sure to click Save to ensure entries are stored.
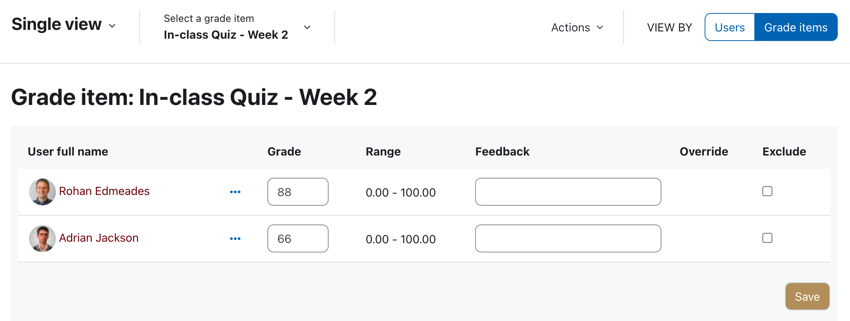
Using Gradebook categories for tasks with multiple graded components
Grade categories allow you to group assessments together to calculate a subtotal and make special calculations (such as excluding the lowest grade). In this example, we’re going to assume a language unit with three tasks: a weekly take home quiz, a weekly in-class test and a final exam:
| Assessment | Weight | Due |
|---|---|---|
| Take home quiz | 40% | Weeks 2-6 |
| In-class test | 30% | Weeks 2-6 |
| Written exam | 30% | Week 13 |
In the above example, we have two tasks that each consist of 5 sub-tasks. To record this in the gradebook, we will add the written exam as a grade item and place the sub-tasks inside two categories for the weekly tasks. We will begin by adding the end of semester exam as a grade item:
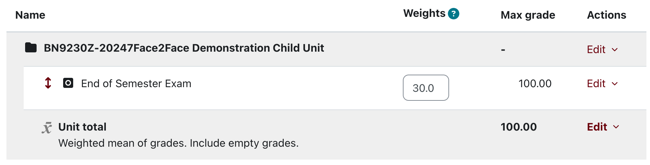
To add a category, click the Add category button:

Give the category a name. Leave the Aggregation as Weighted mean of grades. In most cases you will not exclude empty grades:
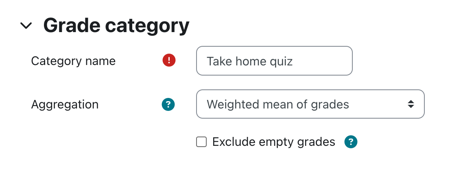
Once we’ve added the categories, we can assign the weights from the Gradebook setup page:
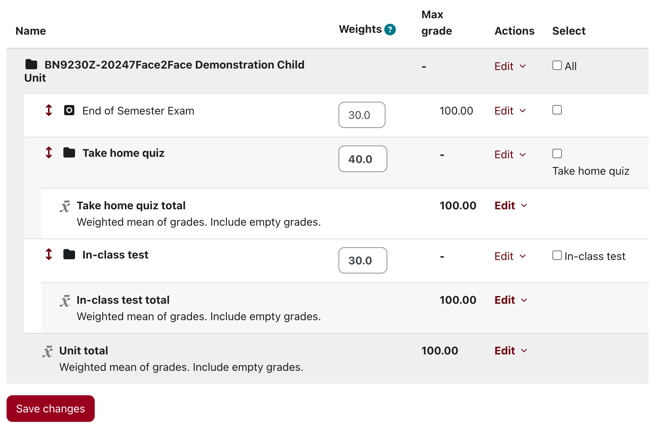
Note: click the up and down arrow to reorder items.
We can now add grade items for each of our weekly tasks. You can assign a task to a category and a weight as you create the grade item:
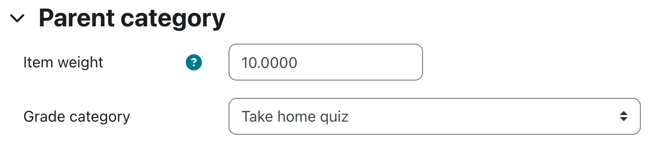
If you are creating multiple grade items, you can speed the process up by duplicating a grade item from the edit menu on the Gradebook setup page:
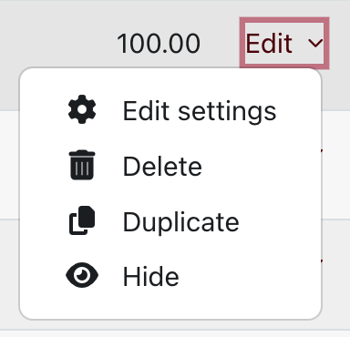
In our example, the resulting Gradebook setup looks like this:
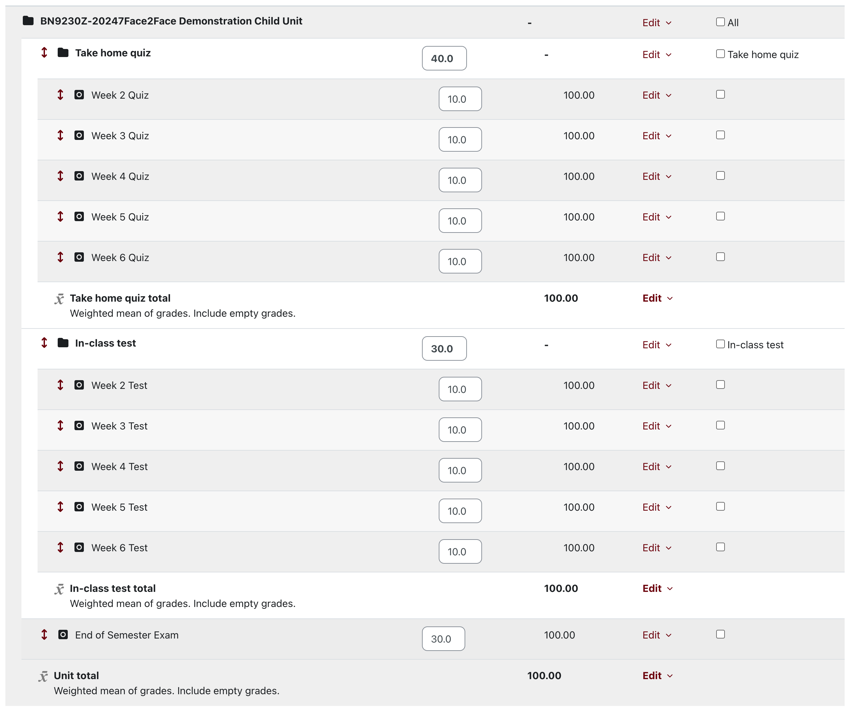
In the above example, the 5 quizzes contribute equally to their parent category. The parent category then contributes the aggregate of those quizzes to the total grade.
Exclude bottom grade items
You can set the gradebook up to exclude the lowest grade item. This is useful to allow students to have a grace task in a series of tasks.
In our example, we can see the student has performed particularly poorly in Week 4:
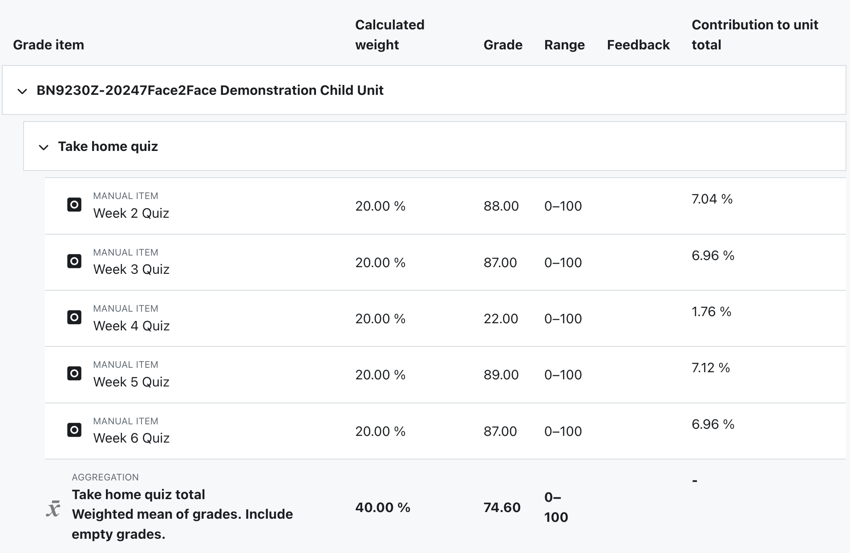
To exclude the bottom grade item, from Gradebook setup, edit the category. Click the Show more… link and set Drop the lowest to the number of lowest grade items you’d like to exclude:
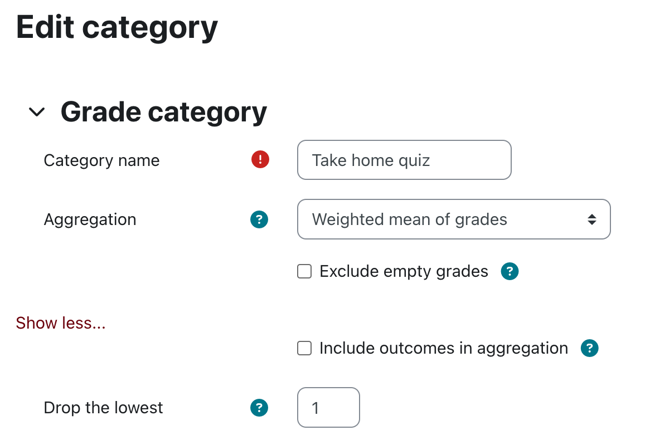
Now if we view the User report for the above student’s results, the students aggregated total excludes the poor showing in Week 4:
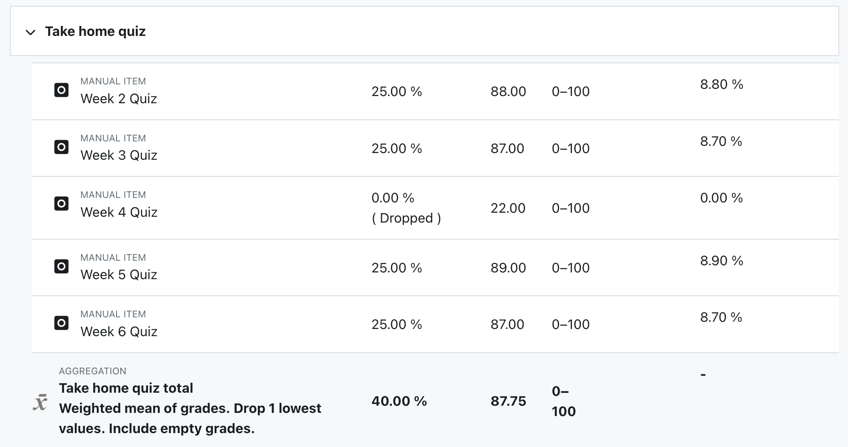
With the poor result in Week 4 dropped, the student’s weighted result for the category jumps from 74.6% to 87.75%.
Introduction to the Gradebook
- Each course in Moodle has its own gradebook accessed from Unit navigation > Grades.
- Students can see this too but see only their own grades.
- Teachers see a list of course participants with their grades for each activity. (Note that students can see all their grades for all courses from the link in the user menu top right.)
- You can manually enter and edit grades here and put graded activities into categories with category totals.
- You can create your own custom scales instead of the default points.
- You can also import and export grades.
Note: The gradebook shows only student grades by default. If teachers do the graded activities, their grades are not normally shown.
Using the Gradebook at the University of Divinity
4.5 - Reporting and Analytics
ARK provids a range of reports and analytics to help you understand student activity and engagement
Analytics (Insights)
ARK has a default analytics report, called Students At Risk
4.5.1 - Students At Risk (Analytics)
The Students At Risk report is a default analytics (Insights) model.
It is a computer model that analyses student behaviour in the unit in order to identify students at risk of not completing the unit.
In addition to how recently the student accessed the unit, the model uses indicators such as, accessing resources, participating in forums and working through lessons to score student engagement with the materials. Students who appear to be engaging significantly less may then be flagged as falling behind. This report can assist staff in quickly identify students who might not be keeping up with their peers.
Aim
Many academics are used to listing participants and seeing when they last logged in as an indicator of student engagement. The aim of this model and reporting is to reduce the need to manually scan through the participants list.Notifications
The analysis is run frequently and is set up to examine data across a two week window in making determinations. It will notify those with a teaching role in the unit if there are any students that the model deems to be at risk.
Choosing when you are notified
You can choose whether you receive an notification from ARK if the insight identifies students.
Go to the User menu (in the top right) > Preferences > Notification preferences.
Locate the line Insights generated by prediction models.
Select your notification preferences.
The Insight
Accessing the insight from a within a unit
You can view Insights when you wish by navigating to the tabs menu (under the Unit title) > Reports > Insights
Note
If the Insights menu item is not listed, then none have been generated for this unit. This will happen if the unit has not started or has ended. See adjusting meta dates.Accessing the insight from a notification email
The notification email informs the recipient that one or more students in the unit are considered at risk and links to the ‘insight’ for further information and actioning.
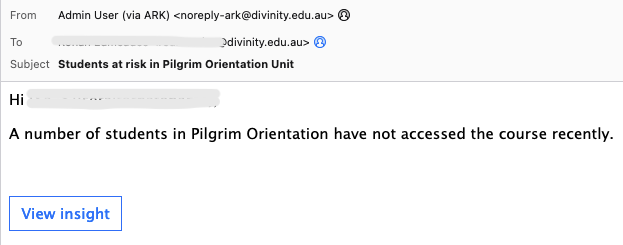
Viewing the report
The link from either place noted above lists the students considered at risk.
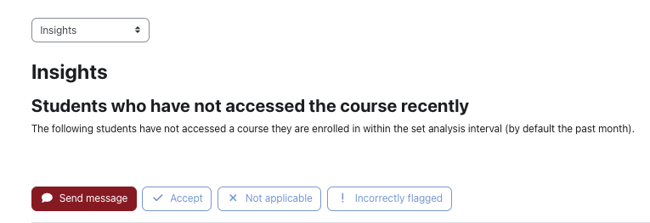
In the Actions column, there are two links to further information that the model has regarding the student. The first (magnifying glass) is to a prediction, the second (the chart) to analysis of individual data points used.

The prediction outlines the period over which the evaluation took place and when it estimated that the student would have engaged by. If it is now pas this time, the student is flagged as at risk.
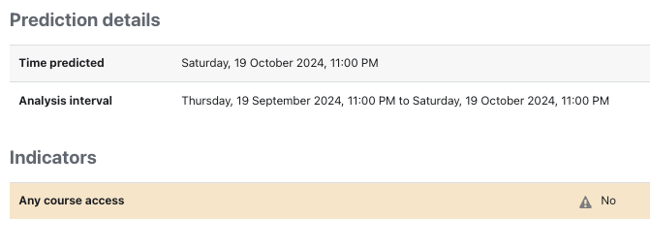
The analysis lists items from the unit that contribute to the prediction and shows the student’s engagement, or not, with each. Below we can see items that have been viewed multiple times, some that have not been viewed, a quiz results and the dates on which these took place.
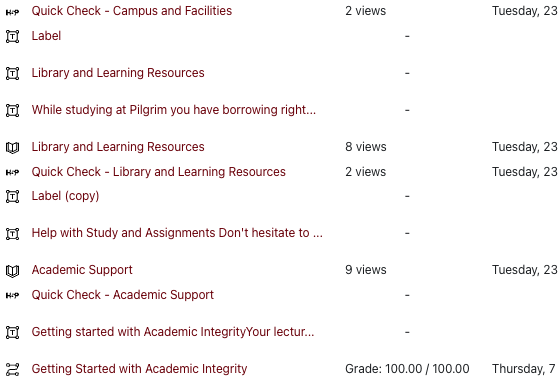
Responding to an insight
At the top of the listing are four buttons.
The listing enables bulk actions by selecting the checkboxes in the left-hand column.
The Send message button enables you to immediately communicate with all of the students that have been selected.
The Accept button is to acknowledge the generation of the report for the selected student(s) and to remove the prediction from view.
There are some instances where a student is not expected to regularly engage with the unit. For example, orientation or college specific units are there to support students if needed and so may be sporadically engaged with. In these scenarios, click Not applicable to acknowledge the insight (as it is accurate), and remove the prediction about the student(s). This will provide feedback to the model for later instances of report generation.
If you have looked into a particular student’s activities and it appears that they have engaged the unit sufficiently, you can click Incorrectly flagged so that the model is updated for better predictive results.
5 - Forms
The Divinity Forms site is used for various submission and approval processes at the University. This section provides documentation on the use of the Forms site itself.
Forms are only available to logged in users. In order for a new person to be able to log in and fill out a form, an authorised person must fill out the Add New Staff + Appointment form to have them added to the system. This ensures that relevant information is captured for reporting and college collection and systems integration processes.
5.1 - Forms overview
1. Form selection
Select the relevant form from the list, or by inputting a search term in the search bar. Note that your interface may differ slightly to that pictured, subject to different permissions or site developments.

2. Fill out the form.
Whenever you move past a field or click a button, those fields that are mandatory will be checked and a message displayed if they are empty.
At any time you may save the form for later completion with the “Save for later” button. Saving the form will preserve your content for later editing. You will be prompted to load this saved copy whenever you next open the same form.
Clicking “Close” will prompt you to save a draft (the default). Unticking the box will enable you to close the form and discard any information entered.
If you need to show the filled out form to another person, you can print the form (to paper or PDF)
The ‘My CV’ link in the menu will provide a CV-like view of your information which is available to be viewed alongside your submission and printed.

3. Submission
Select “Submit” to submit your form. This will save the form and automatically forward your form for review, if applicable. An email will notify the applicant that their form has been received for consideration.

5.2 - Workflow and review process
1. Submission notification
Once a form has been submitted, an email notification will be issued to the person who is first in the workflow process that is associated with the form. That email will include a link to review the form (the first link highlighted in the image below). This is link is associated with the person and role of the recipient and should not be forwarded to anyone else. A read-only share link is also included in the email, and in the review process. This share link can be copied and circulated to others, where appropriate, for consideration.

2. Submission review
After clicking on the ‘Click here to review the form’ link you will see displayed a four part form.

- The first section shows an overview of the form submitted.
- You can proceed through the review process steps with the “next step” button. You may return to previous steps by selecting “previous step”. You may print the whole form at any time by selecting the “print form” button.
- The second section shows the information submitted in the form
- The third section shows the workflow history of this form. It includes each step that the form has been through.
3. Your decision
The last step is for you to select your decision, and provide any internal notes.

- Select the “Approve” button to approve the application. This will then require you to register the date that the decision was made by the relevant committee.
- The “Query” button will return the application to the submitter for further development. This action will then require you to provide feedback which will be sent to the applicant.
- The “Deny” button will deny the application.
Once you have selected your decision and filled out the necessary information, use the “Confirm Approved”/“Confirm Queried”/“Confirm Denied” button to complete your review.
If approved, the review process (step 4 to 6) will repeat until the final reviewer completes their review.
The applicant will not receive an automatic notification of the result of their application and must be contacted manually.
Staff forms are submitted directly by the applicant. Authority forms are submitted on behalf of an applicant by an authorised submitter.
5.3 - Discipline Accreditation Workflow
- Form is submitted
- Reviewed by University
- Approved by DAP
- Letter of accreditation sent
- Accreditation entered into University Gazette
flowchart

    submit[Form is submitted]
    review[Reviewed by University]
    approve[Approved by DAP]
    letter[Letter of accreditation sent]
    gazette[Accreditation entered into University Gazette]

    submit --> review
    review --> approve
    approve --> letter
    letter --> gazette
6 - UMS
The Unit Management System allows students and staff to view the diverse range of units available across the University and its Colleges. It also provides the means to develop and revise units, guiding them through the approvals process.
6.1 - The UMS - an overview
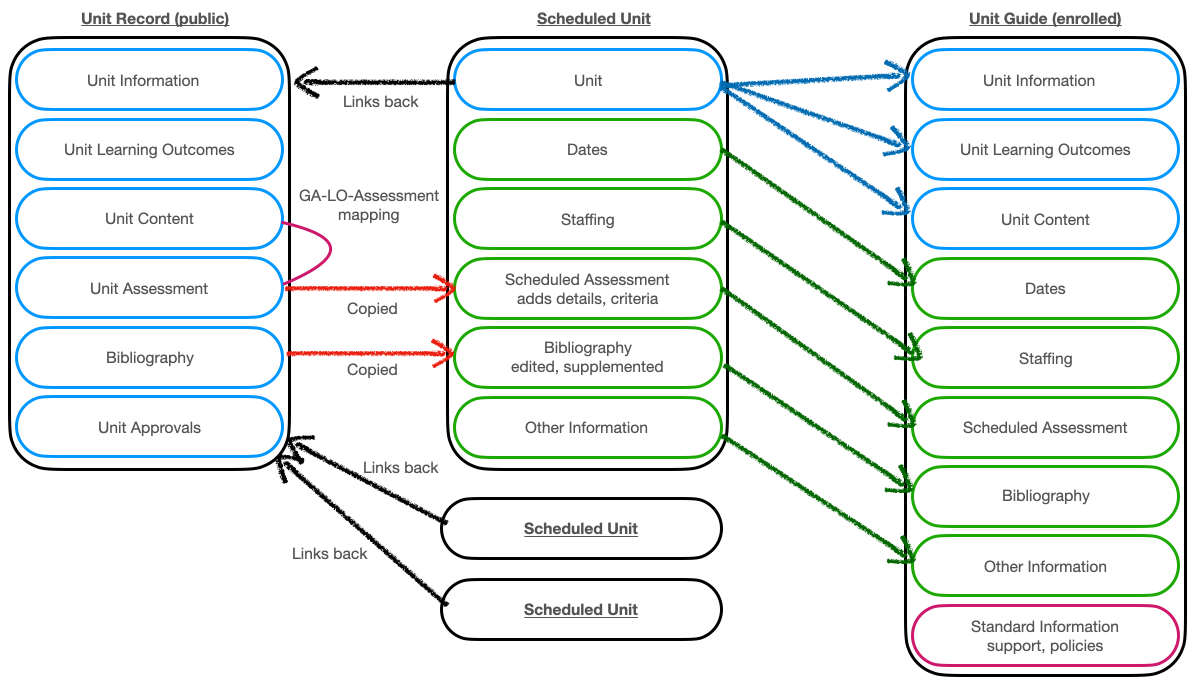
UMS Overview image
6.2 - Help Videos
Unit approval
- How to create a new unit on the UMS (29:26)
- How to do a minor modification on the UMS (17:44)
- How to do a major modification on the UMS (23:45)
- How to create assessment variants on an existing Unit Record (7:58)
Unit delivery
- How to schedule a unit for delivery on the UMS (28:48)
- How to create a link to the Unit Guide in ARK (2:02)
- This video demonstrates how to enter the link to the Unit Guide from the UMS in the ARK child unit.
6.3 - Creating a Unit
This applies to people with the capability of unit creation - Academic Dean, AD Delegate and Academic roles.
Drafting a unit
Click on Units in the menu system and select Create draft unit. You will be presented with a blank Unit Record form.
Fill out the form as needed, noting the following, and click Create unit to save it.
A title, discipline, level, college and academic are the minimum required fields.

If you do not fill out these fields you cannot proceed and you will be prompted.

You can enter up to 6 learning outcomes in this initial form (adding more or editing them later)

Most fields have an information that explains what the field is for.

A number of the fields are labelled with ‘Markdown’ which provides simple text formatting. Clicking ‘Markdown’ in the label or going Help -> Markdown will display further information.

Once the draft has been saved you can return to it as needed to continue to edit and prepare it.
Proposing a unit
Once the draft has been completed, it needs to be proposed in order for next steps in the approval process to be undertaken.

6.4 - Revising a Unit
This applies to people with the capability of unit revision - Academic Dean, AD Delegate and Academic roles.
Creating a draft revision of a unit
Locate the unit that you wish to be revised. Ensure that you are looking at the detailed view of the unit. If the unit is currently approved, you will be presented with three revision buttons: (1) Start major revision, (2) Start minor revision and (3) Start minor assessment revision. These correspond to sections 10.5, 10.1 and 10.2 of the Unit Policy respectively and progress along different workflow pathways.

Clicking on any of these will clone the unit, place it in a draft state (pink circle) and record the type of revision being undertaken - as noted in the unit status and button (green circles).
Please make sure that you choose the correct type of revision process as different information is copied to the draft version and cannot be changed.

Editing a draft revision
You can then edit the unit by clicking on the Edit unit button, noting that the type of revision only allows certain fields of the unit record to be edited.
- Each type of revision requires a rationale and can have further notes added
- Minor revisions allow changes to Title, Awards, Unit Sequence, Content and Bibliography
- A Major revision allows editing of additional fields
You can compare this new version of the unit to the previous one by clicking Compare to previous. The earlier version is on the left, the current unit is on the right.

Proposing a draft revision
Once any editing has been completed, click on the Propose X revisions (Propose assessment revisions in the image below) to advance the unit to the next step of the workflow process.
- For Major revisions, this will be for CAC preparation, including external and library reviews
- For Minor revisions, this will be to the Academic Dean for approval
- For Assessment revisions, this will be to the Academic Dean for approval

6.5 - College preparation of a Unit
This applies to people with Academic Dean and AD Delegate roles.
Once a draft unit (whether new or a revision) has been edited, it is then proposed. Proposed units are considered ‘in preparation’ and require further steps by the College prior to submission for approval.
Units in this state will appear on the Units Dashboard in the Units in preparation section.

Sending a unit for external review
Typically the first steps in the process is an External Review. In order to send this via the UMS to the appropriate person, you need to firstly assign the external reviewer.
Locate the unit that you wish to send for review
Click the Edit unit button
Scroll down to the Approvals section and select the person from the list
Note that only those who are accredited as unit reviewers and for the discipline of the unit are listed.
Click on Update unit at the bottom of the page
You can now click on the Send to reviewer button

The unit will now appear under the Awaiting external review section

Once an external review is complete, the unit returns to ‘In preparation’ on the dashboard. Viewing the unit shows the reviewer and the review date under the Approvals section

Further, an additional button that presents the output of the external review.

Sending a unit for library impact review
There is truncated process for sending to library staff for preparation of the library impact statement.
Locate the unit that you wish to send for review
You can now click on Send to librarian

The unit will now appear under the Awaiting library review section

Once the library impact statement is complete, the unit returns to ‘In preparation’ on the dashboard. Further, viewing the unit shows the librarian and the librarian impact review date under the Approvals section.

Completing unit preparation and CAC endorsement
The next step is a review by the College Academic Committee. The unit is considered prepared after having the above checks completed, and once done a new button appears - Unit prepared, for CAC.

Clicking this button progresses the unit to the next state and allows for the CAC Review.
6.6 - External Review of a Unit
This applies to people with the capability of unit review - Academics with Unit Reviewer status and people with Librarian role.
The College Academic Committee prepares the unit for approval. One of the key steps for new units and those undergoing a major revision is the External Review. The CAC allocates an external reviewer and sends its to them.
Units in this state will appear on the Units Dashboard in the Units in preparation section.
Performing an External Review
You are able to see a listing of all units in which you have been allocated as a reviewer by selecting My External Reviews from the menu.


Clicking on the title of the unit will show its detail along with a button that begins the external process form. From here you can also click on Compare to previous to see the differences between the two versions.

Click Do External Review of unit to display the external review form. This form aligns with the Unit Policy. Clicking on Print view will open the Unit information in a new window.

Once the review process has been done and the information entered into the form, click Save review. You are returned to the unit. You can click on Do External Review of unit to edit or add to the review.

Once a review form has been saved an additional button presented. Click on External review complete in order to finish the review step and return the unit to the College Academic Committee.
The unit will no longer appear under My External Reviews.
The unit returns to ‘In preparation’ on the dashboard.
Viewing the unit displays an additional button to Show external review.
The Approvals section of the Unit will display the reviewer and date
Preparing a library impact statement
Another key step is the check that the library resources are sufficient. This is performed by the library staff of the unit’s college.
You are able to see a listing of all units waiting for a library impact statement by selecting Library Reviews from the menu.

Click on the title of the unit to show its detail and then click Edit unit. Scrolling down, there is Library section.

If the current library resources required to support the unit are already sufficient, the checkbox can be ticked. If additional action is to be taken, that can be noted. Otherwise, enter the details of the actions that the library intends to take. Click Update unit to save the impact statement information.

Once this information has been saved, a new button appears. Clicking Impact statement prepared indicates that the impact statement is complete and the unit is ready for the step of preparation.

The unit will no longer appear under Library Reviews.
The unit returns to ‘In preparation’ on the dashboard.
The Approvals section of the Unit will display the librarian and date
6.7 - College endorsement of a Unit
This applies to people with Academic Dean and AD Delegate roles.
Once a unit (whether new or a revision) has been prepared by having reviews done, it is then ready for review by the College Academic Committee (section 8 of the Unit Policy).
Units in this state will appear on the Units Dashboard in the Units in preparation section.
Preparing the CAC review
After drafting, the external review and the library impact statement are prepared the unit requires that the College Academic Committee review the unit.
- Locate the unit that you wish to perform the CAC Review on, click on it to show the detail

Note that:
- You can see the completed external review by clicking on Show external review button
- You can compare to the previous version of the unit by clicking the Compare to previous button
Click the Do CAC Review of unit button and the CAC Review form is presented

Click on Save review at the bottom of the page and you will return to the unit.
You now have some options as to what is next

Click on Do CAC Review of unit to continue to edit the review
Staff can view the CAC review by clicking on Show CAC review

Click on CAC endorses unit when the process is complete
The unit will now appear under the Awaiting Academic Dean’s approval section
6.8 - Linking to the Unit Guide from ARK
There are a couple of steps required to link ARK to the Unit Guide for a delivery. Due to the configuration, it is the same information that is entered in each.
- In the child unit in ARK, Turn editing on
- Click on Add an activity or resource in the first section
- Click on URL for the resource to add
- Enter the name for the link (e.g. Unit Guide)
- Place ‘https://units.divinity.edu.au/unit-guide' in the External URL field
- Type ‘sn’ into the first variable field
- Choose Unit Short Name from the drop down
- Click on the Save and return to unit button

6.9 - College auditing of scheduled units
This applies to people with Academic Dean roles.
Recording audit status in UMS
- Head to the UMS https://ums.divinity.edu.au/
- In the main menu, under Scheduled, click on “XX audit this year” where XX is your college’s abbreviation

- A list of deliveries will appear. This list includes the Scheduled Unit status (in_preparation, for AD, running) – for those with students enrolled, should be in the status of running.

- At the left-hand end of each item there is a button menu containing links

- The one labelled ARK goes to the child unit in ARK.
- The Audit, OK link records that the audit has been completed for that delivery and information is accurate
- Once clicked the UMS is updated to reflect this has been audited (green)
- You can click the same link again to move it to Audited, failed status (red)
- You can click the same link again to move it to a Audited, follow-up status (orange)
- Clicking a further time reverts it back to not yet Audited state (white)

6.10 - Markdown
Markdown is “a lightweight markup language with plain-text-formatting syntax”.
Basic Syntax
Input
This is *something with italics or emphasis* in it.

This has **something bold or strong** in it.

Paragraphs begin after a blank line.

This is a list

* Apple (you need the blank line ahead of it)
* Orange
* Pear

And another:

1. Genesis
2. Exodus
3. Leviticus
1. Numbers (note you don't need to correctly number all)
5. Deuteronomy
Output
This is something with italics or emphasis in it.
This has something bold or strong in it.
Paragraphs begin after a blank line.
This is a list
- Apple (you need the blank line ahead of it)
- Orange
- Pear
And another:
- Genesis
- Exodus
- Leviticus
- Numbers (note you don’t need to correctly number all)
- Deuteronomy
Links Syntax
You can display a full URL <https://www.ccel.org>

You can display [text to click](https://www.ccel.org) with a URL.
You can display a full URL https://www.ccel.org
You can display text to click with a URL.
Heading Syntax
## Section heading

### Subsection heading

#### Sub-sub section heading
Section heading
Subsection heading
Sub-sub section heading
7 - Repository
The Research Repository provides a collected view of the research output of the University.
7.1 - New Publications
Guidance on adding new publications to Repository
This document provides support on adding entries to the University of Divinity Research Repository.
See the New Publications Field Requirements table for a summary of required and optional fields.
Process and Submission
Submission
Research Active academics at the University can add new entries to Research Repository in the My Research Application on Divinity Portal.
For guidance on using Divinity Portal, see the Divinity Portal Getting Started Guide.
To begin adding a new publication to Research Repository on Divinity Portal, go to the My Research Application. Then select the New Publication button at the top right.

Select New Publication to begin.
Import
To import from an external source, follow the instructions in the Import from Source help document.The New Publication form has seven pages which are outlined below. Details about the requirements for each field are outlined in this document. To view a summary of required and optional fields for each publication type, see the New Publications Field Requirements table.
flowchart LR
    style id1 fill:#ffffff,stroke:#413e39,stroke-width:2px
    style id1b fill:#ffebec,stroke:#413e39,stroke-width:2px
    style id2 fill:#f7f3ec,stroke:#413e39,stroke-width:2px
    style id3 fill:#ece5d5,stroke:#413e39,stroke-width:2px
    style id3b fill:#b79754,stroke:#413e39,stroke-width:2px
    style id4 fill:#740005,stroke:#413e39,stroke-width:2px,color:#ffffff;
    style id5 fill:#a00021,stroke:#413e39,stroke-width:2px,color:#ffffff;

    id1>Item Details]
    id1b>Authorship]
    id2>Publication]
    id3>Classification]
    id3b>ANZSRC]
    id4>Upload]
    id5>Submit]

    id1 --- id1b --- id2 --- id3 --- id3b --- id4 --- id5
Item Details
Title
The Title of your published item. This is the title of your work, e.g. a book chapter, not the title of the book or journal in which it appears. Use headline-style capitalisation (CMOS 8.159).
Alternative Title
Used for translated titles or for specific formatting of a title (e.g. ASCII-only title).
Abstract
Enter an abstract of a few hundred words or less. Journal abstracts: (CMOS 1.93) and book abstracts: (CMOS 2.25).
Publication Type
Choose from one of the following Publication Types:
- Article - An article published in a journal or other academic publication
- Book - A monograph by one or more authors (not in an edited collection)
- Book chapter - A chapter in a published book
- Edited Collection - A collection of items of which you are one of the editors
- Thesis - A doctorate or masters thesis
- Published Conference Paper - A conference paper disseminated publicly (not otherwise published as a book chapter or part of an edited collection)
- Conference Presentation - A conference presentation, where a paper has not been published
- Formal Public Lecture - A public lecture, where a paper has not been published
Article, Book and Book Chapter allow the following Sub-Types:
- Book Review
- Translation
The above are important Tertiary Education Quality and Standards Agency (TEQSA) metrics and should be selected where possible. However, the following additional Publication Types are also available:
- Artefact
- Audio
- Composition
- Data set
- Enduring Teaching Material
- Event or Exhibition
- Experiment
- Image
- Literary Work, Art Work, or Musical Composition
- Patent
- Performance
- Report
- Video
- Other
Please note: the required fields for your publication will change depending on which Publication Type you choose.
Sub Type
Article, Book and Book Chapter allow the following Sub-Types:
- Book Review
- Translation
Thesis Type
Select from one of the following Thesis Types:
- Bachelor of Theology (Honours)
- Master of Arts (major thesis)
- Master of Arts (minor thesis)
- Master of Philosophy (major thesis)
- Master of Philosophy (minor thesis)
- Master of Theology (major thesis)
- Master of Theology (minor thesis)
- Master of Ministry
- Doctor of Philosophy
- Doctor of Theology
- Doctor of Ministry Studies
- Other
Issued Date
The date of publication. Dates of publication in the following calendar year may be entered (e.g. if the current year is 2024 you can enter 2025).
Required fields
Please enter the year, month, and day of publication. Month and day can be left blank if unknown or not applicable, but please try to be as specific as possible.Authorship
Association
The College or School that supported the publication, in most cases this will be the entity where you have an appointment (e.g. St Barnabas College or School of Professional Practice).
Authors, Editors & Contributors
Type
Select UD Staff or External. At least one of Authors, Editors or Contributors must be UD Staff.
Author, Editor or Contributor
UD Staff are selected from a drop down list. This list displays all staff members who are current publishers to the Repository. If your name is not on the list, or you want to select a person that is not on the list, please contact Research Strategy.
Enter the name of external authors, editors or contributors as per bibliography convention (CMOS 14.21) That is, inverted name order (last name first). Start with a capital letter unless the first word would normally be lowercased. (e.g. ‘Smith, John G.’ or ‘de Ville, Jean’)
Add any additional entries by clicking the plus icon beside Authors, Editors or Contributors.

Add an entry.
Remove entries by clicking the X icon at the right of the field.

Remove an entry.
Required information
Please note that at least one UD Staff member is required as an author, editor, or contributor. In most cases your name will be pre-filled as the author.Editor
UD Staff or External editors can be entered in the same manner as for authors. Note that some Publication Types, such as Edited Collection, do not allow an author field, but require one or more editors.
Contributor
Some publications may have contributors that are neither authors nor editors. You may enter them here.
Sponsors
If your publication was sponsored by one or more people or organisations, you may enter the name of your sponsors here. The sponsor can be entered as free text.
Publication
Publication Status
Select from one of the following Publication States:
- Published
- Unpublished: included with permission of the University of Divinity Dean of Research Strategy (DRS)
- Unpublished: included with permission of a Registered Training Institution (RTI) Research Coordinator
- Unpublished: included with permission of the relevant Chair of Examiners
- Unpublished: included with permission of the Director of a Research Institute
Copyright Status
To ensure the University complies with its copyright obligations, select from one of the following:
- Author owns all copyright; Unrestricted access
- Author owns all copyright; Restricted access
- Author owner of copyright; Unrestricted access granted to include external contributions under copyright
- Author owner of copyright; Permission not granted to include external contributions under copyright
- Publisher owns copyright; Permission granted for unrestricted access
- Publisher owns copyright; Permission granted for access within institution
- Publisher owns copyright; Permission not granted for unrestricted access
Journal/Publisher
Enter the name of the journal or publisher. The dropdown list will show all journals or publishers that contain the terms you have typed. You can search by any part of the name.
Tip
If the journal or publisher isn’t showing, try searching by parts of the name with common spelling.
Example: If you are looking for Nijmegen University Press, type ‘university press’ in the text field and scroll to ‘N’ from the dropdown list.
For Non-Traditional Research Outputs (NTRO), the publisher is free-form text.
Missing Journal/Publisher
If the journal or publisher is not listed and you have tried searching by different parts of the name, click the “My Journal/Publisher is not listed” link and enter the expected name of the publisher and the website of the publisher.
Once you have requested a new journal or publisher, you will be allowed to continue editing your item and save it to the Repository with the journal or publisher you have requested. Your request will be reviewed, and once approved, it will be available for selection for future items.
Place of Publication
Enter the place of publication that appears on the title or copyright page. Where multiple locations are listed, enter the first location. (CMOS 14.129).
Volume / Series Number
Enter the Volume or Series number in arabic numerals (e.g. 1, 2, 3,…).
Issue
Enter the Issue number in arabic numerals (e.g. 1, 2, 3,…).
Page Range
Enter the page range using arabic numerals separated by an en dash (-). Abbreviate, or condense, inclusive numbers following the Chicago style (CMOS 9.61). For example, enter ‘11-22’. Do not include ‘p.’ or ‘pp.’
Peer Reviewed
Indicate if the work is Peer Reviewed from the dropdown list.
Citation
Enter the citation in bibliography entry form following the University of Divinity Style Guide. Citations will appear on your University of Divinity Staff Profile.
Classification
Keywords
Enter keywords separated by a comma (,). Choose keywords that represent the content of your manuscript and are specific to your discipline or sub-discipline.
For example: “Paul, New Testament, Grace”.
Do not use a space, dash, newline, or any delimiter other than a comma to separate your keywords.
Discipline
Add the research/teaching disciplines relevant to the item. Assign multiple disciplines by clicking the plus icon beside Disciplines.

Add an entry.
Select from the following disciplines:
- A - Humanities
- A - Languages
- A - Philosophy
- A - World Religions
- B - Biblical Studies
- B - New Testament
- B - Old Testament
- C - Church History
- C - Systematic Theology
- C - Practical Theology
- D - Canon Law
- D - Ecumenical Studies
- D - Education Studies
- D - Ethics / Moral Theology
- D - Liturgy
- D - Missiology
- D - Pastoral Studies
- D - Religious Education
- D - Spirituality and Spiritual Direction
- D - Ministry Studies
Remove an invalid entry by selecting the X icon.

Remove an entry.
Identifiers
Record relevant identifiers. Available identifiers are ISSN, ISBN, ISMN, URI, DOI and OTHER. Select the Identifier Type from the dropdown list and enter the value in the Identifier Value field. To record additional identifier entries, click the plus icon beside Identifiers.

Add an entry.
ISSN
An International Standard Serial Number (ISSN) must be an eight-digit code, divided by a hyphen into two four digit numbers (e.g. 1234-5678).
ISBN
An International Standard Book Number (ISBN) must be 10 or 13 digits.
ISMN
An International Standard Music Number (ISMN) must be 13 alphanumeric characters.
URI
Enter the full URI (such as a URL) for the publisher’s entry of this item.
Please note that items will automatically be assigned a handle, which is prefixed with ‘https://hdl.handle.net’. This is a permanent link to your item. You are not able to edit the handle once it is assigned.
DOI
Enter the DOI in prefix/suffix format, where prefix takes the form 10.NNNN (e.g. 10.1000/182). Do not append the URL (e.g. https://doi.org/10.1000/182).
ANZSRC (Australian and New Zealand Standard Research Classification)
Understanding ANZSRC
Our University’s submission to TEQSA is partly assessed on how our research supports our accreditation as a Higher Education Provider. Your classification of your own research contributes to this assessment. The following section describes how to choose your Type of Activity (ToA), Field of Research (FoR), and Socio-Economic Objective (SEO) fields.Type of Activity1
Select the Type of Activity (ToA) that applies to this item. By default Pure Basic Research will be selected.
The other categories should only be used for research that specifies its application to an identified practical/applied problem.
Pure Basic Research
ANZSRC definition: Pure basic research is basic research carried out for the advancement of knowledge, without seeking long-term economic or social benefits or making any effort to apply the results to practical problems or to transfer the results to sectors responsible for their application.
Pure basic research means that your publication is mainly or entirely theoretical, and engaged with existing scholarship. In advancing knowledge, it seeks to apply critical creativity, thinking and/or analysis to an existing theoretical question, problem or topic. It is not authored with the intention of informing practical discoveries or practical problems, and does not involve methodologies which include empirical evidence or data sets in support of its conclusions.
Example
Sherlock, P. (2020). Monuments and the Reformation. In A. Walsham, B. Wallace, C. Law, & B. Cummings (Eds.), Memory and the English Reformation (pp. 168-184). Cambridge: Cambridge University Press. doi:10.1017/9781108900157.012Strategic Basic Research
ANZSRC definition: Strategic basic research is experimental and theoretical work undertaken to acquire new knowledge directed into specified broad areas in the expectation of practical discoveries. It provides the broad base of knowledge necessary for the solution of recognised practical problems.
Strategic basic research means that your publication involves a methodology by which empirical evidence or data sets are utilised towards achieving new theoretical analyses or conclusions. It itself it does not resolve a practical problem, however it contributes to a broader established practical question or problem.
Example
Hughes, Philip J. (2013) Organization of Leadership in Rural Parishes: Some Australian Catholic Case-Studies. Rural Theology, 11 (1). pp. 3-14. ISSN 1470-4994Applied Research
ANZSRC definition: Applied research is original investigation undertaken in order to acquire new knowledge. It is, however, directed primarily towards a specific, practical aim or objective.
Example
Dixon, Robert E., Stephen Reid, and Ruth Webber. “Contemporary Approaches to Religious Vocations in Australia.” The Australasian Catholic Record 98, no. 3 (2021): 335-348, https://search.informit.org/doi/10.3316/informit.991739913378486.Experimental Research
ANZSRC definition: Experimental development is systematic work, drawing on knowledge gained from research and practical experience and producing additional knowledge, which is directed to producing new products or processes or to improving existing products or processes.
Experimental research means that your publication addresses a practical question or problem and offers a reproducable methodology for a solution, and which bases its conclusions on prior theoretical and practical research. This kind of publication would be most relevant for the research and design sector, and for advances which have patentable outcomes such as the development of new medications or a new process for creating a room-temperature superconductor.
Example
Flamel, Nicolas. (2012). An Historical Survey and New Alchemical Methodology for the Production of the Philosopher’s Stone. Paris: Guillaume Guillard. doi:10.1234/12345678.123Field of Research
Our University’s submission to TEQSA is partly assessed on how our research supports our accreditation as a Higher Education Provider. Your classification of your own research contributes to this assessment.
Selecting codes and assigning attribution
In describing your research, select between 1 and 3 Field of Research (FoR) codes that apply to your item. You can assign these percentages to indicate the weighting they have within your work.
As a rule of thumb, University of Divinity publications will very likely be described by the 6-digit FoR codes within 5004-Religious Studies or 5005-Theology. By default, the first item will be pre-filled with 500501 - Theology at 100%.
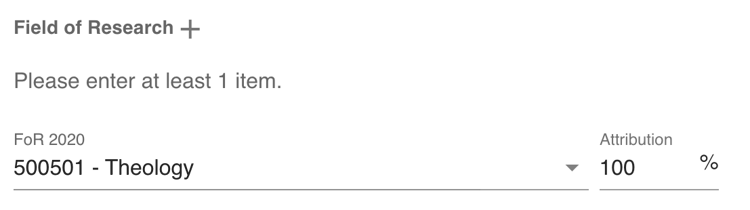
If you are assigning more than one FoR code, the first code will default to an 80% weighting.
Your research will likely suit a single FoR code from these categories with a weighting comprising a large majority (~80% or more). You can then select other FoR codes (as needed) to describe your research as it incorporates those other areas so that the total will come to 100%.
The allocate button below the weightings will automatically assign weightings so that the first item receives a weighting of 80% and the remaining 20% is distributed evenly between the remaining categories.
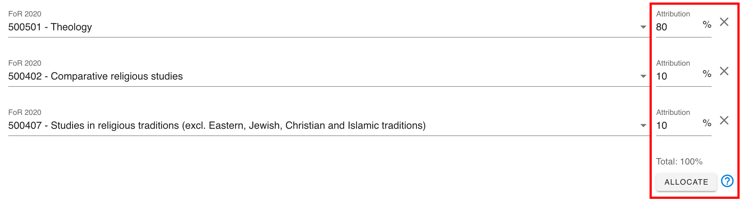
The allocated percentages must total 100% to proceed.

Guidance on choosing FoR codes
You may find that your publication is clearly described by one or more Field of Research codes. Sometimes with specialised research, the broadness of the FoRs can mean make it more difficult to discern what is most appropriate. There are no strict guides to the definitions of Field of Research codes, however - so if you can imagine your research intersecting with a particular FoR, then that is fine to assign it accordingly: it is a case of finding the best fit rather than the perfect fit.
For 5004 and 5005 codes, see below:
- 5004 Religious studies
- 500401 Christian studies
- 500402 Comparative religious studies
- 500403 Islamic studies
- 500404 Jewish studies
- 500405 Religion, society and culture
- 500406 Studies in eastern religious traditions
- 500407 Studies in religious traditions (excl. Eastern, Jewish, Christian and Islamic traditions)
- 500499 Religious studies not elsewhere classified
- 5005 Theology
- 500501 Theology
- 500599 Theology not elsewhere classified
View the full list of FoR codes at the Australian Bureau of statistics.
Example
Confoy, Maryanne (2015) Welcome, Inclusion, Attentive Presence: The Central Role of Pastoral Care in Catholic Health and Aged Care. Catholic Health Australia, Canberra.
- 500405 - Religion, society and culture
- 420316 - Palliative care
- 420301 - Aged health care
Socio-economic Objective
Select between one and three Socio-Economic Objective (SEO) codes that apply to your item. University of Divinity research will often fall under 1305-Religion and its sub-codes, listed below:
- 1305 Religion
- 130501 Religion and society
- 130502 Religious philosophies and belief systems
- 130503 Religious rituals and traditions (excl. structures)
- 130504 Religious structures
- 130599 Religion not elsewhere classified
The drop-down list on the form allows you to type keywords or codes you’ve used for similar research in the past to bring up a shortlist of options for you. You can also view the full list of SEO codes at the Australian Bureau of statistics.
When selecting one or more SEO codes, please note that some of the descriptions may seem too broad or narrow to describe your research. As with FoR codes, aim to find the best fit rather than the perfect fit. Only choose as many SEO codes as you feel are necessary for your publication.
Files
Add File
Click the Add File button for each file you will upload, then click the paper clip icon to select the file from your computer.
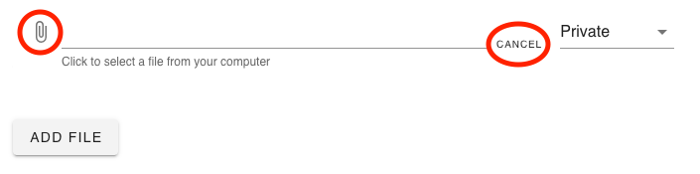
Click the paper clip to select a file. Click cancel if you do not wish to upload another file.
You can set permissions for each file as follows:
- Public - Repository viewers can download the file
- Private - Repository viewers cannot download the file, but can contact you to request a copy (requests will be processed via the Research Office)
- Embargoed - file remains Private until specified date, then becomes Public
If Embargoed is selected, you can set the date when the embargo will be lifted.
If you wish to remove a file, click the X icon to remove. Files marked for deletion will be removed when the form is submitted.

Click the X icon to remove a file.
Finish
Acknowledgments
You will be asked to acknowledge the following statements before submission:
- I declare that all information in this submission has been carefully checked and is accurate and free from errors.
- I declare that the accuracy of this submission reflects the standards of quality of the University of Divinity.
- I acknowledge that once submitted, this information will be immediately available on the public repository website.
Notes
Australian Bureau of Statistics. “Australian and New Zealand Standard Research Classification (ANZSRC).” ABS, 2020, https://www.abs.gov.au/statistics/classifications/australian-and-new-zealand-standard-research-classification-anzsrc/latest-release. ↩︎
7.2 - Import From Source
Add new publications to Research Repository using the Import from Source function.
This document outlines the process for uploading existing publication information to the Research Repository and is applicable to research active staff at the University.
For a comprehensive overview of adding records to the research repository, see the New Publications document. For a summary of required and optional fields, see the Field Requirements summary.
Research active academics can use the import tool to upload existing publication information from DOI or BibTex sources to the Research Repository using the My Research Application on Divinity Portal. For guidance on using Divinity Portal, see the Divinity Portal Getting Started Guide.
Note
Data imported from other sources may be incomplete or format data in different ways. Fields such as Author or Publication may not match the University database and will need to be corrected before the publication can be submitted to Repository.What you will need
The Import process accepts the following sources:
- a DOI
- a BibTex file
- a copy/paste BibTex entry
Submission
When importing from a remote source, please note that not all of the imported information will match the required format. In particular, you will need to make sure that your name and other researchers’ names have been matched correctly, and that there are no extra characters in your fields.There is additional information collected by the University which is not imported that you will need to complete.
Additional information you may require includes:
Importing sources
To begin importing from an external source, select the Import button in the My Research Application located at the top right.

Select Import to begin.
Import from DOI
To import form a DOI, select Import an item using a DOI from the Select Source dropdown.

Paste the DOI in prefix/suffix format, where the prefix takes the form 10.NNNN (e.g. 10.1000/182).
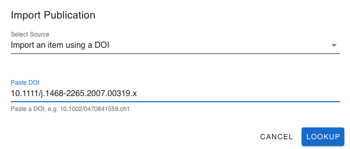
Select the Lookup button to trigger the import.
Paste a BibTex entry
To copy and paste a BibTex entry, select Paste a BibTex entry from the Select Source dropdown.
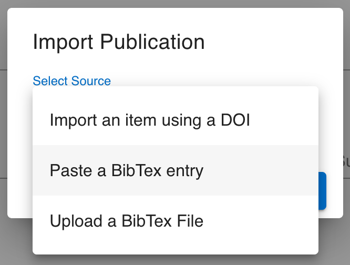
Paste the BibTex entry into the Paste BibTex text area.
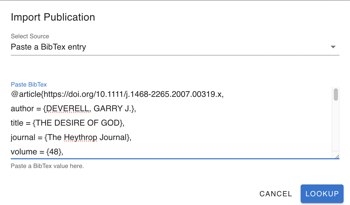
Select the Lookup button to trigger the import.
Upload a BibTex file
To upload a BibTex file, select Upload a BibTex file from the Select Source dropdown. To upload a BibTex file, select Upload a BibTex file from the Select Source dropdown.
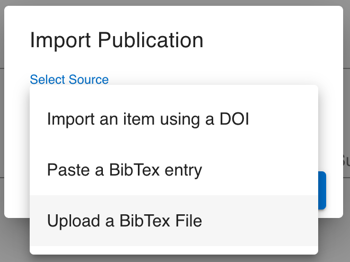
Click the paper clip icon to select the file from your computer.
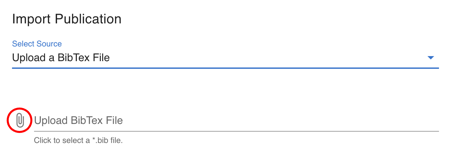
Select the Lookup button to trigger the import.
7.3 - Field Requirements
An overview of information collected for each type of publication in Repository.
This document provides a list of the required fields in the New Publications form.
See the New Publications document for details on each of the fields in the form.
The new publications form will automatically update the required and optional fields based on the selected publication type. The form will guide you in that process. The table below is designed to assist you in preparing information.
Note: Non-Traditional Research Outputs (NTRO)
This table covers the most common item types. For brevity, NTRO types are not included but the form will reflect the requirements of each NTRO item type.Key
- Required field
- Optional field
- Field does not exist
| Article | Book | Edited Collection | Book Chapter | Research Report | Published Conference Paper | Thesis | |
|---|---|---|---|---|---|---|---|
| Item Details | |||||||
| Title | |||||||
| Alternative Title | |||||||
| Abstract | |||||||
| Issued Year | |||||||
| Month | |||||||
| Day | |||||||
| Authorship | |||||||
| Authors | |||||||
| Editors |
| Article | Book | Edited Collection | Book Chapter | Research Report | Published Conference Paper | Thesis | |
|---|---|---|---|---|---|---|---|
| Publication | |||||||
| Publication Status | |||||||
| Copyright Status | |||||||
| Publisher / Journal | |||||||
| Book Title | |||||||
| Series Name | |||||||
| Volume / Series # | |||||||
| Issue | |||||||
| Page Range | |||||||
| Peer Reviewed | |||||||
| Citation |
| Article | Book | Edited Collection | Book Chapter | Research Report | Published Conference Paper | Thesis | |
|---|---|---|---|---|---|---|---|
| Classification | |||||||
| Keywords | |||||||
| Disciplines | |||||||
| Identifiers | |||||||
| ANZSRC | |||||||
| ToA 2020 | |||||||
| FoR 2020 | |||||||
| SEO Objective |
8 - Vox
Vox is an online magazine for sharing news and advertising events from the University, it’s Colleges, Schools and affiliated partners.
Vox reaches an audience of staff, students and alumni, as well as a broader public audience. All content shared on Vox should be appropriate for a public audience.
- News - share important announcements and reports on recent happenings within or about the University community.
- Events - advertise upcoming gatherings which are open to the public (unless otherwise specified).
- Opinion - articles written by academics and members of our wider community to engage in matters of social policy and other topical subjects. Views, thoughts and opinions expressed in these articles belong solely to the author and do not necessarily represent the official position of the University or any of its member Colleges or Schools.
- Jobs - employment opportunities from across the University, and affiliated partner organisations and churches.
- Study with us – for Colleges and Schools to advertise a selection of upcoming units or programs that may have broad public appeal.
Social media
Most content published on Vox is shared to the University’s Social media accounts (Facebook and Twitter). If you do not wish for this to occur, please contact vox@divinity.edu.au as soon as possible after submitting your content.
Vox weekly news
Vox weekly news is emailed to subscribers on a Friday afternoon (3pm Melbourne time). It includes all news/job/opinion/study articles published since the previous week, and the next 10 upcoming events (in date order).
8.1 - How to Submit
Instructions on how to submit items to Vox.
How to submit an article
Go to: https://vox.divinity.edu.au/contribute/
Complete the form, providing as much information as possible.
Once submitted, the Vox editor will review and publish your content. This usually occurs within 2-3 working days, but during busy periods may take slightly longer.
How to submit an event
Go to: https://vox.divinity.edu.au/submit-an-event/
Complete the form, providing as much information as possible.
Once submitted, the Vox editor will review and publish your event. This usually occurs within 2-3 working days, but during busy periods may take slightly longer.
9 - Websites
Documentation on University wordpress sites and documentation site
9.1 - Introduction
A primer on web structure and accessibility
Publishing Content for the Web
The web relies on content being organised in a semantic structure that a machine can read. You’ll know this language as HTML (Hyper-Text Markup Language). Maintaining the standards of this markup helps machines—search engines, social media, apps and bots, and other websites—access and distribute content reliably. It also helps the different parts of a webpage, and its internal relations and functions, be interpreted and rendered properly—in a way that humans can usefully experience.
When we develop and organise information on the web, we need to keep this markup in mind. It also means that the information produced for this medium will be vastly different than if it were intended for another. The guidelines and documentation in this section, identify some of the simple (and best practice) ways you can make your communications shine in this medium. They will help you use the WordPress Content Management System (CMS), take advantage of integrated content drawn from other University systems, and draw on available analytics. Going forward, when new features are introduced, they will be introduced with relevant documentation.
Accessibility
Accessibility is a practice and guiding principle for developing a web that includes everyone, but especially people with disability. It ensures that the barriers to online participation are either removed entirely, or minimised. It doesn’t only benefit people with disabilities. It helps anyone facing obstacles, whether situational—like having broken glasses, or a mouse with a dead battery—or more systemic obstacles—like having limited bandwidth and speed. Accessibility is important, both as a business advantage and a legal obligation, but it’s also something we pursue in recognition of the diversity and dignity of the people we want to communicate with online.
The Four Principles of Accessibility
The Four Principles of Accessibility help define what is necessary for someone with a disability to access and use the web. While they typically reference user-interface components, such that we might use within Blocks, the principles can apply to *any *information on the web, including how we construct our page, or write text. The four principles of accessibility require that content is:
- Perceivable: Information and user interface components must be presented to users in ways they can perceive.
- Operable: User Interface components and navigation must be operable for users in ways they can perform.
- Understandable: Information and the operation of the User Interface must be understandable.
- Robust: Content must be robust, such that it can be reliably and consistently interpreted by a wide variety of technologies.
If any of these are not true for our sites, people with disabilities will not be able to use our sites. You can review the Accessibility Principles and encounter the people who rely on its implementation to better understand—and champion—accessibility.
Web Content Accessibility Guidelines
A working group of the World Wide Consortium provides guidelines to help implement the Four Principles of Accessibility, and make the web an accessible space—specifically for people with disability. These guidelines are called Web Content Accessibility Guidelines (WCAG), and they can be observed in three standards of compliance. Some can be met simply by keeping a few things in mind when creating content, most are automatic and already integrated within WordPress or can be programmed by developers, and some require considerable technical resourcing. Web Content Accessibility Guidelines are not necessary reading for Content Managers, but familiarity is essential for developers.
We aspire for compliance to the very achievable AA standard (of the most recent, stable version available: Version 2.1, at the time of writing) and still have considerable work left to do.
9.2 - Link: Connecting Content
How to best use links in web content
Links let visitors (human and non-human) navigate across the web, and understand how content relates to other content. With linking best practices, you can give visitors the signs and confidence they need to navigate to important and helpful information.
Relevance is Key
Every link must have an obvious and valuable reason to exist. Links must meaningfully connect the link’s location with its target, and accurately communicate something of that relationship clearly and understandably within the link-text.
Quality linking is better than quantity. Too many links will overwhelm visitors with competing options and directives, and can signal to search engines that a site is “link spamming” to manipulate their metrics—rather than optimise its content. The relevance of a link is a key metric for determining rankings on search engines. So its best to avoid re-linking to the same target, or similar targets, even when there are opportunities to do so in the copy. Link the first time only, or wherever it seems most clear and useful on the page. This also ensures that links on each page remain unique, and avoids the appearance of “keyword stuffing”.
Link Parts
Links in the WordPress editor include three parts. The link-text, the link-target (what the link is linking to), and other link-attributes, typically the “Open in new tab” option.

Attachment options… Link parts when adding links in some Editor Blocks. Text (link-text), URL (link-target) and the “Open in new tab” toggle.

Attachment options… Link parts when adding links in some other ways. URL (link-target), Link Text (link-text) and the “Open in a new tab” checkbox.
Link-Text
The link-text helps define what the visitor can expect at the link-target. When nesting a link within copy, the link-text should include those relevant words in the surrounding text that helps make the target-link clear. Ideally, a link could be removed from everything in its immediate context, with the link-target still making perfect sense to the visitor—just from the link-text alone.
Link-text should succinctly describe the content you are recommending at the target-link. If that content is the whole page, your link-text may be as short and generic as a single keyword. It could be longer. But it should only be as long as needed to define and communicate the link-target clearly.
Open in New Tab
The “Open in new tab” option is best used sparingly. It is generally not considered accessible, and normally has security implications. New tabs can disrupt expected browser functions, and disorient visitors as to their location on the web. Use the “Open in new tab” option if your source page features long video content or audio files, or if the target-link features a form.
Linking to Sections of Content
Linking directly to a particular section helps visitors find information quickly.
Using Existing Links to Sections
Pages often include links to different sections in a page contents table, or with its headings. If this is the case, you can get that URL simply by visiting the link, and copying it from your browser. Use this URL as your target-link.
Creating Links to Sections
If there isn’t an existing link available, you will have to inspect the HTML. The specifics may differ according to your browser of choice, but the process will be like this:
- Identify the element you want to link to. A Heading is an appropriate and typical element to link directly to.
- Right-click on the element, and select “Inspect element”, “Inspect” or “Developer Tools > Inspect”.
- A Browser Panel will open with the HTML as one of its sub-panels, and your selected element will be highlighted. In most browsers, you can hover over this element in the sub-panel, to also highlight it in the rendered version. This way you can confirm what element was selected. If the element is incorrect, you can try again, or select another element in the sub-panel. If the selected element is too specific, you can find the correct element by tracing its parent elements upwards. If the selected element is too vague, you can do the inverse to find its child elements. You may need to expand or contract individual elements with the available right/down carets.

An example of a Heading element in HTML. The ID attribute for this element is “specialist-study-options”. The target-link to this element is “https://divinity.edu.au/study/future-students/#specialist-study-options".
- Once you identify the correct element, identify and copy its ID attribute. Heading elements will typically have IDs. If your element does not have an ID attribute, you will have to locate a relevant element that does.
- Copy the page URL from your browser, add a hashtag, followed by the element ID attribute. Use this URL as your target-link. Check the caption of the example above, for an example target-link.
Linking to External Sources
Linking to an external source connects our site in a reciprocal relationship, for better and worse. It helps establish our reputation as being trustworthy when we link to a trustworthy source, and it reinforces its trustworthy reputation. If the site is not trustworthy, it’s simpler to omit the link where you can, or find a better source. We can’t control the content or condition of external sites, and don’t want to risk our reputation on unnecessary links, nor inadvertently direct our visitors to sites that may be (or may become) harmful.
External links will be automatically appended with an icon to signify that they link to content outside of the site. Currently these are not visible to those using screen-readers.
Passive Linking

Examples of passive links nested in copy.
Passive links are links included in content without any further suggestion that visitors should use them. They don’t require any prefacing or commentary. When nested in text copy, they just exist on top of the text. If the link-target were to be removed, the copy would otherwise remain the same and its absence wouldn’t disrupt the reader. Passive links offer more (often clarifying) information if the visitor opts for a little detour. Use them when you think there is content elsewhere that helpfully expands on the information, or is communicated at a more authoritative or canonical source—almost like a reference.

An example of a passive link to an authoritative, canonical and external source. Note the appended external link icon.
Menu Links
When adding a link to navigation menus, where space is variously limited, include the shortest viable description or keyword of the link-target. Guidelines for adding and editing menu items will be covered more extensively elsewhere in the documentation (yet to be completed).
Passive Linking within the Text too Subtle? Try Blocks
If a passive link nested in your text doesn’t adequately represent the value of the link, and nor does it warrant a more directive link, you should use a feature-box or info-notice block instead. These blocks will be covered more extensively within the block documentation (yet to be completed).
Passive Linking not Relevant to the Copy Alone? Try Hotlinks
If a passive link doesn’t belong within your text because it reflects a relationship of the *whole *page to something else, you should add your link as a Hotlink. Hotlinks are displayed in footers and sidebars to represent broader, more thematic connections to other content. Hotlinks will be covered more extensively elsewhere in the documentation (yet to be completed).
Directive Linking

An example of a directive link used in our current documentation. It leads with language that empowers and encourages visitors to take action, and provides a concrete impetus. The link-text is long, but it’s as succinct as necessary to clearly communicate the intended directive.
When actively directing a visitor, purposely empower and encourage them to use a link in the surrounding copy. You can empower your visitor to take action by leading with “you can”, but exclude these addresses from the link-text. Including a concrete and compelling impetus for the visitor, also helps visitors better understand why they should action a directive. These are generally excluded from the link-text, unless they’re essentially descriptive of the target-link.
Communicate confidently by omitting hedging or weasel-words that soften or qualify the ask (like “please” or “consider”). All directive links are confident because your content is carefully considered, trustworthy, and always beneficial to its visitors.
Accessible, Dynamic Language
Employ dynamic, active verbs, and include them within your link-text. Choose verbs that avoid specific mechanics. “See document” or “click here”, for example, refer to actions that might not be performable by people with visual or motor impairments. Emphasise more accessible verbs instead: a mental process or an experience behind the performed activity. Not only is this way of writing more engaging, and empowering generally, it adds meaning to the widest possible audience.
There may be instances where plainer verbs like “read” are preferable, but consider less common, creative alternatives too. Examples of some dynamic, active verbs you could use, include: Access, Browse, Check, Confirm, Consider, Consult, Discover, Encounter, Engage with, Experience, Explore, Find, Inspect, Investigate, Learn, Make sense of, Search, Seek.
“See document” and “click here” are generic links that offer little meaningful reference to the link-target, and relies on a context that might not be being experienced by every visitor. For someone using a screen-reader, on a feed of truncated posts where context has been removed, for example, these links may have no personal or practical meaning whatsoever.
Examples of accessible link-text that employ dynamic, active verbs and include more engaging descriptions of the target-link, include: “you can make sense of accessibility”, and “you can understand your responsibility to people with broken glasses”.
Directive Linking within the Text too Subtle? Try Blocks
Most of the time, if you are directing a visitor to take action—like enrolling on an enrolment page—nesting links in your text may misrepresent its importance. In this case, you should use a button, a document or a call-to-action block instead. The same guidelines here will generally apply to creating links with Blocks, even if they might require terser link-text. Blocks include some additional built-in provisions that mitigate some of the problems with short and less-descriptive link-text. These blocks will be covered more extensively within the block documentation (yet to be completed).
Canonical URL Linking
Using unoriginal or duplicate content without attributing the original source is the SEO equivalent of plagiarism and will harm our rankings. So to properly recognise the author/creator and/or the origin of the original content, and to make it clearer for people using search engines, include an attribution to that content by assigning a special [canonical URL in page meta-data(/staff-docs/web-content/pages-meta-data-and-seo-settings/). A canonical URL does not suffice for permission—if you want to post content made by another author, you still need to ask.
9.3 - Images and Media Items: Meta-data and SEO Settings
How to use images in accessible and search friendly ways
Every media item has settings that you can use to optimise the page for accessibility, search engine results, and indexing on your website. Meta-data for media items can be assigned for each item through the Media Library (via the WordPress Dashboard sidebar).
Image Meta-data
Title
Titles are an advisory attribute, appropriate for a tooltip. Titles are populated automatically from the file name when uploading media items, but are best replaced with a caption in the caption field. If left blank, WordPress will attempt to construct one from other meta-data. This is preferred if you add a caption, and include an author/creator.
❗ Alternative Text (Alt-Text)
Alternative text, or alt-text, is an important tool to make our website accessible and non-discriminatory. Alt-text provides visitors unable to view images to have an experience that is analogous to those who can. This could include people who are unable or unwilling to download images, those who have a visual impairment, and bots that are scraping or indexing our content. It is also displayed if the image fails to load.
Alt-text should be assigned in almost all cases where the image is not strictly decorative. If in doubt, add alt-text.
Alt-Text should be helpfully descriptive, yet concise. 125 characters or less is ideal. Include the item’s subjects or features, activities and setting; use adjectives to include interesting and relevant details.
Description
Descriptions are used on media attachment pages, and may also be displayed in image search engine results. Our websites do not use media attachment pages generally so descriptions have limited value presently. To add descriptions to media items, consult the suggestions for Meta Descriptions.
Caption
Captions provide additional information about the image and its subject, for people who can see the image and want to know more. Unlike the alt-text or description, the caption shouldn’t simply mirror what the image actually shows. When uploading paintings or other visual art, add its title in the caption field.
Image Focus
In some applications, images are automatically cropped to respond to smaller device dimensions. To ensure an image’s subject is kept within an observable frame, select the focal point closest to the subject’s center—usually this is a person’s face/eyes. If there is no obvious subject matter, use the center focal point to crop equally from the image’s outermost edges. The center focal point is selected by default.
Video, Audio and Other File Meta-data
Most other media types will have the fields listed above, excepting the alt-text and image focus fields.
Copyright
All website content must strive to reflect the University’s commitment to academic integrity in its ethical, honest and responsible use and communication of information. An extensive array of licensing agreements exist to cover different types of image usage. If the content you are using is covered by a Creative Commons license make sure your use is covered by its license. A non-commercial Creative Commons license does not cover commercial uses, like marketing, even for non-commercial organisations.
Sourcing Images
- Unsplash is a collection of high-quality, free images with unrestricted use for University purposes, including marketing.
- Wikimedia Commons is a useful repository for images, especially art and historical artefacts. Images on Wikimedia Commons are not necessarily available for unrestricted use. You must confirm each image’s license before uploading it.
Citing Images
As a content manager, you’re responsible for ensuring that the University has the relevant license for the use of the images you upload. Do not use content, including images, without possessing the usage rights or permissions to do so. Citing the creator or copyright holder is not a substitute for usage rights or permission. Consult the canonical URL for re-publishing existing content under the Theme SEO Settings.
Copyright Meta-data
To properly cite an image, use the image meta-data fields below as needed.
Author/Creator
It is always nice and helpful to give attribution to an author/creator. So even if the license does not demand it, add the creator’s name. If there’s no known author, you can leave this field blank.
Publisher
The publisher is the organisation that originally hosted the image. If there is no known publisher, or it does not differ from the author, leave blank.
Source URL
Use a URL to direct a visitor to the source of the image from where it was downloaded, so that they can identify that image, its context and any additional information.
Copyright Year
The year that copyright was asserted. If the year is a date range, just include the latest year. If no copyright has been asserted, or it is not known, you can leave this field blank.
Year Created
The year that the object was created. If the year is a date range, include the date range. If no creation year is known, you can leave this field blank.
9.4 - Pages: Meta-data and SEO Settings
How to optimise page settings for accessibility and search
Every page has settings that you can use to optimise the page for accessibility, search engine results, and indexing on your website. These settings should be reviewed every time you update the page to make sure they remain properly configured. These optimisations are largely configured on a page-by-page basis. To optimise a page, visit the editor for that page in the WordPress dashboard.
Page Meta-Data
Excerpt
An excerpt is a summary of the page that is displayed in some blocks and some archives. Writing an excerpt is an opportunity to craft a useful summary of the page content. They should still be enticing, but it’s more important to cover as many of the main points as possible so that visitors feel informed about the content they are about to access.
A good excerpt is short, punchy and descriptive of the page. As with all writing for the internet: keep it concise and don’t bury your lede—say the most important and interesting information first. Less than 40 words is ideal and can be guaranteed to display properly. The excerpt maximum length is 55 words, so you can exceed forty words if necessary (but the full display of the excerpt cannot be guaranteed).
The excerpt field is accessed in the Settings panel to the right of the editor, under the page tab, within the Excerpt accordion.
If left empty the excerpt may be drawn automatically from the first few lines of the page.
Theme SEO Settings
All Theme SEO Settings fields are available in the Theme SEO Settings accordion in the bottom panel of the page editor.
Only the canonical URL is essential in some circumstances. All SEO (search engine optimisation) configurations should be sincere, specific and succinct.
Document title
A document title appears as the title of the page in search engine results, and in the tab in your browser. If left blank, the document title will automatically draw from your Page Title (at the top of the page). Add a document title only if your page title is too long (more than 65 characters long), not meaningful or appropriate for a search engine result, or in instances where the context of your page, among other pages, might be necessary to understand the page title.
Meta-Description
The meta-description is a short page description featured under its title in search engine results. They do not affect search engine rankings. But as they can entice people to visit, they can be a useful tool for marketing content. Meta-descriptions differ from excerpts in that they will not display within the website, and they are not summaries of content—they are inviting descriptions of the content. You may not need to cover all of the main points like a summary would, but it should be informative for potential visitors.
Meta-descriptions are best when brief, enticing and incorporate relevant, unique keywords. Less than 40 words is advised; less than 20 words preferable. Search engines do not guarantee the display of a particular length (Google will typically allocate about 20 words, but it varies widely). As with all writing for the internet: keep it concise and don’t bury your lede—say the most important and interesting information first.
Avoid double-quotation marks. These indicate truncated descriptions and will automatically remove any text that follows. If double-quotation marks are important to communicate meaning you can replace them with the HTML entity instead: "
Meta-descriptions are optional. If left blank, the meta description will automatically draw from the excerpt (if it exists) or the first few lines of the page.
Meta-Keywords
This field assigns meta-keywords to the page. Meta-keywords aren’t consistently used by search engines so are not of great value. That said, future website indexing on University sites may draw on these keywords to weigh internal search results and improve the filtering of our content. If you would like to add meta-keywords, make sure they are highly unique and relevant to the page, and accurately reflect the page’s content.
Canonical URL
A canonical URL tells search engines that the content on the page has been copied from another “canonical” page on the internet. Adding this URL lets the search engine know which is the original and that it should be preferenced in its rankings. You should add canonical URLs to your page whenever you are copying content from the Divinity.edu.au site.
A canonical URL does not suffice for permission—if you want to post content made by another author, you still need to ask.
9.5 - Documentation site
Documentation and references for the it.divinity.edu.au documentation site
9.5.1 - Documentation Style Guide
An introduction to the format and tone of University documentation
This document explains the format of the documentation on it.divinity.edu.au. It is intended for contributors of documentation to this site.
For technical guidance on contributing, see the it-site GitHub repository readme.
For technical guidance on shortcodes and HTML syntax used on this site see the Code Cheat Sheet.
This document provides a general overview of the style of the it.divinity.edu.au content and is in no ways exhaustive. If you are unsure and need further guidance, see the Google developer documentation style guide, the University of Divinity Style Guide or The Chicago Manual of Style Online (Library Hub login required).
Types of Documentation
University of Divinity documentation is categorised as either Training, Guides or Documentation. These are defined as:
Documentation
Documentation is specific to a particular application and task or concept such as resetting a password, adding a profile picture or how internet links should be used.
Documentation should be aim to be atomic (a singular part of a whole) with the intent that it would be referenced in response to a specific problem or inquiry. If an application sends someone to a support document, it should assist them with the task they were attempting in that application.
Documentation is by nature static, unidirectional in engagement and available at any time without a deadline or completion requirement. A user might access the same document multiple times to recall or diagnose different problems.
Guides
Guides can be thought of as sequenced documentation which connect a series of atomic tasks as part of a larger whole. For example, the ARK: Signalling with Text and Media Areas applies multimedia design theory to the technical processes of adding a series of different types of resources to a section on the Learning Management System. As such it is in multiple parts and regularly sends users to specific documentation on steps.
Guides are intended to help users navigate through a series of concepts or provided collated upskilling on a series of tasks. They might be produced as a result of in situ training such as a Teaching Conference presentation but they will not require completion or have an associated assessment.
Training
Training refers to skill or knowledge development that requires completion and includes assessment. Training might be used for orientation/induction to policies and expectations (e.g. Code of Conduct) or professional development to a specific role or function (e.g. course adviser).
Assessment might be automated (such as an ARK quiz) or be conducted separately by an examiner(s). The training might be entirely online or hybrid with an in-person or Zoom session.
Location of Documentation
Documentation and guides on University IT applications should be hosted on this site (it.divinity.edu.au). At this stage, this site is focussed on documentation in the domain of the University IT department.
Documentation taxonomy
This site has 5 top level documentation folder trees:
Getting Started is accessible from the home page while the other trees are accessible from the top navigation.
Staff Documentation Structure
Staff documentation is grouped by IT application, these are all listed on Getting Started - University Systems.
Outside of this structure is a Getting Started folder and a Guides folder.
Student Documentation Structure
As per Staff Documentation but mostly centred around ARK with a reference page to other University student guides on other websites.
Format of Documents
Page Info Scope notice
Documents should begin with a Page Information notice ( {{% pageinfo %}} ) that scopes the purpose and intended audience of the document. Provide direction to other pages if application might be confused or external references are needed. For example:
This document explains the format of the documentation on it.divinity.edu.au. It is intended for contributors of documentation to this site.
For technical guidance on contributing, see the it-site GitHub repository readme.
For technical guidance on shortcodes and HTML syntax used on this site see the Code Cheat Sheet.
For assistance with inserting Page Info notices, see the Code Cheat Sheet
Heading and content structure
Write in a linear progression through a process. Follow the inverse pyramid structure of importance, placing important information at the top of the document and assuming readers will skim the document.
If users may understand the process and just need a quick primer on a key step, you can provide a summary or internal link. A key example of this is the prominent Reset your SSO Password button at the top of the Login Guide. During a stage of major process change, a prominent notice might be required. For example, after the December 2023 ARK upgrade, this notice was placed on the Login Guide:
FAQ: Change to ARK login
ARK switched to Single Sign On in December. If you have difficulty logging in, follow the steps to Reset your SSO Password below.The pages should follow a linear progression from <h1> (markdown: #) to <h6> (markdown: ######), beginning with <h2> (the page title is <h1>). This is explained in the Presenting Information document. If a section of a document might need direct referencing (either internally within the page or from another document), it should have its own heading. For example, the link to Presenting Information earlier in this paragraph, has a direct link to the heading Headings and paragraphs, achieved by appending #headings-and-paragraphs to the end of the link.
For information on formatting documents for this site, see the Markdown reference.
Process diagrams
For workflows or processes, a flowchart may help illustrate the sequence of events or decision making points. For example (from New Publications):
flowchart LR
    style id1 fill:#ffffff,stroke:#413e39,stroke-width:2px
    style id1b fill:#ffebec,stroke:#413e39,stroke-width:2px
    style id2 fill:#f7f3ec,stroke:#413e39,stroke-width:2px
    style id3 fill:#ece5d5,stroke:#413e39,stroke-width:2px
    style id3b fill:#b79754,stroke:#413e39,stroke-width:2px
    style id4 fill:#740005,stroke:#413e39,stroke-width:2px,color:#ffffff;
    style id5 fill:#a00021,stroke:#413e39,stroke-width:2px,color:#ffffff;

    id1>Item Details]
    id1b>Authorship]
    id2>Publication]
    id3>Classification]
    id3b>ANZSRC]
    id4>Upload]
    id5>Submit]

    id1 --- id1b --- id2 --- id3 --- id3b --- id4 --- id5
Diagrams should not be used as the only way to convey information and the information should be clearly indicated in other ways in the document.
See the Code Cheat Sheet for the code for an example Mermaid flowchart.
Working with Policy and Sources
Where a workflow or process is governed by policy, the policy should be clearly referenced and pointed to as the authoritative source. If policy is unclear, do not extend the policy in documentation.
As clearly as possible, refer users to the relevant policy or policy guidance on the University website. For example:
Note: This page documents how to use the extension request form. Students are advised to check their eligibility for an extension on the Grading and Assessment page and the Assessment Policy before completing the form.
If you are unclear about your eligibility for an extension, contact your lecturer or the Academic Dean at your college.
9.5.2 - Code Cheat Sheet
Cheat sheet for content developers on shortcodes and html used in docs
This page is a technical reference document for this documentation site.
It is not applicable to Wordpress sites.
Alert shortcode
Alert shortcode is used for essential information or tips. Essential information should be in the primary colour and tips short be in the secondary colour.
Parameters
- title - free text title
- color - stylesheet defined colour name. primary is
#b10024and secondary is#a48545. - alert text - free text placed inside the alert tags
{{% alert title="title goes here" color="colour goes here" %}}
Insert your alert text here
{{% /alert %}}
Example Shortcode
{{% alert title="Example alert shortcode" color="primary" %}}

This is an example alert shortcode. Colours defined in the site are ```"primary"``` (brand red #b10024) and ```"secondary"``` (brand gold #a48545).

{{% /alert %}}
Example Output
Example alert shortcode
This is an example alert shortcode. Colours defined in the site are"primary" (brand red #b10024) and "secondary" (brand gold #a48545).Imgproc shortcode
See Docsy Doc: imgproc shortcode
Add screenshots and other images using the imgproc shortcode. The shortcode will resize the image for you and place it inside a figure tag with a border to display neatly on the page.
The imgproc shortcode takes an image in the page bundle (basically the folder in which the document is located - see Docsy docs: Page bundles) and resizes it on page build based on the specified processing parameters. The Fit process is the only process in common use.
To add a screenshot using the imgproc shortcode:
- Take a screenshot and place it in the same folder as the markdown page. The folder structure followed on this site is to create a folder with the name of the document and a single page
index.md(see Hugo docs: Single page templates). This structure is followed for ease of site maintenance. - Name the screenshot a unique name. A semantic naming convention followed on most docs is:
staff/student-docs + application + document name + interface element + action. A unique name is necessary to ensure that the shortcode processes the correct image. - Insert the
imgprocshortcode, placing the filename in the first position. - Set the dimensions inside the third position.
- As appropriate, add a caption between the open and close tags of the shortcode.
Parameters
- filename - unambiguous name of the image in the same page bundle as the document
- process - usually
Fit. Could beResize,FillorCrop - processing options - for fit width in pixels and height in pixels separated by “x” (e.g.
250x250) - Image Caption - note: if annotating (see Annotate images), make sure this doesn’t move your annotations on different viewports
{{% imgproc “filename” Fit “processing options” %}}
image caption
{{% /imgproc %}}
Debug tip
Incorrect or ambiguous image names are a frequent cause of Hugo server errors. Following the staff/student-docs + application + document name + interface element naming convention strictly will help avoid these errors.

Example Shortcode
{{% imgproc "docs-site-code-cheat-sheet-example-imgproc" Fit "450x450" %}}

This is a sample code for an imgproc shortcode with caption. (Note that the pictured example shows syntax markup in VSCode).

{{% /imgproc %}}
Example Output
This is a sample code for an imgproc shortcode with caption. (Note that the pictured example shows syntax markup in VSCode).
Page info shortcode
{{% pageinfo %}}

**Insert info text here**

{{% /pageinfo %}}
Example shortcode
{{% pageinfo %}}

This is a page info box.

{{% /pageinfo %}}
Example output
This is a page info box.
Youtube shortcode
{{< card header="$1" >}}

{{< youtube id="$2" title="$1" >}}

{{< /card >}}
Mermaid
The Mermaid diagramming and charting tool is installed on this site. For a guide to using Mermaid see the Mermaid Doc: Getting Started.
Mermaid flowchart
    ```mermaid
    flowchart LR
        style id1 fill:#ffffff,stroke:#413e39,stroke-width:2px
        style id1b fill:#ffebec,stroke:#413e39,stroke-width:2px
        style id2 fill:#f7f3ec,stroke:#413e39,stroke-width:2px
        style id3 fill:#ece5d5,stroke:#413e39,stroke-width:2px
        style id3b fill:#b79754,stroke:#413e39,stroke-width:2px
        style id4 fill:#740005,stroke:#413e39,stroke-width:2px,color:#ffffff;
        style id5 fill:#a00021,stroke:#413e39,stroke-width:2px,color:#ffffff;

        id1>$1]
        id2>$2]
        id3>$3]
        id4>$4]
        id5>$5]

        id1 --- id2 --- id3 --- id4 --- id5
    ```
HTML elements
Icon tables
Create table in excel with Y, o N. Upload CSV to Markdown Tables Generator. Find and replace with HTML below:
Field required
<i aria-hidden="true" class="fa-regular fa-circle-check" title="Required field" style="color: #009400;"></i>
Optional field
<i aria-hidden="true" class="fa-regular fa-circle" style="color: #898379;" title="Optional field"></i>
Field does not exist
<i aria-hidden="true" class="fa-regular fa-circle-xmark" style="color: #d10000" title="Field Does Not Exist"></i>
Annotate images
Outer HTML
<div class="position-relative" style="max-width:1000px;">

</div>
<p>
Tippys
Change the following as required:
- href
- bg-primary or bg-secondary
- style left and top position
- data tippy content
<!-- Marker 1a: Section Description -->
<a href="#presentation-resources" class="screenshot-marker lh-1 fw-medium text-white position-absolute transform-center px-2 py-1 bg-primary rounded-circle" style="left: 26%; top: 1.5%" data-tippy-content="Section Description" aria-expanded="false">1</a>
10 - Office365
10.1 - UD webmail
Information for staff who have a University email address.
Logging into your University email
In your web browser head to https://outlook.office.com/owa/
Username: your email (xxxx@divinity.edu.au) PW: [use the password provided]
On first login you will be prompted to add a secondary phone or email to be used in the event that you lose access to your account. Please follow the prompts to provide a phone number.
How to change your University account password
- Click the profile button (circle shape with your initials top right of menu)
- Open “View account”
- Locate the block that says “Password” and select “Change Password”
- Enter old password, create a new password and submit
- You may need to restart any Microsoft apps that use this account (Outlook, Teams, etc) and login again with the new password.
Creating an email signature
- Open Settings (the cog icon in the upper right)
- Type “Email signature” into the settings search bar (in the left-hand column) and open “Email Signature” option
- Click “+ New Signature”
- Give the signature a name (e.g. “default”)
- Select the template text presented below the line underneath these instructions and copy and paste it into the signature box.
- Edit your name and position title
- To edit the staff profile link, click the word staff and then click on the Link button (two interlocked circles) in the toolbar, replacing firstname.lastname
- Click the blue Save button
- Select the signature name (e.g. ‘default’) from the drop-down boxes to activate the signature to send for all new messages AND replies/forwards.
- Click Save and then send a test email to ensure formatting looks correct to the receiver.
Alice Ajax
| Honorary Research Fellow
Your College affiliation, University of Divinity
staff.divinity.edu.au/staff/firstname-lastname

ABN 95 290 912 141 | TEQSA Provider PRV12135 | CRICOS 01037A