This is the multi-page printable view of this section. Click here to print.
ARK
- 1: Getting Started with ARK
- 1.1: What's New in 2023 Update
- 1.2: Accessing ARK
- 1.3: The User interface
- 1.4: Editing a Unit
- 1.5: Add profile picture
- 1.6: About ARK
- 2: Setting Up Meta Units
- 3: Meta Unit Content
- 3.1: Activity Chooser
- 3.2: Text Editor
- 3.3: Presenting Information
- 3.4: Adding Zoom Resources
- 4: Setting Up Child Units
- 5: Reporting and Analytics
1 - Getting Started with ARK
This guide is designed to aid new teaching staff at the University on the ARK Learning Management System located at ark.divinity.edu.au.
It is written based on Moodle 4.1 functionality which the University upgraded to in December 2023.
Introducing ARK
ARK is the University of Divinity’s Learning Management System located at ark.divinity.edu.au. ARK is an online software solution “used in all courses and units of study as a means of supporting and enhancing student learning and facilitating access to learning materials.”1
Footnotes
1.1 - What's New in 2023 Update
In December 2023, the University upgraded ARK to Moodle 4.1. This document will assist staff with understanding what new features are made available and the different methods of using ARK in the new version.
Logging In
All users will now login to ARK with Single Sign On (SSO).
If you have used Forms, Portal or UMS, you are already set up with SSO and can use your existing username and password to login. If you are already logged in to Forms, Portal or UMS when accessing ARK, you will be automatically logged in to ARK without needing to re-enter your credentials.
If you haven’t logged into SSO previously, your username will be the email address registered on StaffPlus - the University’s personnel management platform (this will be the email you have been using to log in to the old ARK site) and you can set a password by using the Forgot Password link. You will receive an email with a link to reset your password. For further assistance, see the Login Guide.
New Navigation
Dashboard and My Units
A new My Units page in the top navigation menu makes it easy to locate your units.
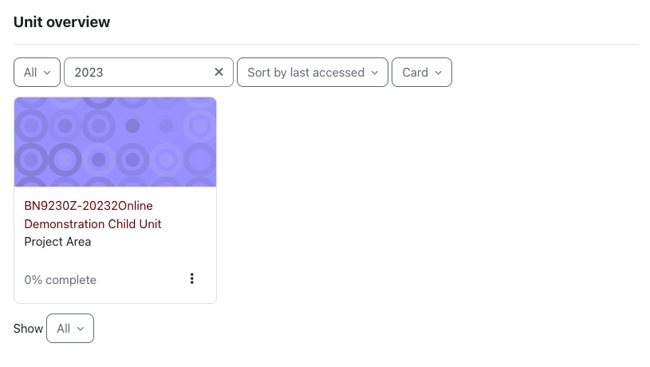
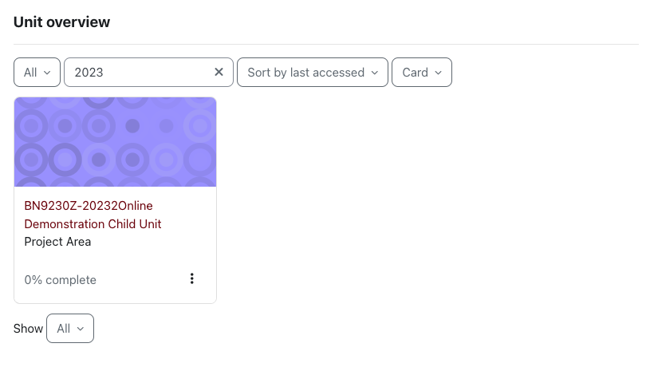
On this page you will find an updated Unit Overview block with the ability to filter by a search term.
Tip
Using this search filter will make it easy to find meta or child units. For example:
- Search “meta” to only show meta units
- Search the current year (e.g. “2024”) to find only child units
- Add the numerical start month of the unit after the year to narrow to current child units (e.g. “20242” will filter to units starting in February 2024) - n.b. the month is single digit unless November or December
- Add the discipline code and a space before the year to find just units in a particular discipline (e.g. “BN 2024” will find units in New Testament in 2024)
Unit Navigation
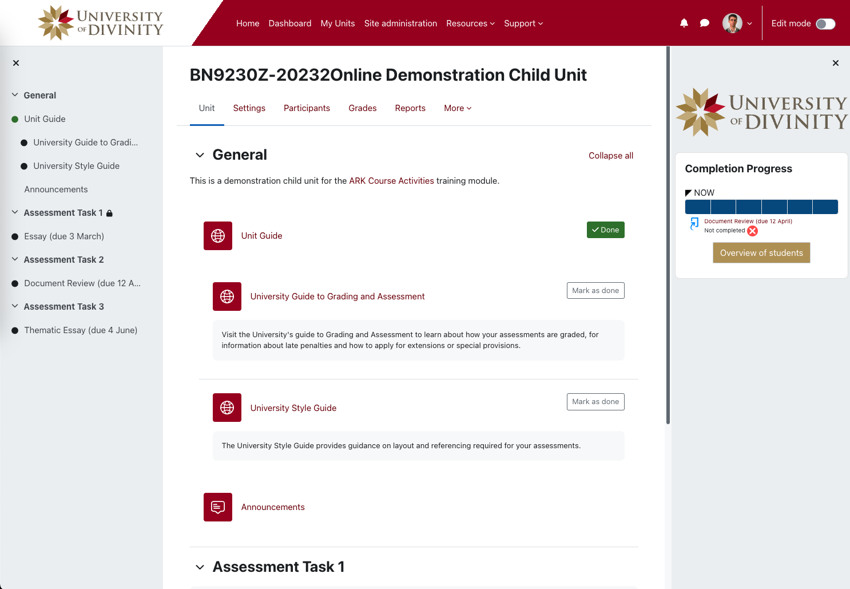
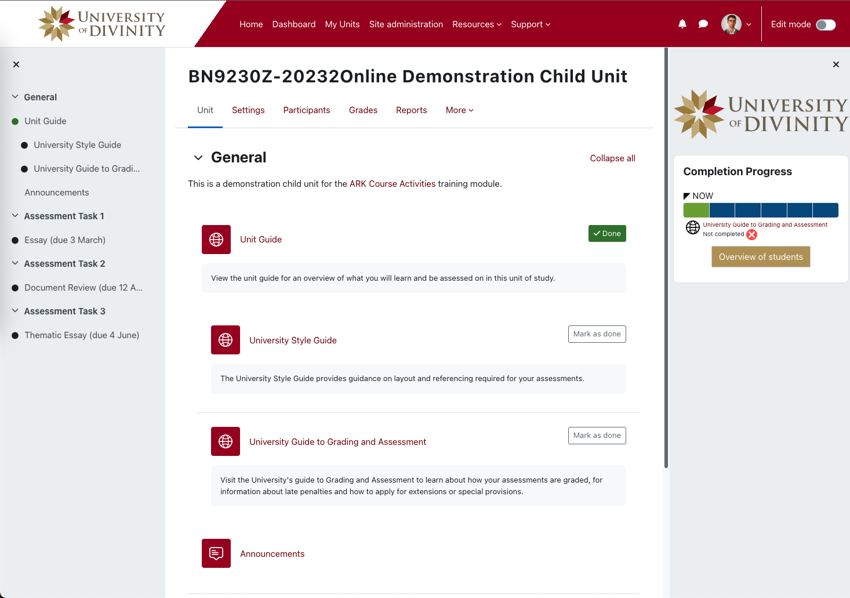
The screenshot below highlights enhancements to unit navigation and presentation. Hover over the numbers on the screenshot below for more on each interface element:
- (1) Unit Index - a new collapsible Unit Index navigation menu makes navigating through courses easier.
- (2) Contextual navigation - find your way around units and activities with the contextual tab menu.
- (3) Block drawer - collapse or expand the block drawer
- (4) Edit mode toggle - the toggle in the top right of the interface makes it easy to enter and exit edit mode
- (5) New activity icons - modern icons enhance unit presentation
- (6) New activity completion badges - improved presentation of completion status and requirements
Edit Mode
Interface
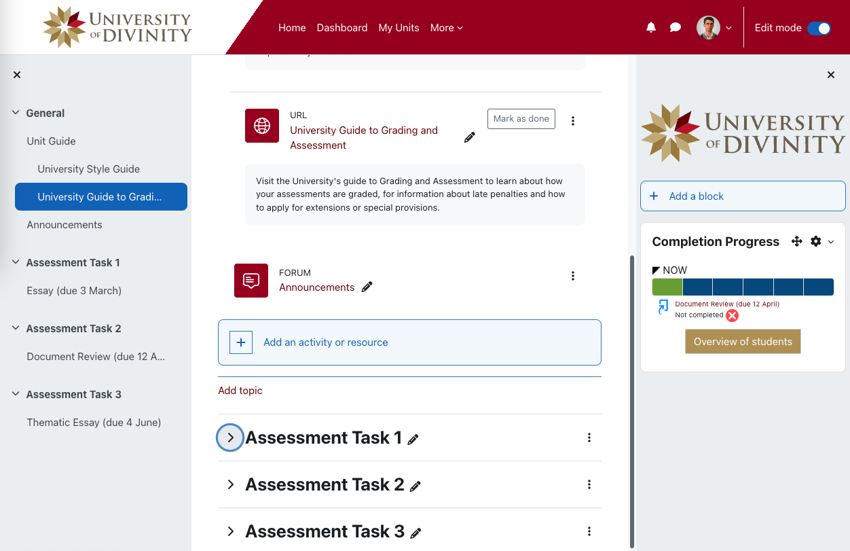
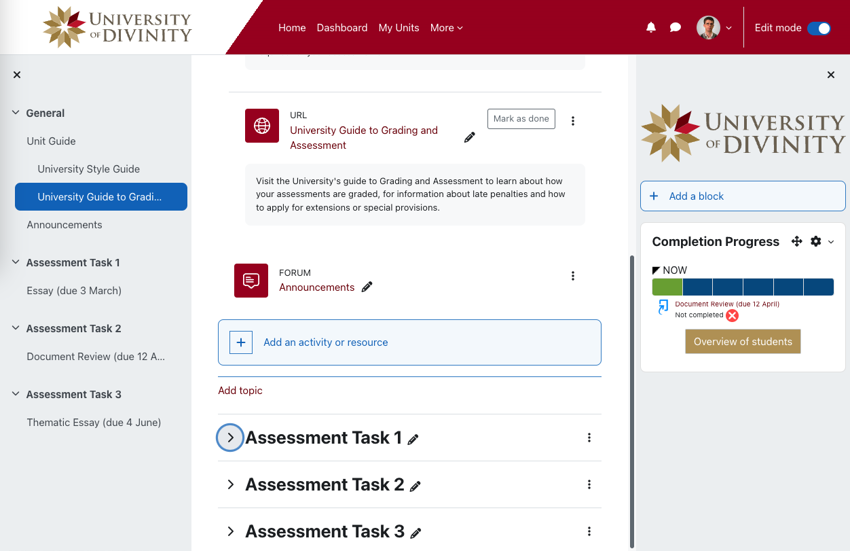
The screenshot and animations below highlight enhancements to the Edit mode interface. Hover over the numbers on the screenshots for more on each interface element:
- (1) Edit mode toggle - the toggle in the top right of the interface makes it easy to enter and exit edit mode
- (2) Add blocks buttons - an easy to find button to add blocks.
- (3) Add activities and resources button - a simple click button to add activities and resources
Reorder content
It is now easier to reorder content with a simple drag and drop.

You can also reorder content from the Unit Index.

1.2 - Accessing ARK
Accessing ARK
ARK is located at ark.divinity.edu.au. You can also find a link to ARK at the top of the University of Divinity website.
On visiting the ARK page, click Student or Staff Login to sign in to the site:

Username and Password
The login credentials for ARK use Single Sign On (SSO Account). For instructions on changing or resetting your Single Sign On account, visit the Login and Password Guide.1.3 - The User interface
This document is an introduction to the ARK user interface. It is applicable to all staff and students of the University.
Navigating ARK
On first login, users are given a guided tour of the interface. This tour can be viewed again by clicking the ‘Reset user tour on this page’ link at the bottom of the site.
Dashboard and My Units
The My Units page in the top navigation menu makes it easy to locate your units.
Choosing visible units
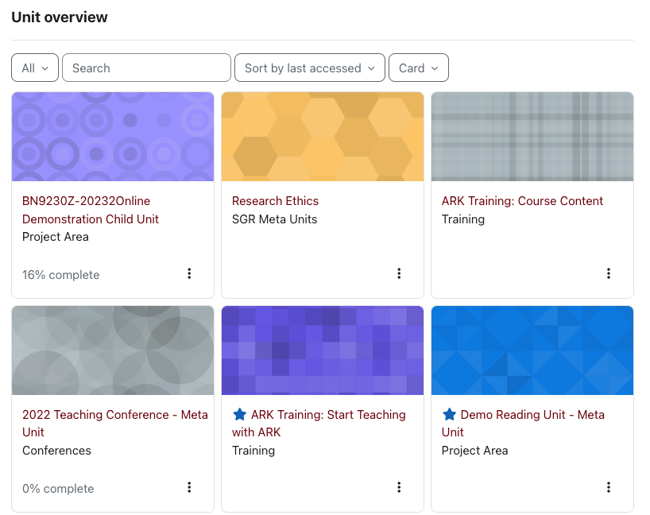
The unit overview block shows units in which the user is enrolled as an Editing Teacher, Teacher, or Student. Users can customise the view of units and filter units to easily locate what they need. The screenshot below highlights the following elements:
- (1) Filter by status - filter by All, In progress, Future, Past, Starred and Removed from view
- (2) Search filter - filter units by name
- (3) Sort - sort units by Last Accessed or Unit Name
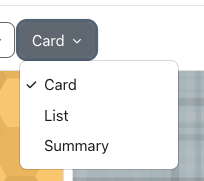
- (4) View mode - view listed units in Card, List or Summary view
Filter by status
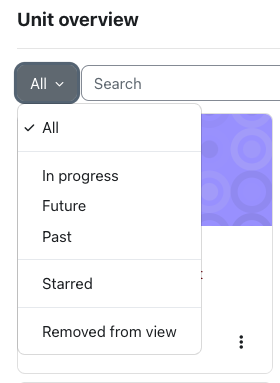
The left-most drop down menu in the Unit Overview block allows you to select from the following view options:
- All - All units you are enrolled in are displayed, unless you hidden some units.
- In Progress - Units for which the current date is after the unit start date, and where no end date is set or the end date is in the future. Teaching staff can set the Start Date and End Dates of Meta Units from the unit settings page.
- Past - Units for which the End Date is in the past unless Course Completion settings have been set and the course completion criteria have not been met.
- Future - Units for which the Start Date is in the future.
- Starred - Only units you have Starred will show.
- Removed from view - If you have hidden units, you can find those units from this view.
Starred and hidden units
Starred units allow you to bookmark or favourite a set of units and only show those units. You can also choose to hide units.
- To ‘star’ (bookmark) a unit, click the three dots by its name and click “Star this course”.
- To hide a unit, click the three dots by its name and click “Remove from view”.
Tip
If you choose to filter by starred, or hide units, you may wish to make a note that you have done this in your calendar so that you remember in the lead up to the next semester.Search filter
The search field in the Unit Overview block allows you to filter by a search term.
Tip
Using this search makes it possible to filter by meta or child units. For example:
- Search “meta” to only show meta units
- Search the current year (e.g. “2024”) to find only child units
- Add the numeric start month of the unit to the end of the year to narrow to current child units (e.g. “20242” will filter to units starting in February 2024)
- Add the discipline code and a space before the year to find just units in a particular discipline (e.g. “BN 2024” will find units in New Testament in 2024)
Sort
Sort the view of units by unit name or last accessed.

View mode
Change the way units are displayed in the Unit Overview block to Card, List or Summary.
Unit Navigation
The screenshot below highlights key components of unit navigation and presentation. Hover over the numbers on the screenshot for more on each interface element:
- (1) Unit Index - a collapsible Unit Index makes navigating through courses easier.
- (2) Contextual navigation - find your way around units and activities with clear tab menus.
- (3) Block drawer - collapse or expand the block drawer
- (4) Edit mode toggle - easy edit mode toggle makes entering and exiting edit mode simple
- (5) Activity icons - modern icons enhance unit presentation
- (6) Activity completion badges - activity completion badges signal to learners completion status and requirements
Unit Index
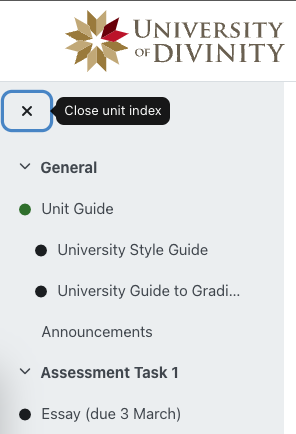
The left navigation menu is collapsible and enables easy access to different parts of a unit. Click the menu icon to open and X to close.
Contextual Navigation Menu
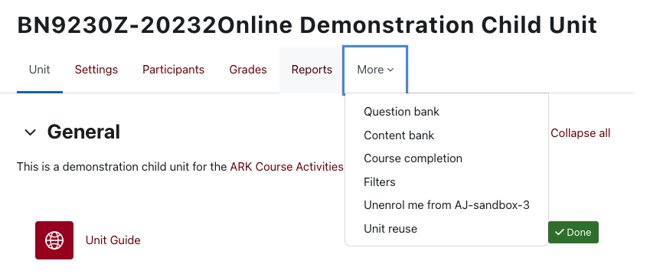
The contextual navigation menu underneath the unit title will present options for configuring or reports on the unit, activity or resource you are viewing. On the unit page, it provides access to the unit content, settings, participants list, grades and reports. The more dropdown menu provides access to the question bank, content bank and the course reuse page allowing content to be imported from one unit to another.
1.4 - Editing a Unit
Teachers with Editing Teacher privileges in a unit are able to make changes to settings, add content and reorder parts of the unit.
Edit Mode
Interface
The screenshot and animations below highlights enhancements to the Edit mode interface. Hover over the numbers for more on each interface element:
- (1) Edit mode toggle - toggle the switch in the top right of the window to enter or exit edit mode
- (2) Add blocks button - use this button to add blocks to the block drawer
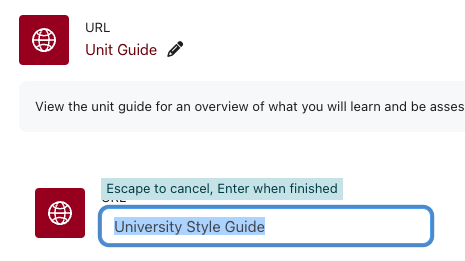
- (3) Edit item names - click the pencil icon to rename items
- (4) Edit menu - click the ellipsis icon to access the edit menu for sections, activities or resources
- (5) Add activities and resources button - a simple click button to add activities and resources
Edit Mode Toggle

The edit mode toggle in the top right of the ARK window allows you to enter editing mode. Toggle it again to exit editing mode.
Rename content
To rename content, click the pencil icon and type your changes. Press enter to save or the escape key to cancel.
Reorder content
To reorder content, select the 3 dots to the right of an activity or resource and click the move icon (or just click the item and drag). You can drag the item up or down the page, or drag it to a place in the unit index.

You can also reorder content using the unit index.

Item edit menu
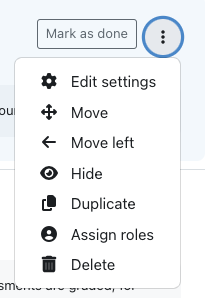
From the 3 dots to the right of an item, you can access the settings for that item, hide it, duplicate it or delete it.
The edit menu next to a section allows a section to be highlighted, which places a border around the section to mark it to learners. You might want to do this to aid students in finding the current week faster.
Note
Depending on unit layout settings, you will not be able to add a topic directly on the unit page but will need to go to unit settings, Edit Format and set the “Number of sections”.Adding content
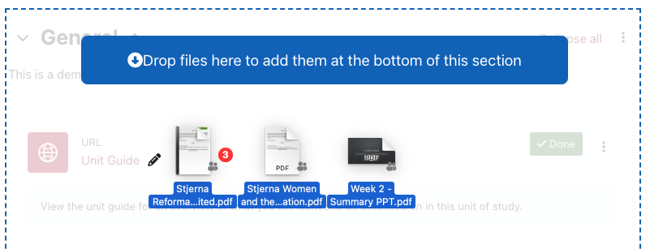
When in edit mode, you can drag and drop files from your computer to add them to the unit.
You can also add activities or resources by clicking the Add an activity or resource button.

1.5 - Add profile picture
Adding a profile picture will help people recognise you when you participate in activities on ARK such as forums.
Step 1: Login to ARK using your login email and password.
Step 2: Click on your name in the top right corner.
Step 3: Click Profile from the drop down menu.
Step 4: Under the heading ‘User details’, click Edit profile.
Step 5: Scroll down until you see the heading User picture.
Step 6: Click the Add… button. The button is an icon of a piece of paper.
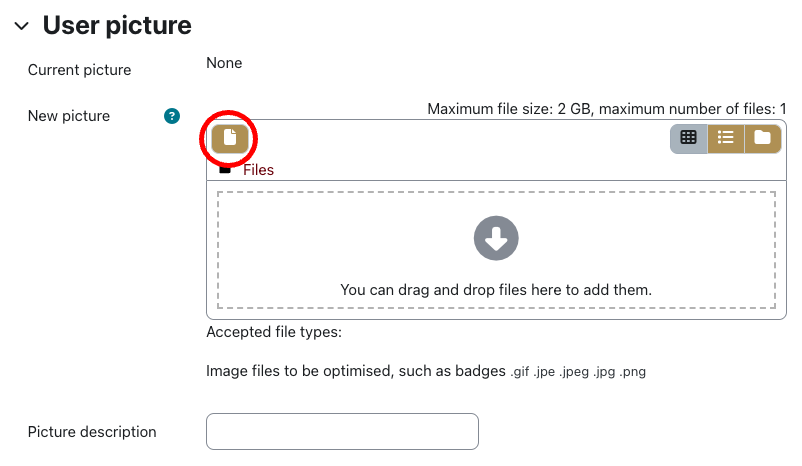
Step 7: Click the Choose file button to Upload a picture from your computer.
Step 8: When you have located the picture you wish to upload, click on it.
Step 9: Click Upload this file.
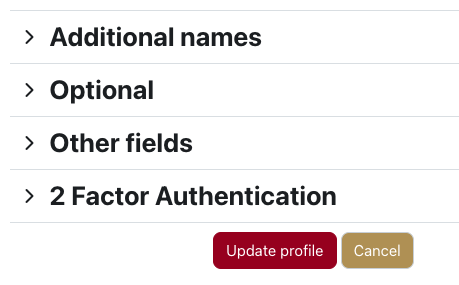
Step 10: When you are done updating your profile, be sure to press the Update profile button at the bottom of the page to save your changes.
1.6 - About ARK
ARK runs on Moodle software. In December 2023, the University upgraded from Moodle version 3.9 to Moodle version 4.1. Outside of this documentation, there are two authoritative sources of help for using Moodle:
- MoodleDocs 4.1 - MoodleDocs is the extensive documentation site for Moodle with granular instructions on all functions of the software. (When using MoodleDocs, make sure that the help document matches the version of ARK. As of December 2023, ARK is using Moodle 4.1).
- Moodle Academy - Moodle Academy provides a self-paced online learning program for using Moodle including certification. Parts of this Getting Started guide are based on Moodle Academy courses.
Moodle Pedagogy
Moodle is designed on a social constructionist pedagogy. In short, social constructionism holds that we learn best when we construct meaning for ourselves in dialogue with others.
Moodle aims to achieve this by providing Resources and Activities. Resources are materials that the student is presented by the instructor and Activities are materials that the students interact with in some way, either by themselves or collaboratively with other learners.
Visit MoodleDocs to learn more about the Philosophy and Pedagogy of Moodle.
2 - Setting Up Meta Units
2.1 - Overview of Unit Structure
A well designed ARK unit will enable great learning experiences by making it easy for students to find what they need when they need it. In this document, you will be introduced to the key concepts in the structure of ARK units and be provided guidance on best practices for enabling students to locate learning activities and resources.
How are ARK units structured?
An ARK unit contains a hierarchy of three levels:
- the unit format level: This is the overarching structure of the unit where the different sections are presented on a single page. Different layouts are available and can be selected based on pedagogical design.
- the section level: Sections are a type of container for each week or topic. Learning activities are accessed from sections.
- the activity level: These are the activities and resources that present information and provide learning materials to the student. See activity chooser to learn more about this layer.
stateDiagram-v2

classDef colorset1 fill:#ece5d5,stroke:#413e39,stroke-width:2px,font-size:28px,line-height:2rem
classDef colorset2 fill:#740005,stroke:#413e39,stroke-width:2px,line-height:2rem,y:-12,color:#ffffff;
classDef colorset3 fill:#ffebec,stroke:#413e39,stroke-width:2px
classDef nodeLabel padding-bottom:40px
classDef hidden display:none;
classDef edge0 display:none;
class State1 colorset1
class State2, State3, State4 colorset2
class State5, State5a, State6, State6b, State7 colorset3
class State0 hidden

        State1: Unit Format
        State2: Information sections (e.g. unit overview)
        State3: Weeks/topics sections

        State5: Content Pages
        State5a: Content Pages
        State6: Learning Activities
        State6b: Links
        State7: Links

state State1 {
        State2 --> State5
        State3 --> State6
        State3 --> State5a
        State3 --> State6b
        State2 --> State7
}
The above diagram presents one way of thinking about unit structure.
Thinking about structure from student experience
Student engagement with a unit on ARK can be thought of as having three purposes: functional, learning and assessment. These purposes peak at various stages in the delivery of the unit but are present throughout the entire delivery.
- the functional purpose of visiting an ARK unit is to ascertain information about the delivery of the unit: resources required (e.g. textbooks), find zoom links, location of classes, key dates and learning processes
- the learning purpose is to access resources and participate in activities intrinsic to learning
- a student will visit ARK for information about assessments, ensuring they are completing the task correctly and seeking resources to aid in the completion of the assessment
The goal of unit design is to provide a clear and consistent structure to ensure students are not frustrated in their attempts to locate and understand learning materials.
How to use structure effectively
When choosing a layout, structuring your content and entering descriptions, you should consider when and why a student will be accessing the content you are entering. Cluster related content by choosing logical sections and choose layouts that reduce the number of clicks required to find discrete content. Some questions to guide your decision making:
- What do students want to see in the week before the start of the unit? Is it easy to locate? Does it enable students to organise a study plan?
- Note: units become visible to students a week before the scheduled start date of the delivery. This allows students time to design a study plan and locate any required resources or sort out any technical issues.
- What do students need to access in each week or module of study? Can they easily find the information? Is it clear what is required and what is optional or supplementary?
- Is it clear when content will be released if it is not currently available?
- How will students use the meta unit in preparation for an assessment? If information presented in teaching weeks will aid in assessment preparation, is it easy to locate a few weeks later?
Worked example
Scenario
Amrit is teaching a unit delivered face-to-face over the 12 weeks of semester. Each week of the semester will cover different topics. During each week, the students will be required to complete 2-3 pre-readings, post in a discussion forum and attend lectures. The PowerPoint files from the lecture will be posted on ARK after the lecture.
Amrit determines that the functional purposes for students visiting the meta unit are: checking the unit schedule, finding contact and attendance information, accessing resources to complete assessments, and determining priorities.
Solution
Amrit sets his meta unit to have 15 sections consisting of the following:
- Section 1: Getting Started: this section provides an orientation to the meta unit itself, contact and attendance information, and an overview of how the unit will be delivered.
- Section 2: Assessment Information: this section provides links to the associated child units, additional information or resources for the assessments not placed in the child unit, directions and links to academic skills supports and assessment information such as the Grading and Assessment information page on the University website.
- Section 3: Unit Schedule: a calendar of weekly requirements for the semester including readings and assessment dates. (Note: if you choose to do this, remember to update any dates before each delivery.)
- Sections 4-15: Weekly topics: each week contains links or PDFs of required readings, and a summary of the lecture after the class. A pattern is repeated throughout the semester for ease of use.
This is demonstrated below using the “Tile format” :
Methods and strategies for laying out the activities and resources within sections are covered in the Presenting Information document.
Making it easier
If you have a preferred structure that you use across multiple units, it may make sense to build a reusable template. It is often quicker to delete unneeded sections and activities than create them from scratch. Ask your ARKLO if your college has any templates that you can use.
To learn how to import from a template or other unit, see the MoodleDoc, Import course data.
2.2 - Changing Unit Settings
Teachers with Editing Teacher privileges in a unit are able to make changes to settings such as unit visibility, indicative start and end dates, unit format and appearance.
Finding unit settings
Click ‘Settings’ from the unit navigation menu at the top of the unit:

General Settings
The General settings allow you to change the name of the unit, show or hide its visibility to students and set the start and end dates for the unit.
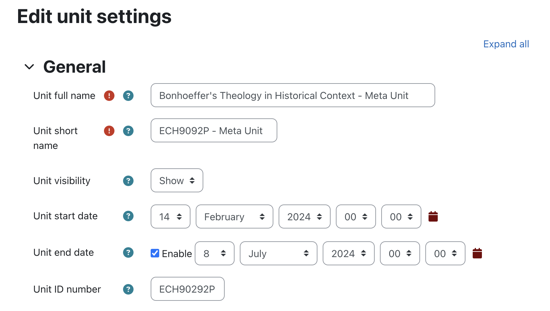
Unit full name, Unit short name and Unit ID number
Caution
Do not change the Unit full name, unit short name or Unit ID number. If there is an issue, let your college ARKLO know.Unit visibility
The unit visibility setting determines if a unit will display in the list of units available to a student. It does not affect users with Teacher, Editing Teacher or admin privileges such as ARKLOs, Registrars or Academic Deans. If a meta unit visibility is set to Show, the unit will be visible to students from when the student’s enrolment is processed by the Registrar. To prevent students from viewing content in the meta unit while you are preparing for the semester, set the visibility to Hide but don’t forget to toggle it back 7 days before the scheduled commencement date for the unit.

Unit start date and end date
The Start date and End date for a unit do not change whether a student can access a unit. However, the view settings in the Unit Overview block can be set to filter units based on these dates.
- Set the Start date to at least 7 days prior to the scheduled start date of the unit. (For example, if the unit starts on 26 February, set the start date to 19 February or before).
- Set the End date to 6 weeks after the end of the teaching period to allow for any possible extensions and for students to review content.

3 - Meta Unit Content
This section provides a basic guide to designing and building a Meta unit on ARK. The focus is on creating learner experiences.
We recommend you are familiar with the overview of unit structure before starting this section.
3.1 - Activity Chooser
When we introduced unit structure we presented the hierarchy of content in ARK as:
- unit
- section
- resource or activity
The smallest unit in the hierarchy is either a resource or an activity.
A resource is a piece of static, ungraded content designed to present information to the student.
An activity is an item that the student interacts with, either individually or with other students. Some activities can be graded and may contribute to the gradebook.
Using the Activity Chooser
Teachers can add activities and resources to their units using the activity chooser. To access the activity chooser, enable editing and click Add an activity or resource at the bottom of a section.
When you first open the Activity Chooser, you will see four tabs: All, Activities, Resources and Recommended.
The Recommended tab contains a shortlist of activities and resources recommended at the University of Divinity.
You can star your favourite or frequently used activities and resources and they will show in the Starred tab.

Click the star icon to favourite an activity or resource.
The activity icons are colour-coded according to their various functions:
- Green = communication
- Pink = assessment
- Blue = content
- Red(orange) = collaboration.
Further Resources
See the MoodleDocs page for more information: Activity Chooser (4.1)
3.2 - Text Editor
This page introduces teaching staff to the text editor in ARK.
When adding content to activities and resources, teachers will be able to write content directly to text areas in ARK using the text editor.
Default text editor
This document describes the interface for the default text editor, Atto. The new version of ARK (Moodle 4.1) introduces an alternate editor, TinyMCE which is more featured and will become the default in future versions. To change the text editor and for help on using TinyMCE, see MoodleDocs: TinyMCE editor.
This document largely provides advice on effective formatting and use of media in ARK and is applicable for both text editors.
The text editor in ARK is a powerful interface, and is similar to working with other text editors such as Microsoft Word. However, this guide contains a few key recommendations to ensure your content is accessible to all users and is consistent with how learners access content across the internet and other University of Divinity resources.
If you’re unfamiliar with the interface, jump to the text editor interface first.
Styling content
Eye-tracking studies have consistently found that users scan content on the internet.1 This makes the layout and styling of your content, including on ARK, particularly important. Screen reading software uses pre-defined markers to allow vision-impaired users to more easily navigate the page but it requires those entering content to be consistent with those conventions.
Headings and paragraphs
The style dropdown, marked (2) on the screenshot below, presents the key styles that a screen reader will use to navigate the page. Heading levels should indicate the rank of the content, with large headings being the most important, and headings of same importance being the same size. Skipping headings can be confusing and should be avoided.2.
Applying styles
The style dropdown will apply the style to an entire paragraph of text so it easiest to insert paragraph breaks between content before selecting the style.Emphasis
The top row of the editor gives easy access to bold and italics. These text effects can be difficult to read if they are used excessively and so should be reserved for emphasis.
- Bold text is useful for increasing the scannability of text and should be used to draw attention to key pieces of information. Avoid emboldening full sentences or paragraphs.
- Italics can help denote special terms. As with bold, avoid applying to full sentences or paragraphs.
The second row of the toolbar gives the ability to add underline, strikethrough, subscript and superscript.
- Underline (for example) is generally reserved on the web for marking hyperlinks. Using underline elsewhere can confuse readers who may expect it to be a link (if a student uses different colour/contrast settings for vision access, all underlined text may appear the same).
- Strikethrough (for
example) can illustrate changes or corrections but can be difficult to read. Always provide an alternate representation of the text that is struck out if it needs to be read. - Subscript (for example) is most commonly used in science and mathematics.
- Superscripts (for example) are more commonly used for functions such as ordinals and footnotes. They may also be used for trademark (TM).
Using colour for emphasis
The default editor provides no option for changing text colour. Colour in text can have unwanted effects and be distracting so should be avoided.Using links
To create a link, select the text and then click the chain icon, marked (9) on the screenshot below. Paste the URL into the field.
- The tick box “Open in a new window” will launch the page in a separate tab or window based on a users browser settings. A rule of thumb is to always load external links (that is, to sites other than ARK) so the student can access the resource and easily return to the content in the unit.
- For accessibility reasons, use descriptive links. For example:
- The Web Content Accessibility Guidelines (WCAG) explain how to make web content more accessible.
- Using click here doesn’t tell a user where the link is going
- A raw URL is unhelpful for a screen reader. Such as:
To remove a link, select the text with the link and click the break chain icon, marked (10) on the screenshot below.
Working with media
You can insert or embed images, video and interactive content in text areas using the text editor.
Caution
The practice of inserting or embedding images, video and interactive content can have Copyright implications. It is advisable to seek out images and media that are released under licenses that allow for sharing such as the Creative Commons license.
For more information contact your library staff or see the Australian Copyright Council.
Inserting images
Most browsers will allow you to drag and drop an image from your computer to the text editor. Alternatively, you can click the image icon, marked (12) on the screenshot below. To edit the settings of an image already placed in a text area, click the image and then select the image icon.
The image properties dialogue allows you to paste a link to an image elsewhere on the internet. Always place an image description to assist students using a screen reader or to explain the image in the event the link breaks.
Where possible, resize the image before uploading it to ARK to reduce the file size and subsequent load time of your unit. As a guide, images covering the full width of a course area should be no more than 1200 pixels wide. Reduce the size accordingly for images only displaying at part width of the text area (see “Best Image Size for Websites” for more information).
You can change the size and relative position of the image using the image properties box. Select Auto size to avoid warping the image.
Inserting video and sound files
As with images, audio and video can be dragged and dropped into the text editor. Links to some video hosting sites such as Vimeo or YouTube will automatically be converted into embedded content (if you don’t want this behaviour, ask your ARKLO for instruction on disabling the Multimedia Filter).
Audio and video should be hosted on a hosting site such as Vimeo to avoid adding server load and slowing ARK for all users.
The insert media dialogue allows instructors to change the size of the content, adjust playback settings and add additional subtitles or captions.
Interactive content
H5P interactive content can be inserted with the H5P icon, marked (17) on the screenshot below. Creating H5P content is a more advanced concept and will be covered elsewhere. More information is available on MoodleDocs: H5P.
Working with the code
The HTML code, marked (16) on the screenshot below, allows instructors with HTML understanding to change the appearance in ways not available in the editor menus.
Caution
Be extremely careful using code you have found on other websites. Only use it if you can understand all parts of the code. Code found elsewhere may break your ARK page or allow malicious actors access to student information. Always use the editor tools where possible and only use code if you are sure it can be trusted.Note
If you introduce custom style parameters or particularly css classes, your content may render poorly after an ARK upgrade or on mobile devices. It is best to use the provided styles to avoid against future breaking changes.The text editor interface
The text editor is used extensively throughout ARK, including posting in forums, editing section headings, activity descriptions, quiz answers and the content of blocks.
There are two rows to the editor toolbar, which can be expanded using the expand button, marked 1 below:
Toolbar Row 1

| (1) Expand | (2) Style | (3) Bold | (4) Italics | (5) Unordered list |
| (6) Ordered list | (7) Decrease indent | (8) Increase indent | (9) Create link | (10) Remove link |
| (11) Insert emoticon | (12) Insert picture | (13) Insert video | (14) Record audio | (15) Record video |
| (16) Manage embedded files | (17) Insert H5P |
Toolbar Row 2

| (1) Underline | (2) Strikethrough | (3) Subscript | (4) Superscript | (5) Left align |
| (6) Centre align | (7) Right align | (8) Equation editor | (9) Insert character | (10) Table |
| (11) Clear formatting | (12) Undo | (13) Redo | (14) Accessibility checker | (15) Screenreader helper |
| (16) Edit html code |
Footnotes
Nielsen, Jakob. 1997. “How Users Read on the Web.” Nielsen Norman Group. September 30, 1997. https://www.nngroup.com/articles/how-users-read-on-the-web/. ↩︎
“Headings • Page Structure • WAI Web Accessibility Tutorials.” n.d. Www.w3.org. https://www.w3.org/WAI/tutorials/page-structure/headings/. ↩︎
3.3 - Presenting Information
This document covers the methods and tools available for presenting static information to students on ARK. It will introduce the Text and Media, Page, File and Book Resources and cover basic user interface and pedagogical design strategies to aid navigation for students.
Common Resources
There are multiple ways to present content or information to learners in ARK. The screenshot below shows the most common Resources:
- (1) Description - the section title is followed by a Description. Descriptions can be added to any activity or Resource – there is also a Description on the File Resource.
- (2) Text and media area (previously called labels). There are three separate Text and Media Area Resources shown. The first is displaying a picture of the University’s St Paschal’s campus, the second and third contain headings to break up the content. The first two could be combined with the description but leaving them separate makes it easier to move or duplicate parts of the content.
- (3) File resource, in this case it is a PDF. You can also add images and office documents as Files.
- (4) Page Resource. This shows content in a single page with all the functionality of the text editor.
- (5) Book Resource. A Book is a set of Pages presented in a book-like format, allowing a table of contents and forward and back navigation.
- (6) URL Resource. This allows you to provide links to resources elsewhere on the internet.
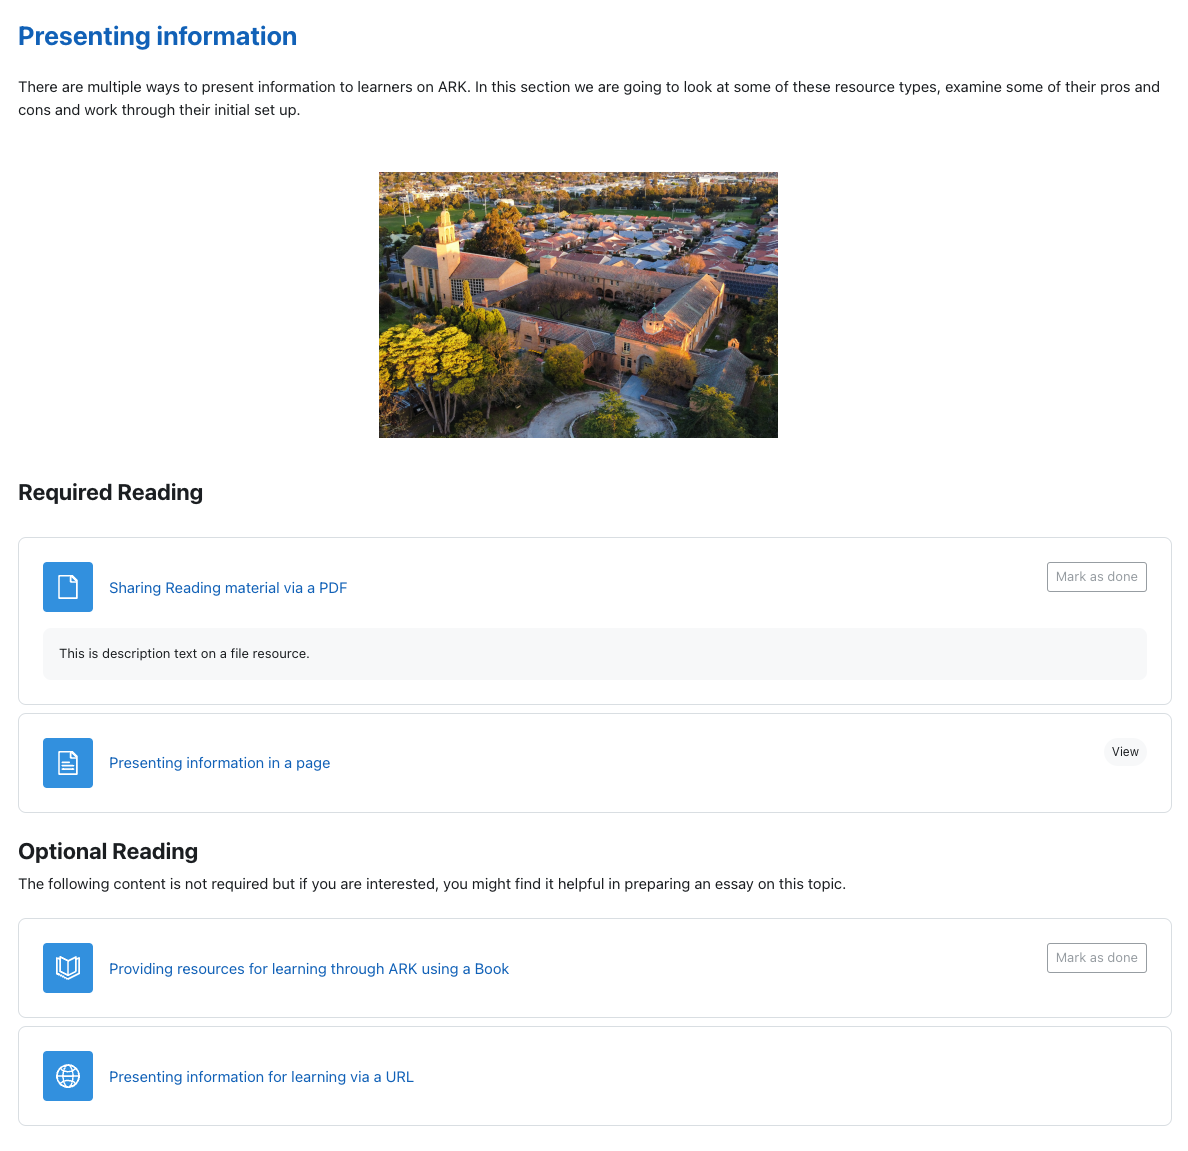
1 1 2 2 2 3 4 5 6 7 Screenshot of a sample section in Moodle. Hover over the numbers for more detail.
Selecting Resources
The above Resources can be grouped into three types: presentation resources (descriptions and, Text and Media Areas), external resources (URL) and internal resources (Page, Book and File) .
Presentation Resources
Text and Media Areas (previously called Labels) and Descriptions help students navigate the sections in an ARK unit. They can function as signals – to point students to where information is or how it is arranged – or as direct instruction – to explain a concept or set up an activity.
Descriptions
Descriptions sit below an Activity or Resource and are set in the settings for the Activity or Resource. You can use a Description to provide context for a particular Activity or Resource, or provide a citation.
Text and media areas
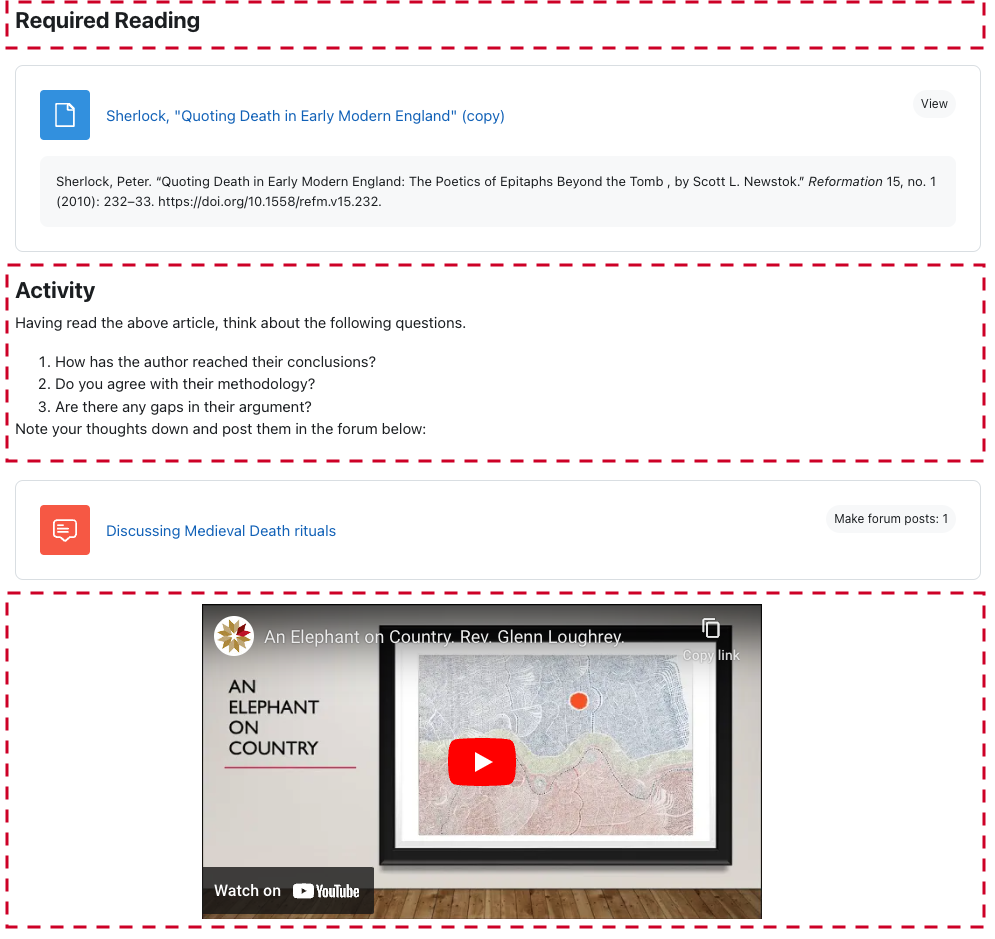
A Text and Media Area is a way of presenting content on the section page and can be used to group or separate Activities and Resources, provide instruction or deliver content. In the example below, the heading is placed before the first reading to signal to students what the reading is for, a subsequent Text and Media Area sets up an activity, and the video is placed in a Text and Media Area for easy viewing.
External Resources
In many cases, the learning resources you provide to students will be outside of ARK, which you can link to (such as an external website or Library Hub resource).
URL Resource
A URL Resource allows you to provide a link to a resource external to ARK such as the Library Hub or a website. While it is possible to hyperlink from any text in a Text and Media Area or description, a URL resource is preferred as it allows you you to set completion requirements to track or signal progress to the student.
Internal Resources
ARK offers a few Resources and Activities to present content. The simplest of these are Page and Book. Pages and Books both allow you to build web content in ARK with text, images and embedded content. They are considered Resources as the only behaviour available to students is to view the content. Both Pages and Books are easily printed to PDF by students. You can also upload a File (such as a PDF or other downloadable resource)
Other options: other methods of presenting content include the Lesson activity and the H5P activity. These activities are more complicated to setup and will be covered elsewhere.
Page Resource
Page Resources are best used to present content that doesn’t need extensive scaffolding for students to process or to present information that would take up too much space on the section page. For example, a Page might be used to provide an extended bibliography for a topic or to collate instructions for a learning task such as an assessment.
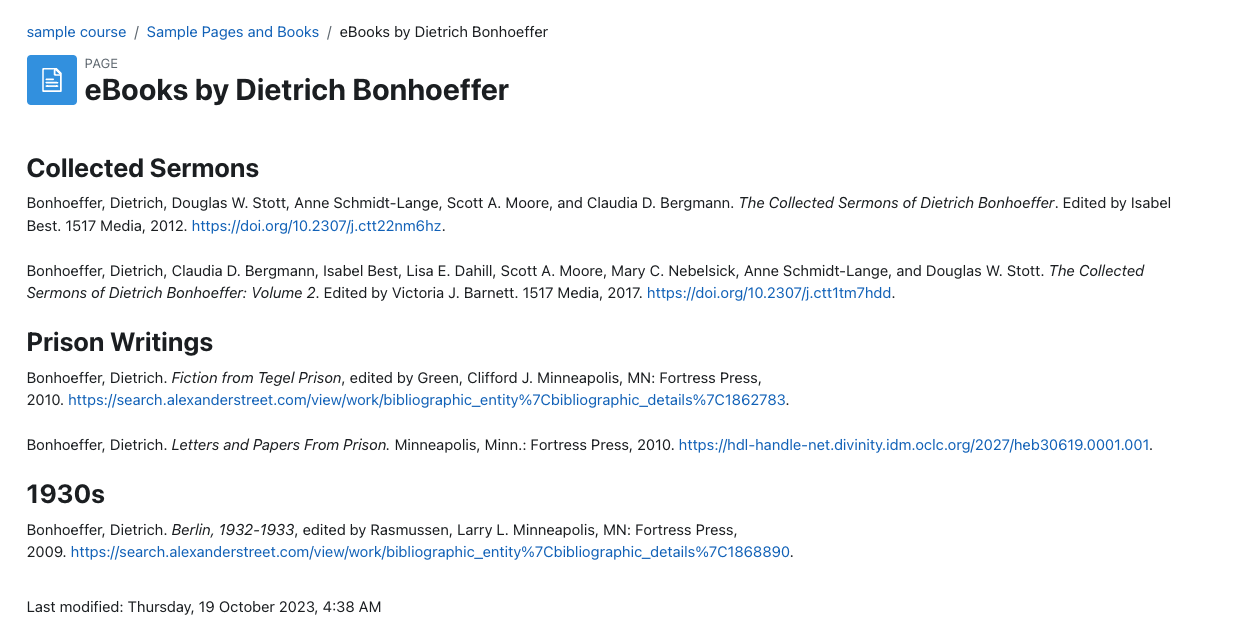
An example of a Page showing a bibliography of selected Library Hub resources.
Book Resource
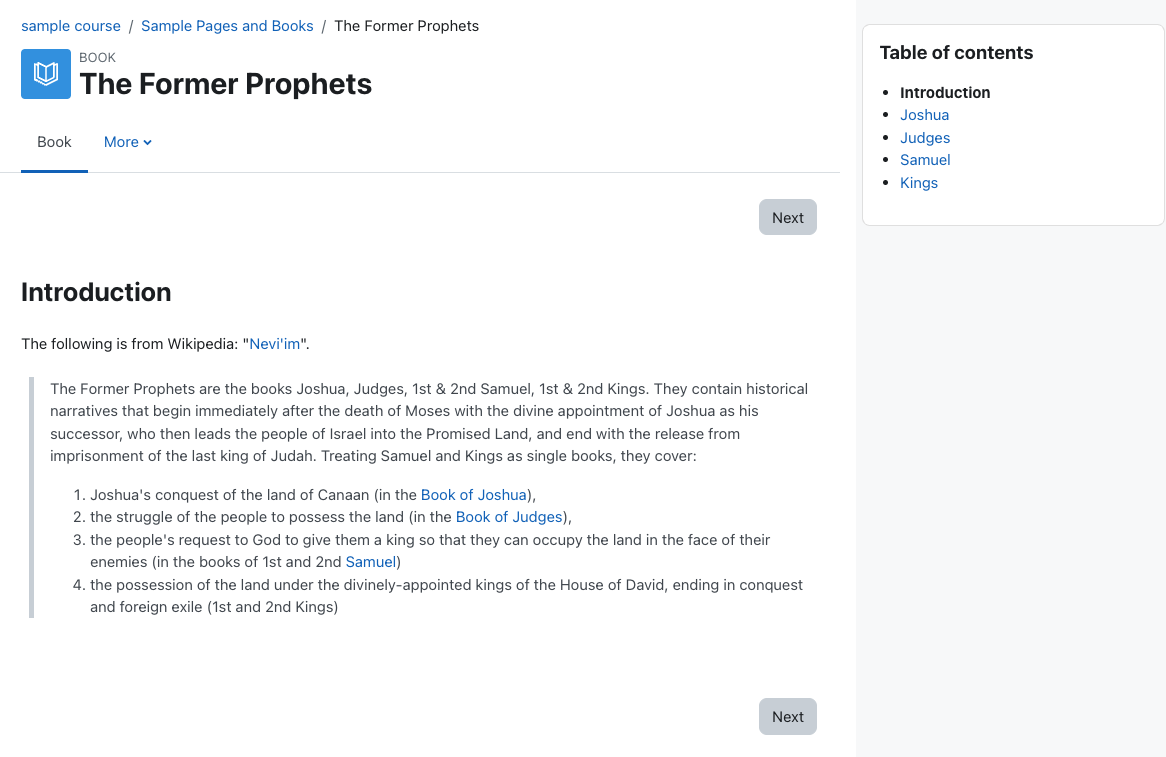
A Book is a set of pages presented in a book-like format. Books are best used to present related ideas that together are too much to contain to a single Page. For example, prior to a lecture on the prophets, you might wish to ensure students have a basic overview of the content and themes of each. You could create a Book with a short introduction to each of them.
File Resource
A File Resource allows you to share files with students. This is most commonly used to upload PDFs but can also be used to provide PPTs, Word documents or audio recordings.
Caution
The practice of uploading files, images and documents can have Copyright implications.
For more information contact your library staff or see the Australian Copyright Council.
3.4 - Adding Zoom Resources
This page shows the process for displaying Zoom information in a meta unit on ARK. It requires Editing Teacher permissions and a Zoom account issued by either the University of Divinity or Yarra Theological Union.
Note
Before adding a Zoom resource to your meta unit, ensure that you are logged in to Zoom with your University of Divinity or Yarra Theological Union issued Zoom account on the computer you are using.- Turn editing on in the meta unit on ARK, click on Add an activity or resource.

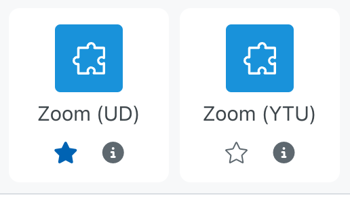
- From the Activities tab select the Zoom (UD) button (or Zoom (YTU) as applicable).
- Name the activity (e.g. Weekly session).
The rest of the settings can be left as they are, scroll to the bottom and click ‘Save and return to unit’ - Open the activity and click Schedule a New Meeting.

- Schedule the Meeting with a time, duration and start date. You can set up one meeting for the entire semester by selecting Recurring meeting.
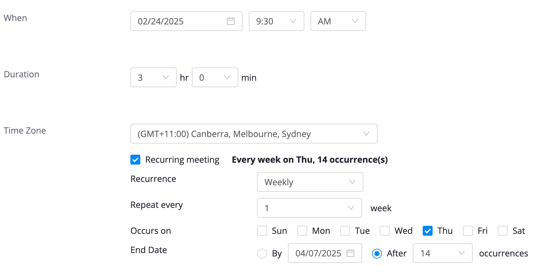
Note: the start date is displaying in MM/DD/YYYY format
Tip
There is no need to create multiple meetings if your class meets on different times or skips some weeks. Once you have scheduled the recurrence, you can delete the instances that you don’t need.
In the screenshot above, the class is scheduled for 14 recurrences. That way, once we’ve Saved our new meeting we can delete the two mid-semester break weeks:

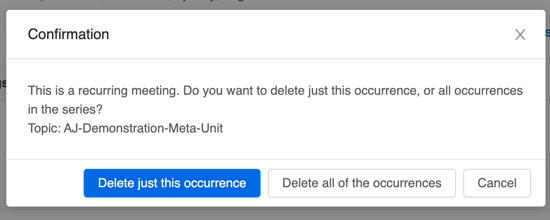
- If you’re co-teaching or someone else may need to step in for you, add them as an alternative host. (Alternative hosts must be on the same Zoom account as you - either UD or YTU).

- Save to apply your settings.

- You can return to your unit by clicking on the unit name in the ‘breadcrumbs’ that appear at the top of the page.
Permissions error
If a user is accessing the meta unit with a privileged role in the unit (e.g. Teacher or Editing teacher), they must be logged into their UD Zoom account on their computer to be able to access the meeting from the External Tool resource on ARK.4 - Setting Up Child Units
4.1 - Setting Up the Gradebook
The Gradebook in ARK provides a clear summary of student progress through a unit. The Gradebook can include both activities graded on ARK (such as Turnitin submissions or quizzes) and tasks graded offline (such as exams or oral presentations). Once set up, the Gradebook will show students a summary of their grades for each task and the weighted total contribution to their overall mark for the unit (pre-moderation). For teaching staff, the Gradebook provides a convenient way to track student progress across tasks and a simple way to provide student results to the Academic Dean and Registrar for moderation and finalisation in Paradigm.
The Gradebook is incredibly powerful and can get very complicated. To simplify things, this document will step through setting up the Gradebook in increasing complexity:
- Setting Gradebook visibility and Accessing the Gradebook
- Navigating the Gradebook interface
- Assigning weights to tasks graded on ARK
- Configuring Grade settings in ARK activities
- Adding grade items for tasks graded offline
- Using Gradebook categories for tasks with multiple graded components
Setting Gradebook visibility and Accessing the Gradebook
A lecturer can choose to show or hide the Gradebook from students in the Appearance section of Unit Settings (see Changing Unit Settings):
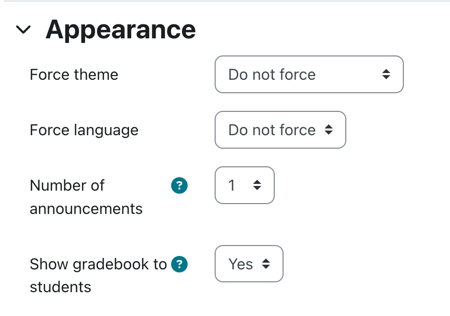
Set Show gradebook to students to No if you don’t want students to be able to access the gradebook.
The Gradebook will still show and function as usual for the Editing Teacher and Teacher even if students cannot see it.
The Gradebook is accessed via Grades in the Unit Navigation menu:

Navigating the Gradebook interface
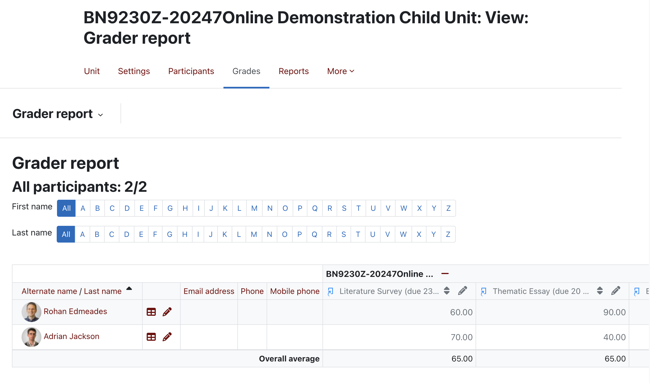
The Grader report
The default view in the Gradebook is the Grader report:
1. Navigation dropdown menu
The Gradebook provides a number of views and settings. To access different pages, use the navigation dropdown menu in the top left (marked (1) on the screenshot above).
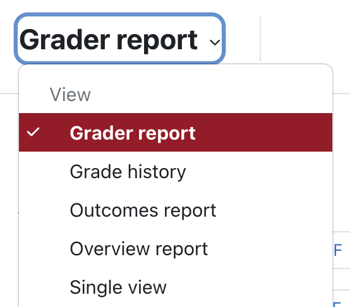
Navigation dropdown menu. This screenshot is cropped, more items display in the menu on ARK.
2. Grader report table
The Grader report table displays a row for each student in the unit and by default a column for each grade item along with any grade categories and totals.
The table is wider than the window. To view all items, you will need to scroll right.
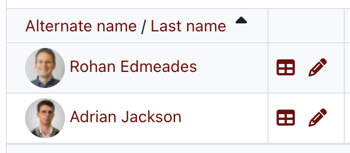
Icons to the right of the student names provide shortcuts to view a user report ( table icon) or grade items for the student ( pencil icon).
3. Expand and collapse categories
The table can be displayed in three views:
- full view
- aggregates only (shows only the weighted totals for each student)
- grades only (shows only the totals for each grade item)
Select the icon to the right of the unit or category name (here the dark red minus icon; marked (3) on the screenshot above) to change views:

Assigning weights to tasks graded on ARK
If all of the assessment tasks for a unit are ARK activities that receive grades in the child unit, the Gradebook is already partially set up. Activities such as Turnitin or Quiz will report the grade to the Gradebook. However, you will need to weight those grades appropriately to align with the Unit Record.
To demonstrate, we will assume the unit in Sample 3 from the Unit Policy §Schedule F . There are three tasks, to be submitted via Turnitin, summarised in the table:
| Assessment Type | Weight | Due |
|---|---|---|
| Literature Survey | 25% | Week 4 |
| Thematic Essay | 30% | Week 8 |
| Exegetical Essay | 45% | Week 12 |
By default, each item in the Gradebook is weighted equally with each grade item contributing an equal amount to the final grade. See the example User Report below:
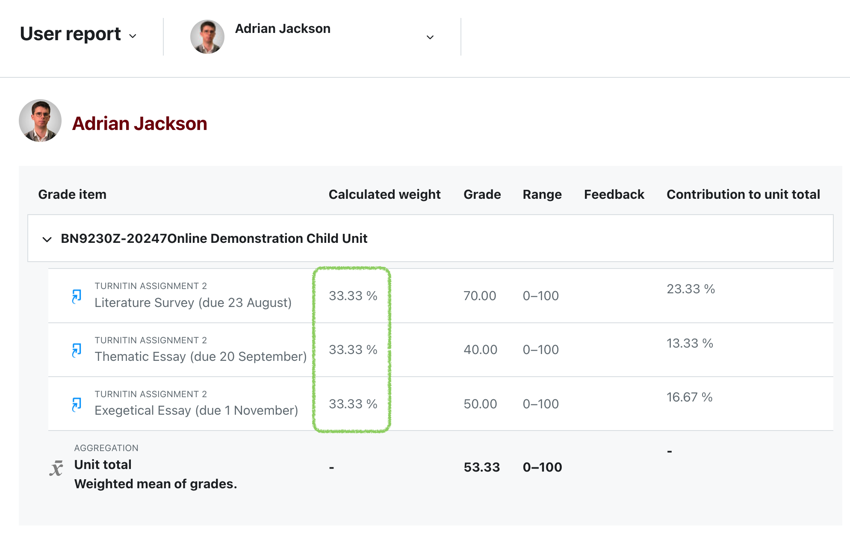
To reflect our unit’s assessment configuration, we need the calculated weights to match the weights in the Unit Record. We can set this up by going to Gradebook Setup.
Setting weights in Gradebook Setup
Click the navigation dropdown menu in the top left corner of the Gradebook and select Gradebook Setup:
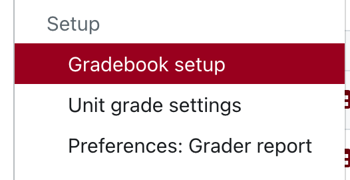
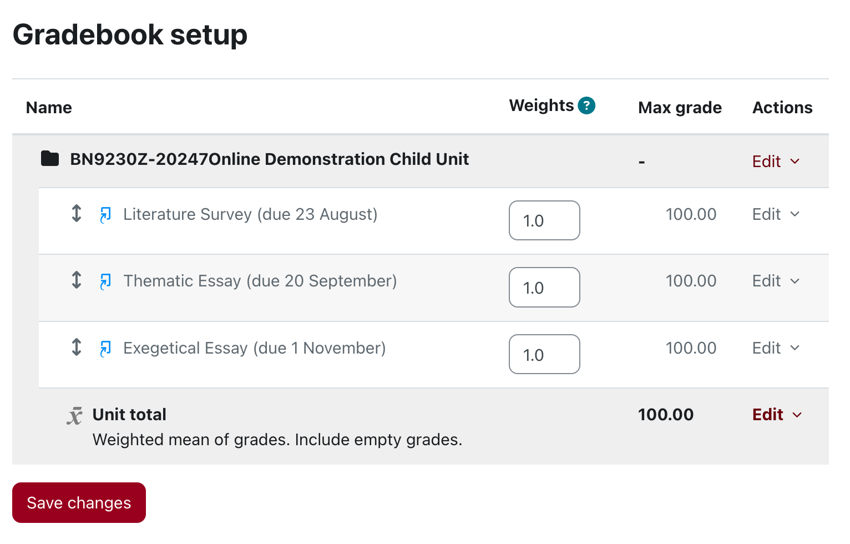
When we open Gradebook Setup, all tasks have a default weight of 1.0:
We can set the Gradebook to our desired outcome by changing the weights to match the values in our Unit Record.
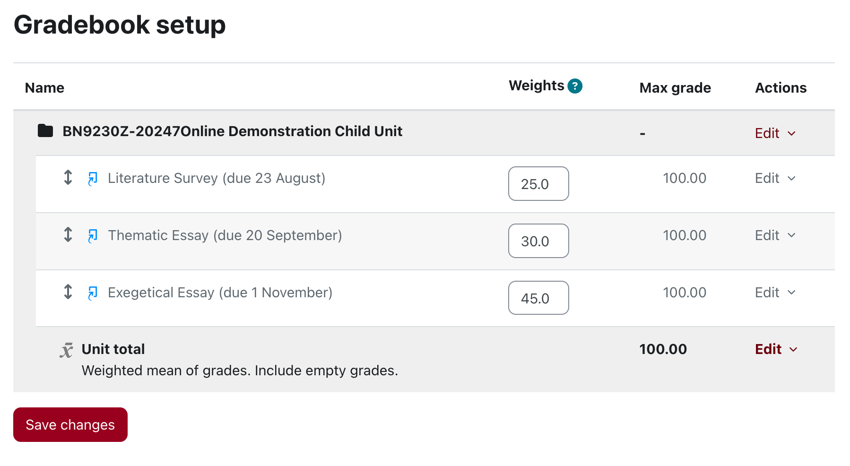
Note: Weight ≠ Percentage
Please note that Weight does not equal Percentage. ARK will not tell you if the weights do not add up to 100.
The calculated weight is relative to the other weightings in the category. The default value of 1.0 for each means that each item contributes an equal amount (1/3) to the total. In the above example, setting the weights to 50, 60 and 90 or 2.5, 3 and 4.5 would give the same result.
Always confirm your desired outcome by following the step below.
Confirming configuration in the User Report
Confirm the weight is set correctly by viewing the User Report from the navigation dropdown menu. If the calculated weights equal your Unit Record, then you have set the weights correctly:
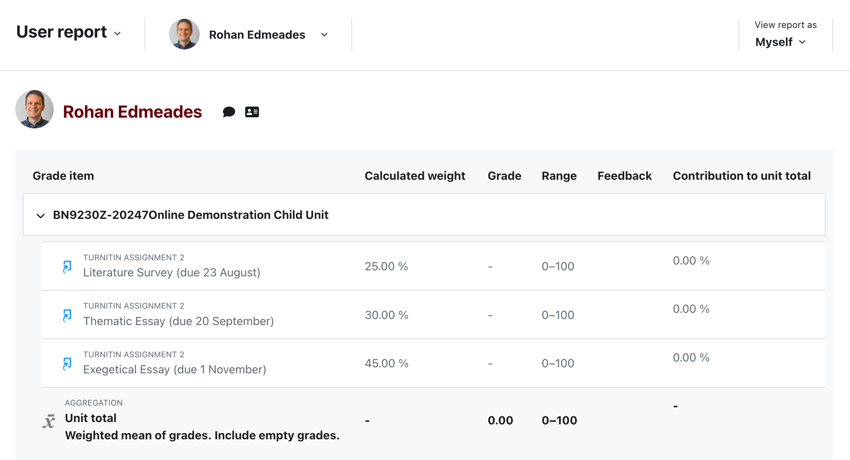
If the calculated weights aren’t what you expect or the totals aren’t as expected, confirm the following:
- Check the weights have been entered correctly in Gradebook Setup
- Check that the aggregation is showing as Weighted mean of grades. Include empty grades. As per the image below. If they aren’t, see Using Gradebook categories:

Configuring Grade settings in ARK activities
Most activities in ARK will contribute to the Gradebook. Depending on your needs, you can change how the grade works. On the settings page for the activity (such as Turnitin or Quiz), you will find a section labelled Grade:
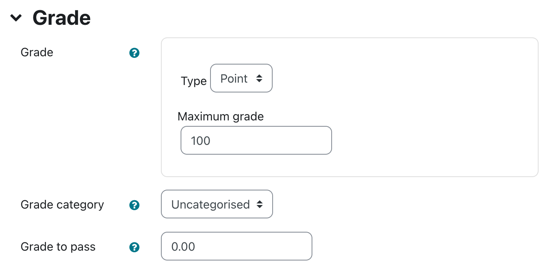
From here, you can change the Grade, Grade Category and Grade to pass.
To set an item to not send a grade to the Gradebook, set the Grade Type to None.
Grade
The Grade Type can be:
- None. The activity is not graded and any completion or points will not be sent to the Gradebook for the unit.
- Point. The activity is given a point based result. If this is chosen, you can set a Maximum grade:
- Maximum grade. By default the maximum grade is 100. In most cases, you will leave this as 100 and use the weights in the Gradebook to adjust relative contributions to the unit grade total. This is usually easier than trying to assign marks on a scale such as 0-35.
- Scale. The item is graded by selecting from a scale such as Fail, Pass, Non-Graded Pass or Not yet competent, Competent. Additional scales can be created in the Gradebook settings.
Grade category
You can group grades using categories. You can assign a grade to a category using this setting if the category is set up in the Gradebook. This will be covered in Using Gradebook categories for tasks with multiple graded components.
Grade to pass
This setting determines the minimum grade required to pass. The value is used in activity and unit completion, and in the gradebook, where pass grades are highlighted in green and fail grades in red.
Adding grade items for tasks graded offline
The ARK Gradebook allows you to record grades for tasks that are graded away from ARK such as an exam, practical assessment or in-class quiz. This can also be used to add grade items for activities completed in the meta unit, such as forums.
To add a grade item, go to Gradebook Setup and select Add Grade Item:

You will be asked to enter a name for the item and settings similar to the activity grade settings above:
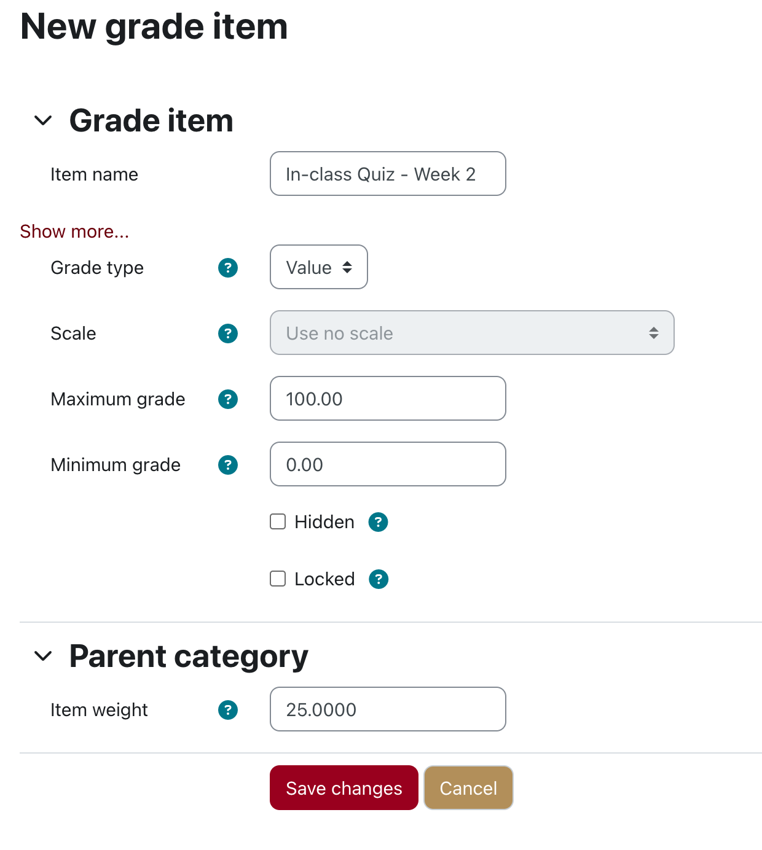
To add a Grade to Pass or a date the grade is Hidden until, click the Show more… link.
You can set the weight at this point or when you return to the Gradebook Setup. Your additional grade item will show like below. To change settings, click the edit dropdown to the right of the item.

Entering grades for offline grade items
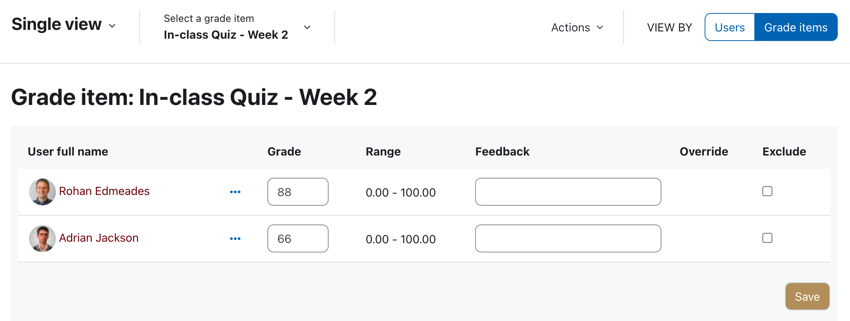
To enter grades for offline grade items, select Single View from the navigation dropdown menu and select View By Grade Items:

Select the grade item you wish to enter from the Select a grade item dropdown:
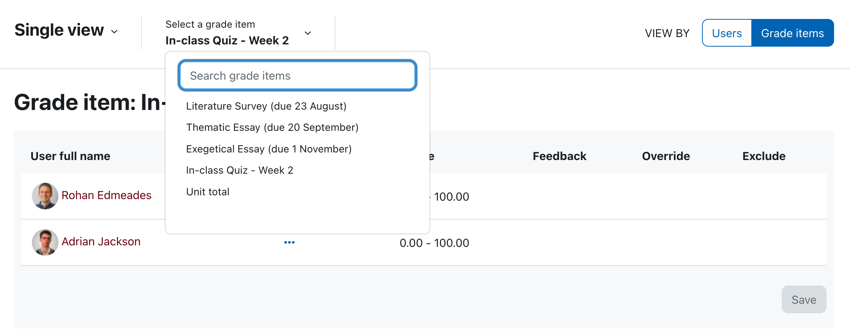
Toggle the edit mode icon in the top right to enter editing mode. You will now be able to enter grades for each student. Be sure to click Save to ensure entries are stored.
Using Gradebook categories for tasks with multiple graded components
Grade categories allow you to group assessments together to calculate a subtotal and make special calculations (such as excluding the lowest grade). In this example, we’re going to assume a language unit with three tasks: a weekly take home quiz, a weekly in-class test and a final exam:
| Assessment | Weight | Due |
|---|---|---|
| Take home quiz | 40% | Weeks 2-6 |
| In-class test | 30% | Weeks 2-6 |
| Written exam | 30% | Week 13 |
In the above example, we have two tasks that each consist of 5 sub-tasks. To record this in the gradebook, we will add the written exam as a grade item and place the sub-tasks inside two categories for the weekly tasks. We will begin by adding the end of semester exam as a grade item:

To add a category, click the Add category button:

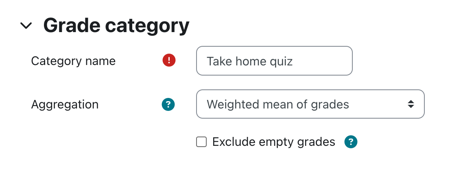
Give the category a name. Leave the Aggregation as Weighted mean of grades. In most cases you will not exclude empty grades:
Once we’ve added the categories, we can assign the weights from the Gradebook setup page:
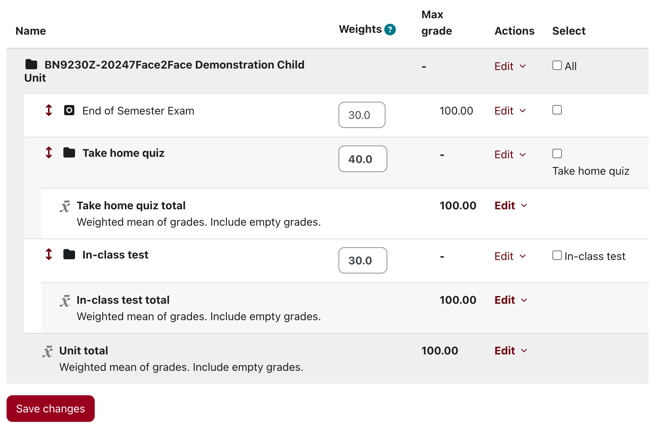
Note: click the up and down arrow to reorder items.
We can now add grade items for each of our weekly tasks. You can assign a task to a category and a weight as you create the grade item:

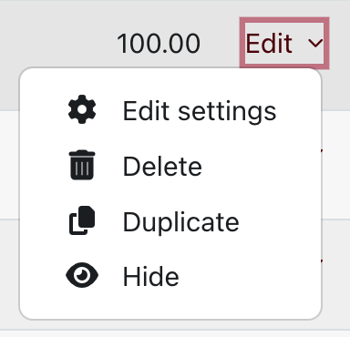
If you are creating multiple grade items, you can speed the process up by duplicating a grade item from the edit menu on the Gradebook setup page:
In our example, the resulting Gradebook setup looks like this:
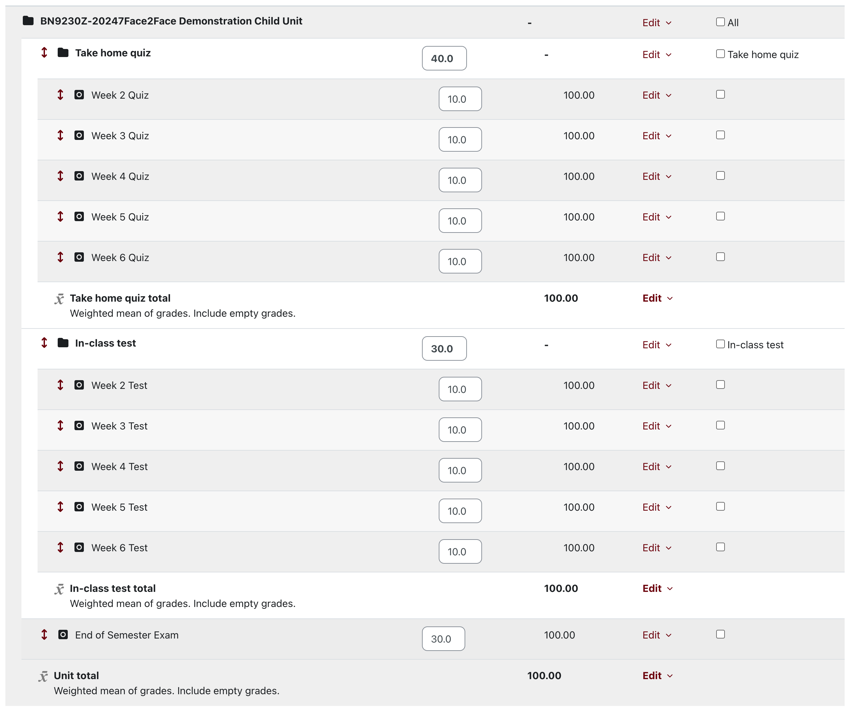
In the above example, the 5 quizzes contribute equally to their parent category. The parent category then contributes the aggregate of those quizzes to the total grade.
Exclude bottom grade items
You can set the gradebook up to exclude the lowest grade item. This is useful to allow students to have a grace task in a series of tasks.
In our example, we can see the student has performed particularly poorly in Week 4:
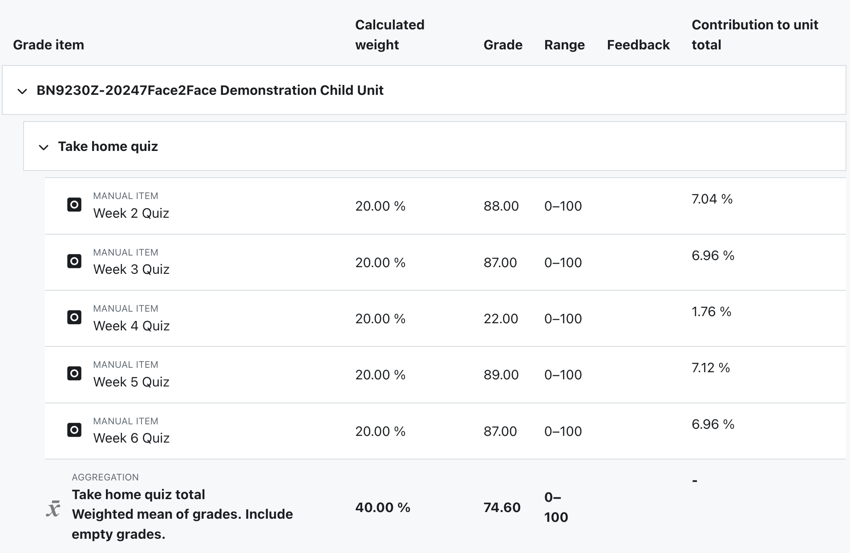
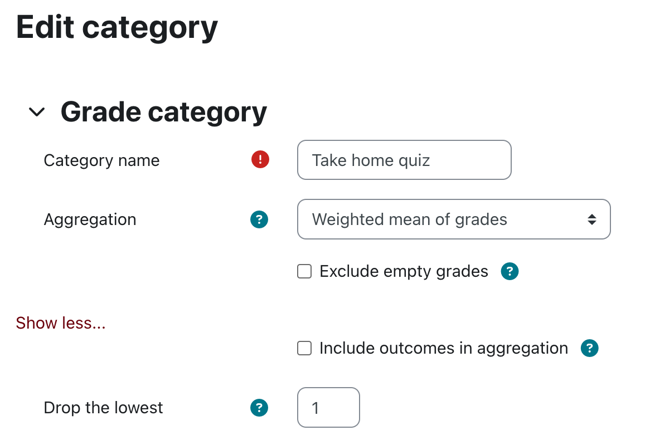
To exclude the bottom grade item, from Gradebook setup, edit the category. Click the Show more… link and set Drop the lowest to the number of lowest grade items you’d like to exclude:
Now if we view the User report for the above student’s results, the students aggregated total excludes the poor showing in Week 4:
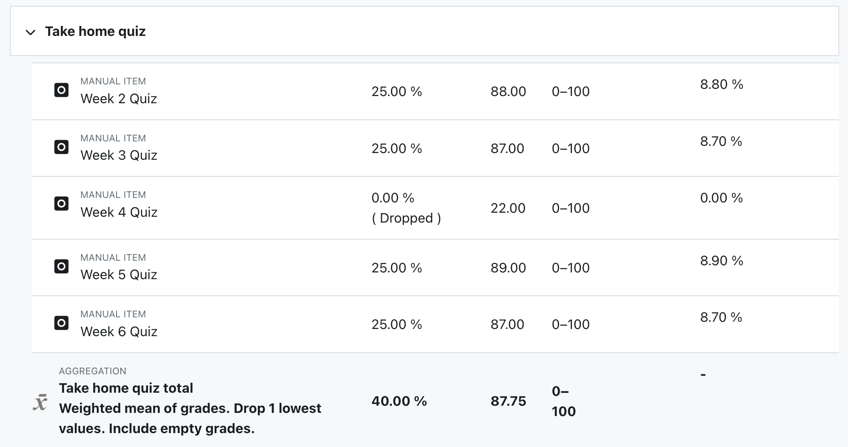
With the poor result in Week 4 dropped, the student’s weighted result for the category jumps from 74.6% to 87.75%.
Introduction to the Gradebook
- Each course in Moodle has its own gradebook accessed from Unit navigation > Grades.
- Students can see this too but see only their own grades.
- Teachers see a list of course participants with their grades for each activity. (Note that students can see all their grades for all courses from the link in the user menu top right.)
- You can manually enter and edit grades here and put graded activities into categories with category totals.
- You can create your own custom scales instead of the default points.
- You can also import and export grades.
Note: The gradebook shows only student grades by default. If teachers do the graded activities, their grades are not normally shown.
Using the Gradebook at the University of Divinity
5 - Reporting and Analytics
Analytics (Insights)
ARK has a default analytics report, called Students At Risk
5.1 - Students At Risk (Analytics)
The Students At Risk report is a default analytics (Insights) model.
It is a computer model that analyses student behaviour in the unit in order to identify students at risk of not completing the unit.
In addition to how recently the student accessed the unit, the model uses indicators such as, accessing resources, participating in forums and working through lessons to score student engagement with the materials. Students who appear to be engaging significantly less may then be flagged as falling behind. This report can assist staff in quickly identify students who might not be keeping up with their peers.
Aim
Many academics are used to listing participants and seeing when they last logged in as an indicator of student engagement. The aim of this model and reporting is to reduce the need to manually scan through the participants list.Notifications
The analysis is run frequently and is set up to examine data across a two week window in making determinations. It will notify those with a teaching role in the unit if there are any students that the model deems to be at risk.
Choosing when you are notified
You can choose whether you receive an notification from ARK if the insight identifies students.
Go to the User menu (in the top right) > Preferences > Notification preferences.
Locate the line Insights generated by prediction models.
Select your notification preferences.
The Insight
Accessing the insight from a within a unit
You can view Insights when you wish by navigating to the tabs menu (under the Unit title) > Reports > Insights
Note
If the Insights menu item is not listed, then none have been generated for this unit. This will happen if the unit has not started or has ended. See adjusting meta dates.Accessing the insight from a notification email
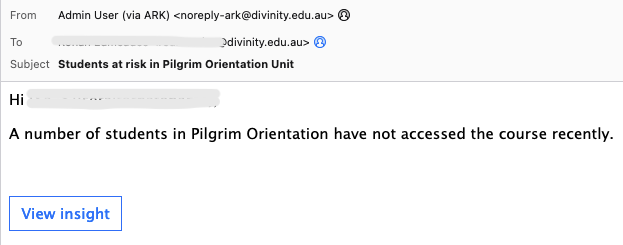
The notification email informs the recipient that one or more students in the unit are considered at risk and links to the ‘insight’ for further information and actioning.
Viewing the report
The link from either place noted above lists the students considered at risk.
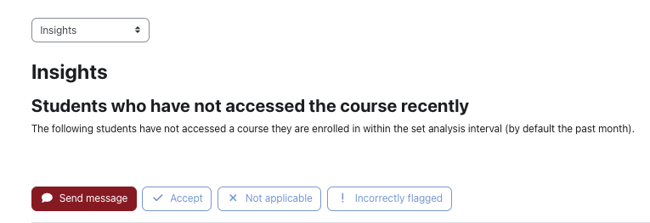
In the Actions column, there are two links to further information that the model has regarding the student. The first (magnifying glass) is to a prediction, the second (the chart) to analysis of individual data points used.

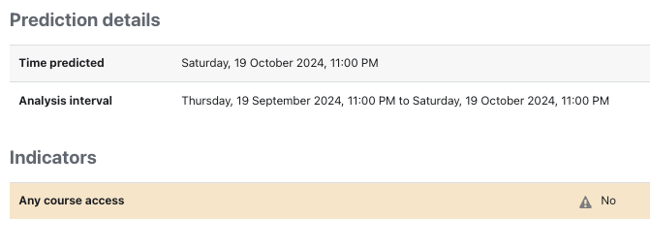
The prediction outlines the period over which the evaluation took place and when it estimated that the student would have engaged by. If it is now pas this time, the student is flagged as at risk.
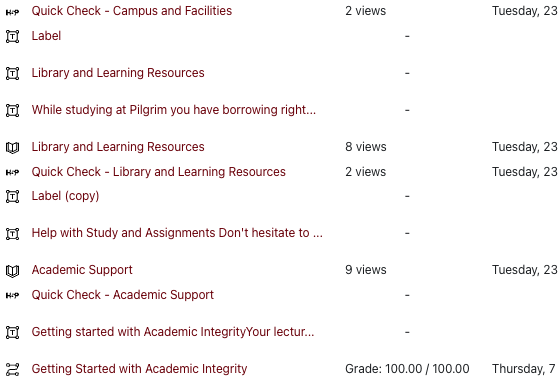
The analysis lists items from the unit that contribute to the prediction and shows the student’s engagement, or not, with each. Below we can see items that have been viewed multiple times, some that have not been viewed, a quiz results and the dates on which these took place.
Responding to an insight
At the top of the listing are four buttons.

The listing enables bulk actions by selecting the checkboxes in the left-hand column.
The Send message button enables you to immediately communicate with all of the students that have been selected.
The Accept button is to acknowledge the generation of the report for the selected student(s) and to remove the prediction from view.
There are some instances where a student is not expected to regularly engage with the unit. For example, orientation or college specific units are there to support students if needed and so may be sporadically engaged with. In these scenarios, click Not applicable to acknowledge the insight (as it is accurate), and remove the prediction about the student(s). This will provide feedback to the model for later instances of report generation.
If you have looked into a particular student’s activities and it appears that they have engaged the unit sufficiently, you can click Incorrectly flagged so that the model is updated for better predictive results.

